Email is a great way to stay in contact with your members and contacts. Thorough the use of accounts with roles, subgroups, voice parts or labels, you can configure a variety of ways to contact people.
Topics covered in this page:
- Account preferences
- Mailing Lists
- Special Feature: Public Inbox
- Add a mailing list
- Sending an email to a mailing list
- Mail Deliverability and Tracking
- Suppressions & Unsubscribes
- One-time Emails (sending emails to account sets, event invitees, and ticket purchasers)
Account Preferences
Contact preference
All accounts have a contact preference setting in the "Contact details" section of their profile. This preference can be:
- Any
- Phone
- SMS
- Do not contact
This setting is meant to help guide you and let you know the best option for contacting a user. The default setting is "Any".
Contact preference is set by the user, but can also be edited by Admins and Managers. If a user unsubscribes or makes a spam complaint against an email sent from your site, their contact preference will be set to "do not contact". There is more about this particular case this below.
Email preference
Email preferences allow a user to select further details about where they want to receive emails. The options are:
- Send to primary email address - this is the option more users will want
- Send to all email addresses - this will all a user to receive the same emails to all of the email addresses saved to their profile.
- Send only to all parents - this will send all emails to the attached Parent/Guardians on the account. This is most common for minors who do not have their own email address.
- Send to primary email address and all parents - this will send to the account's primary email address, but it will also send copies to all attached Parent/Guardians on the account. This is useful for older children who have their own email addresses who also need their parents kept in the loop.
This setting can be edited by the account holder, as well as Admins and Managers.
Mailing Lists
Managing mailing lists
As an Admin, Manager or Coordinator, you can access your list of mailing lists to review and manage by navigating to: Communication > Mailing Lists.
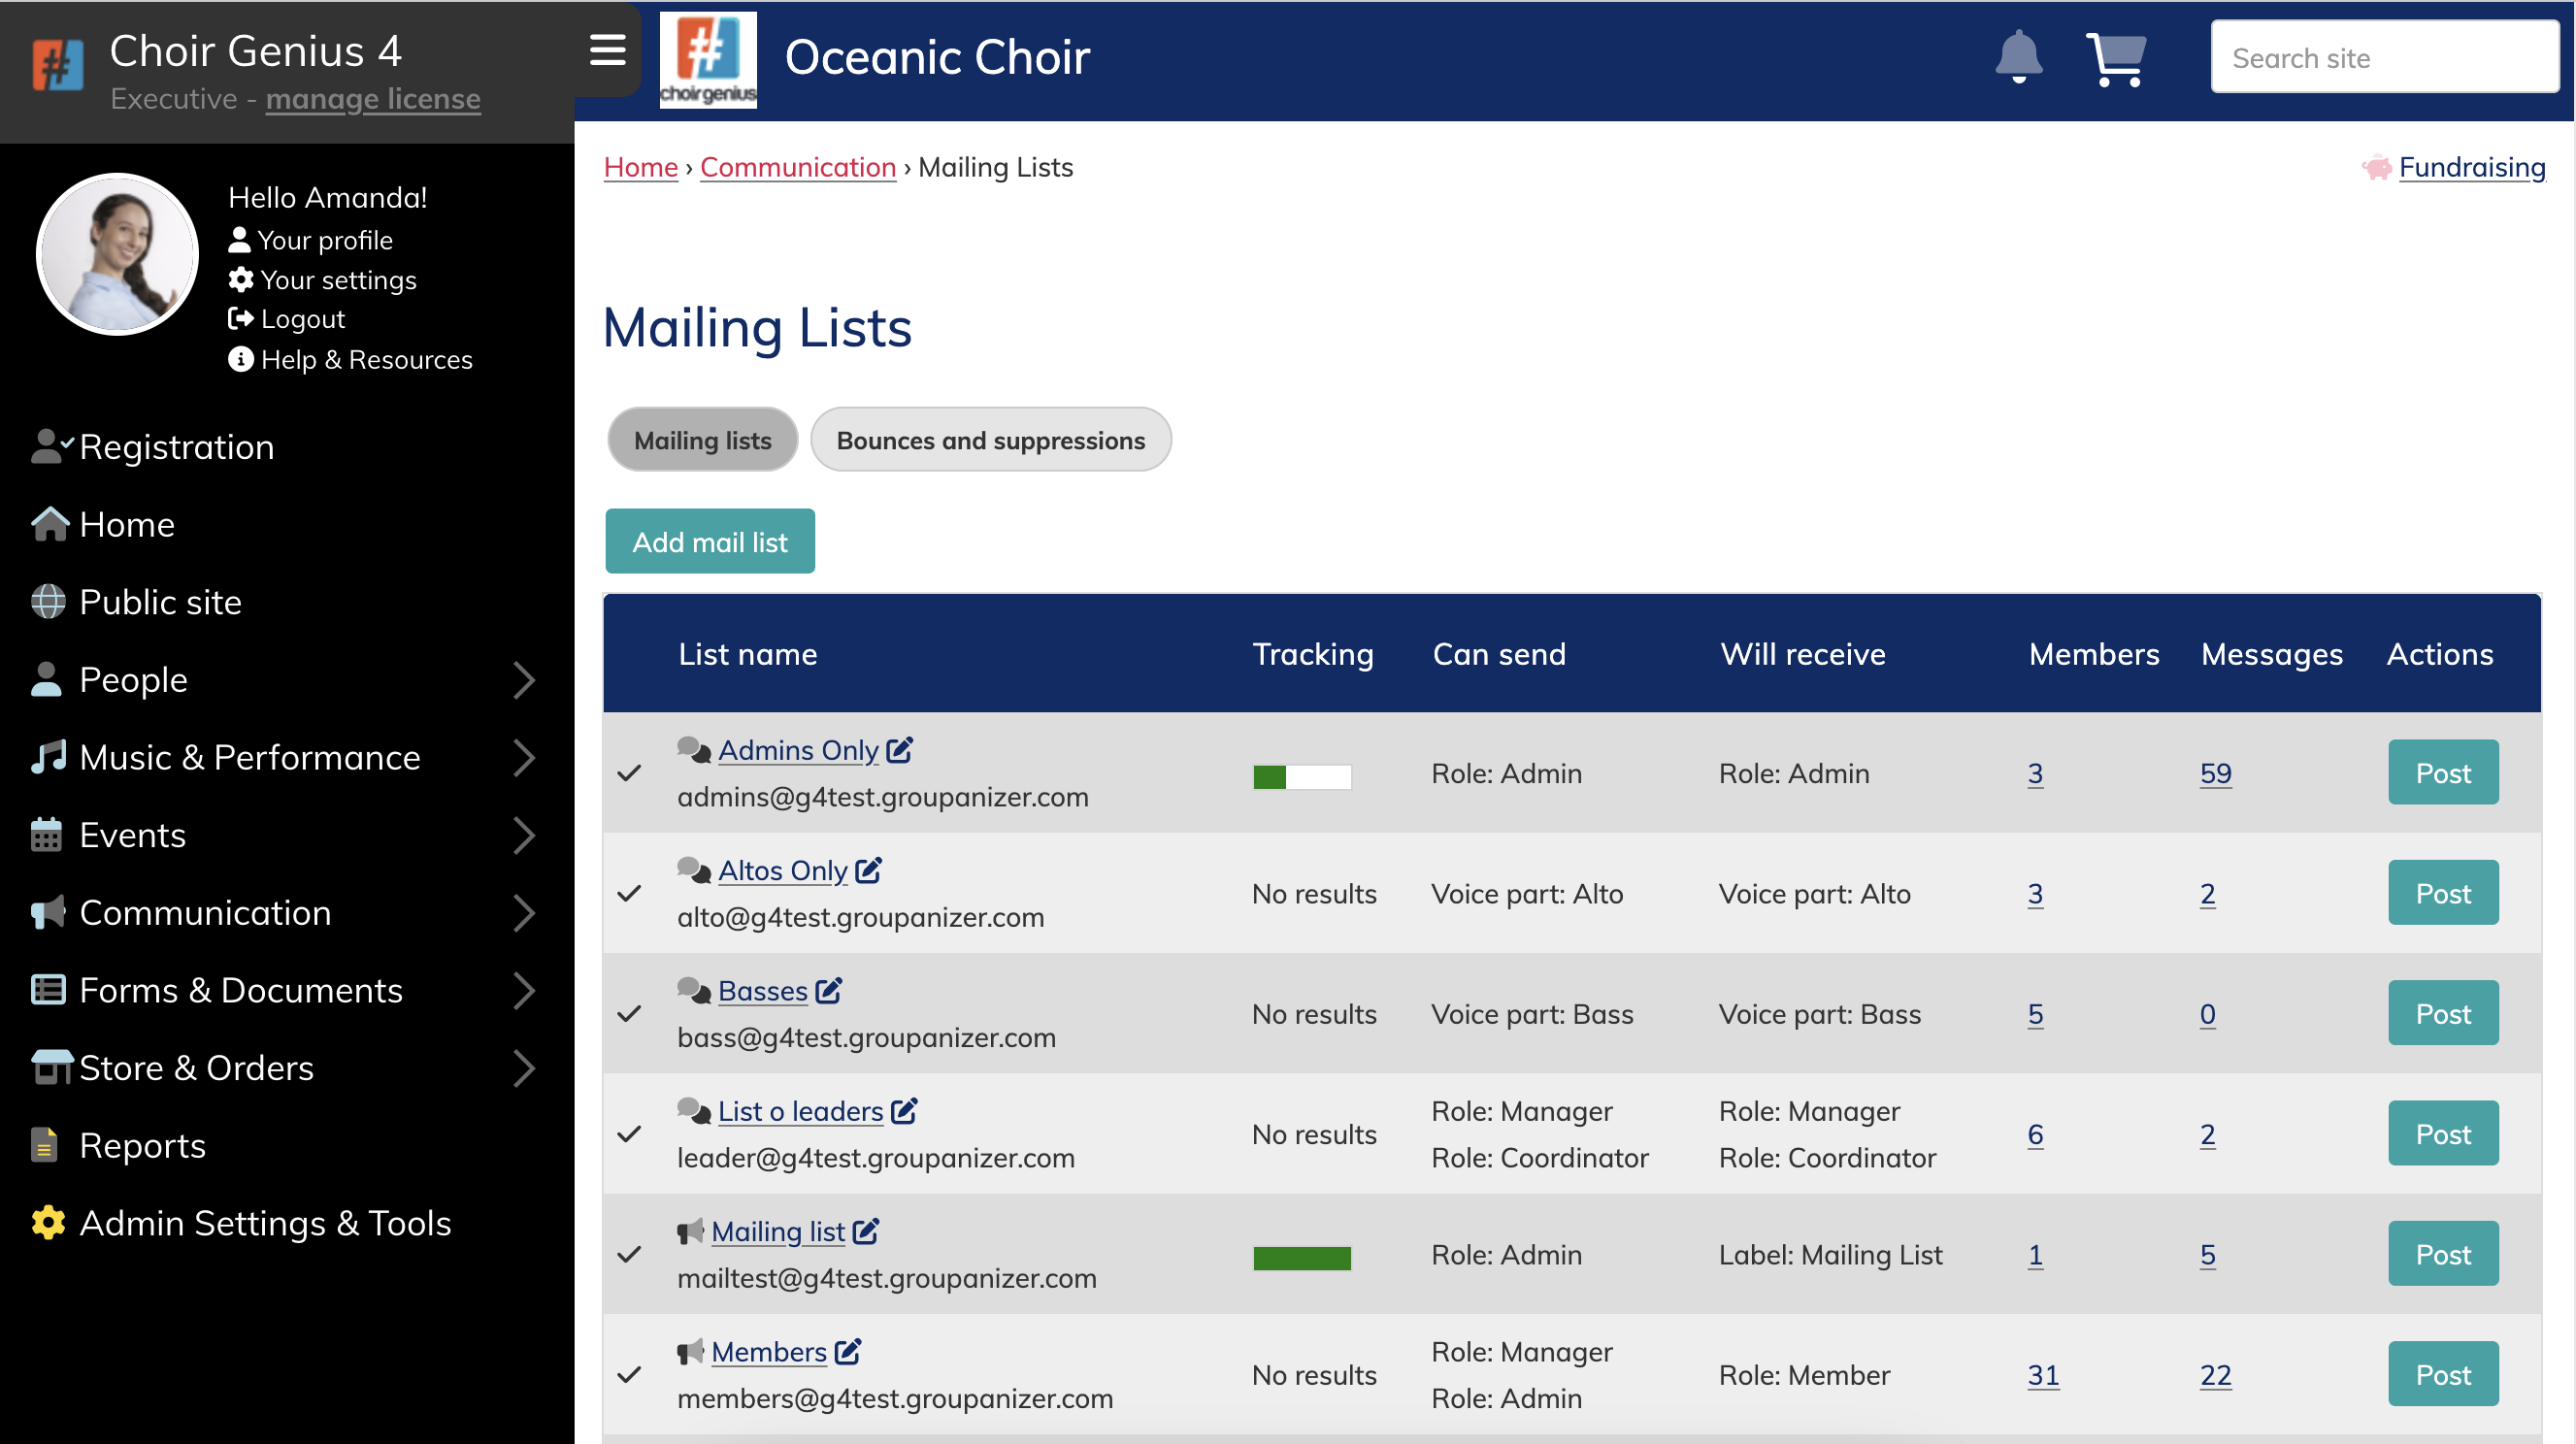
Here you can see if a mailing list is enabled (it will have a checkmark or an x on the far left), the name of the list and the associated address, the current general tracking status, who can send to it, who will receive messages sent to the list, the number of recipients of the list, and the number of messages sent via the list. If you have permission to send to a list, you will also see a "post" button on the far right like in the image above.
On the left next to the list name is an icon. There are two main types, a small bullhorn, and a small chat bubble.
 One-way List - This style list has separate allowed senders and recipients. When replying, the replies will go to the primary email address of the sender. This list style is great for leadership to send information to all members, or for sending newsletters and advertisements to donors and patrons.
 Chat List - This style list has the same senders and recipients. When replying, replies will go to the whole list by default. This list style is great for committees and voice parts to chat to each other.
There is also a new third option, but this one functions very differently:

To learn more about the public Inbox option, check out this help page.
You can add a new mailing list by going to the Mailing Lists page, and the clicking the "add mail list" button on the top left of the page above the table.
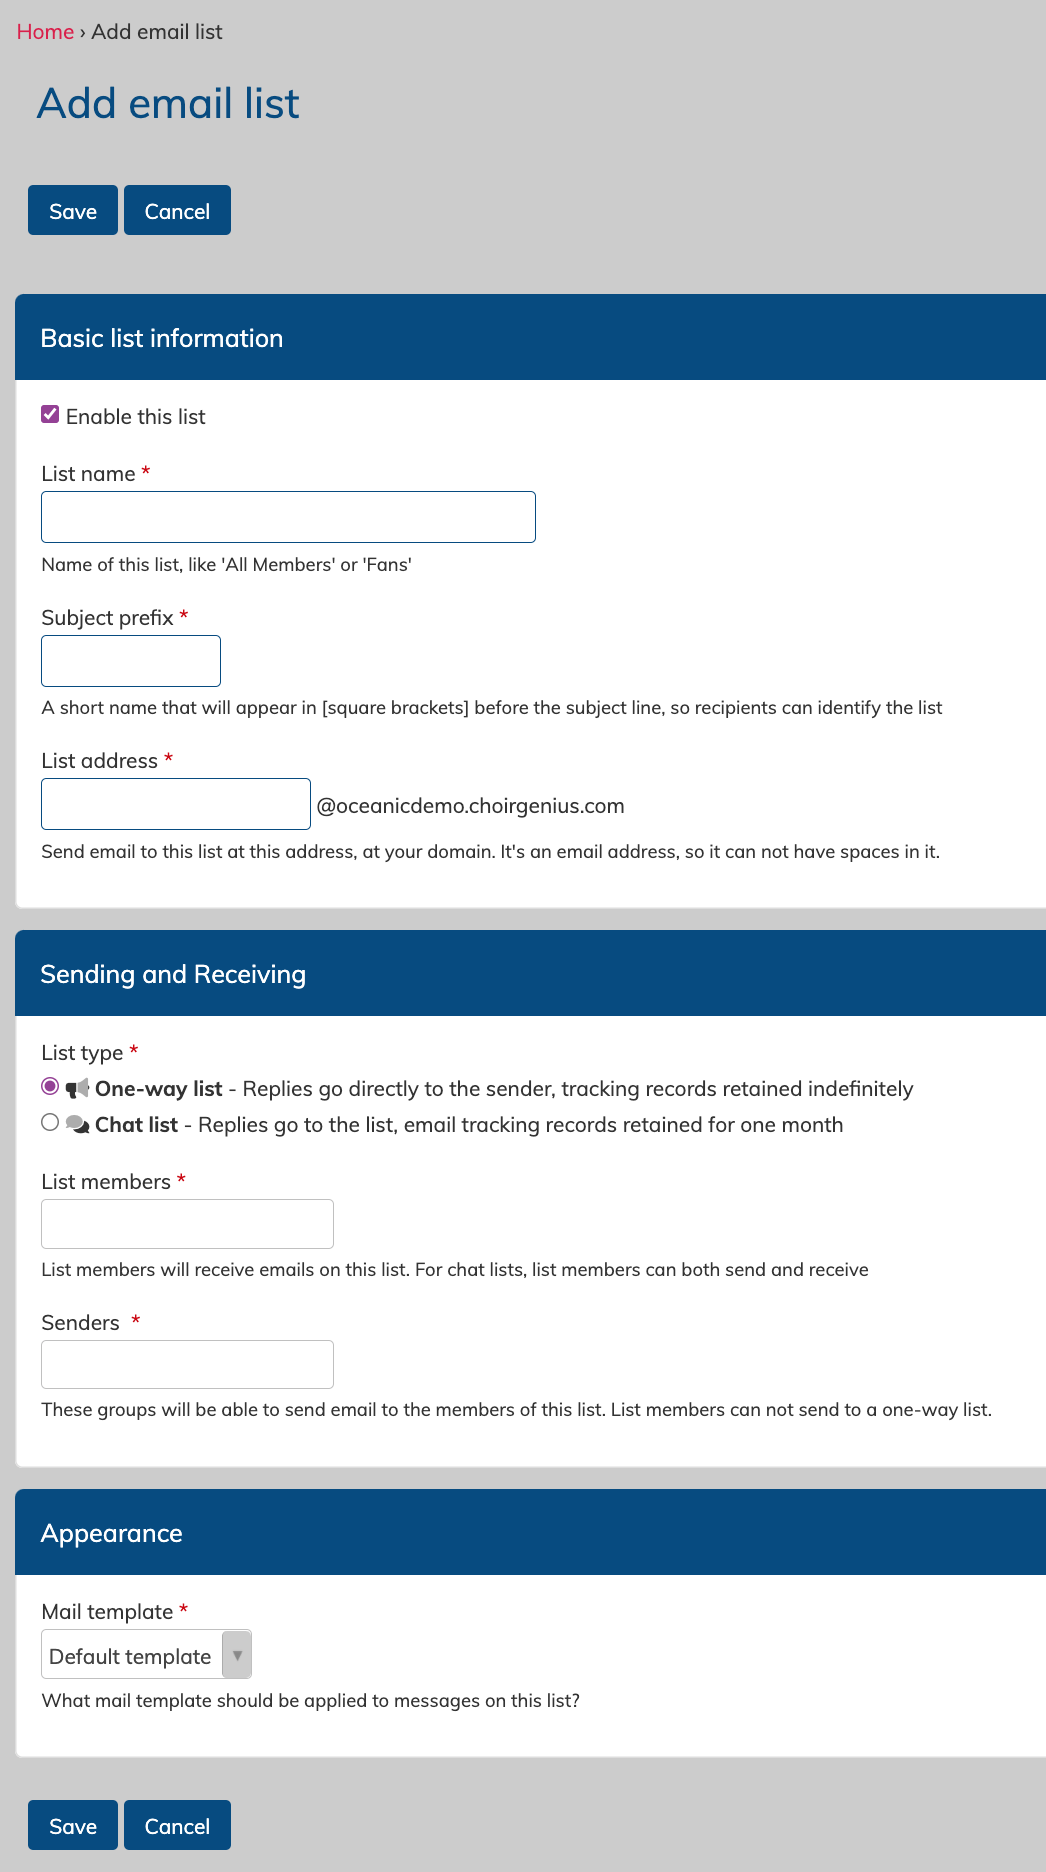
Options for the list include:
- An enable checkbox, allowing you to turn this list on and off as needed. A disabled list cannot send nor receive mail.
- A list name, to let everyone know the topic or purpose of a list.
- A subject prefix, to make it easier to spot what list a message is from in your inbox.
- A list address, so you have an address specifically tied to a mailing list that you can sue to send mail to the recipients from your personal email client.
- The list type setting, so you can choose the reply functionality. One-way list allow replies to go directly to the sender. Chat style lists keep everyone included by always sending to the mailing list.
- The list members (recipients) and senders settings, which will change based on the list type selection. This is where you select who receives messages sent to a list, and who can send messages via a list. You will select accounts based on the "sets" they are in, such as their assigned role, subgroups, label or voice part.
Note: sending to labels is only available for Team subscribers and above.
- A mail template, so you can choose if your list has any special automatic formatting. This can be useful for "newsletter" style lists to your contacts.
Note: This option is only available for Executive subscribers.
Note: Templates are only included for mailing lists when you write the outgoing email from within your Choir Genius site.
You can read more about email templates here.
Remember to save your changes.
Clear all messages in a mailing list
Currently, the message log for a mailing list cannot be deleted one-by-one. However, you can erase all logged messages in a list by going to the Manage Mailing lists page, clicking on the list name, and then on the "Actions" tab for that particular list.
Clicking the "clear messages" button will delete the log of sent messages for that list within your site, but it will not un-send any already delivered messages.
This action cannot be undone.
Delete a mailing list
You can delete a mailing list you no longer wish to keep. This will erase the list from all sending options, and will delete all sent messages in the site Inbox.
Deleting a mailing list cannot be undone.
Verifying the recipients of a mailing list
If you wish to verify the names and email addresses of the recipients of a list, you can do so by going to the Manage Mailing Lists page, and clicking on the number in the "Members" column on that page across from the relevant list.
You can also access this list by going to the "members" tab when viewing a list.
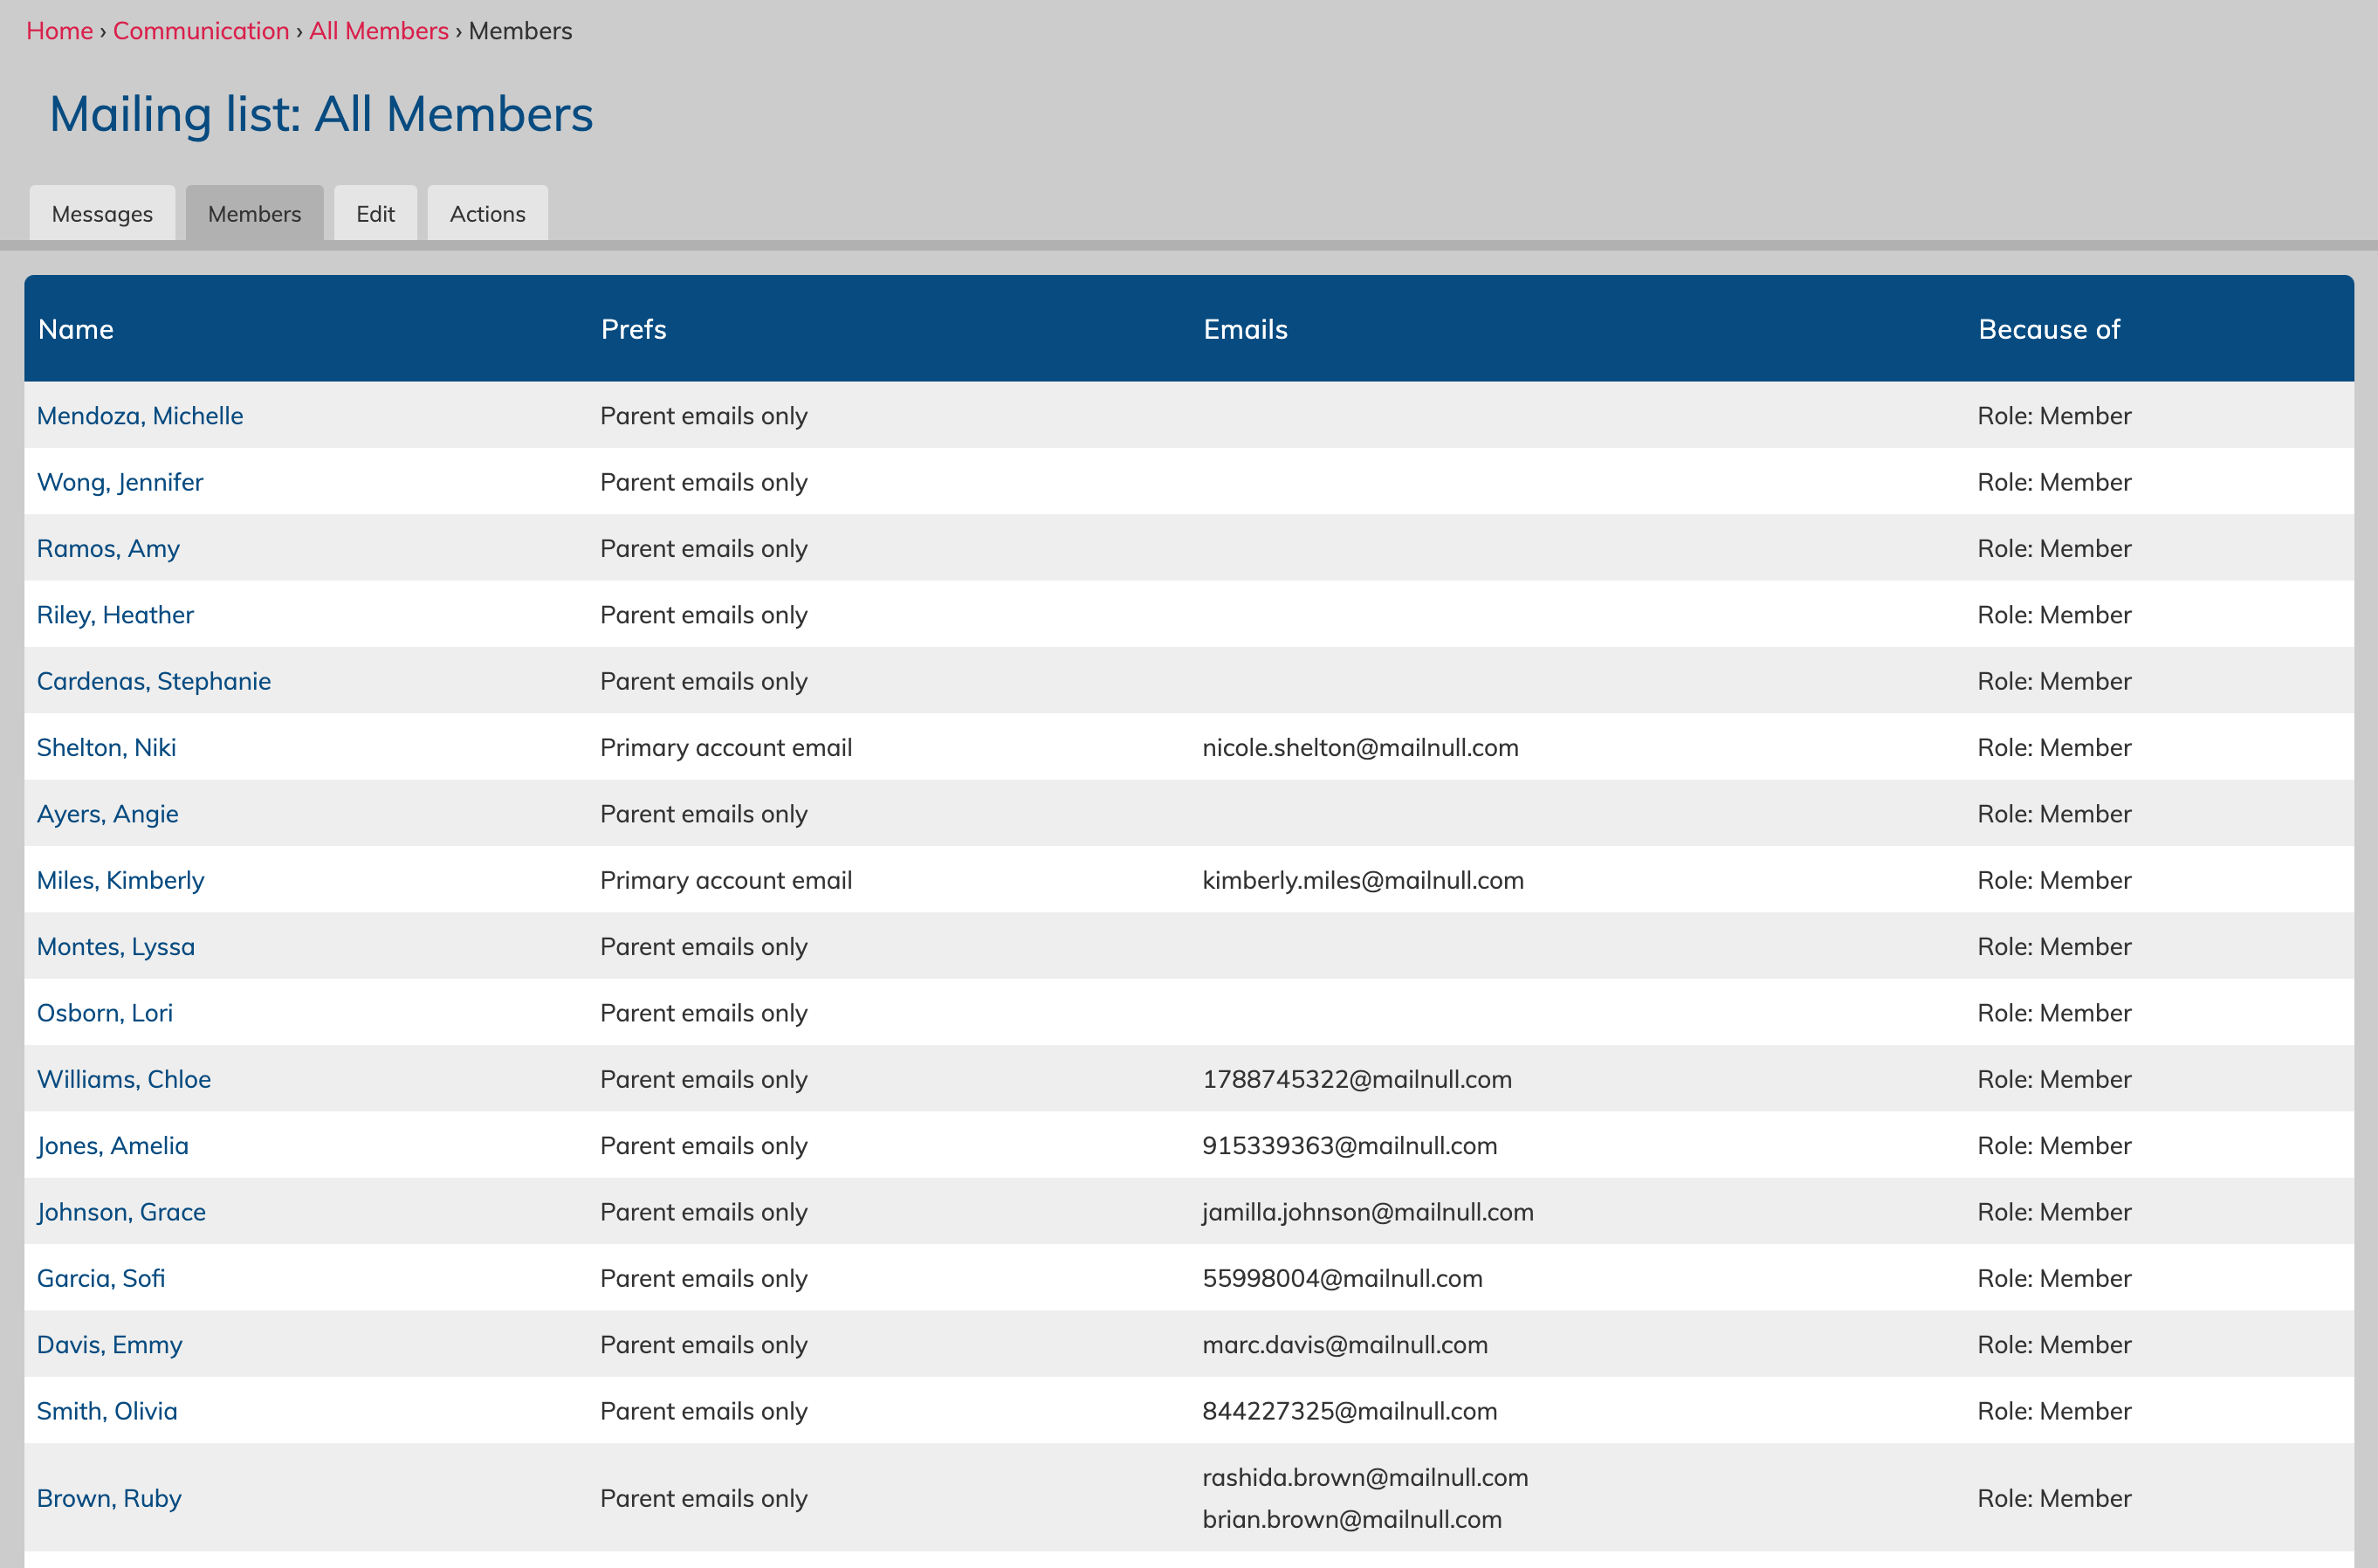
This list allows you to see the names, email preference settings, the email address, and the reason that account is included in the list based on the list settings. You can click on the name of the account holder to go to their profile to make any necessary changes.
Alternatively, Ruby Brown has two parent email addresses that will be receive email via this list.
For Niki Shelton's account, her preference is set to send to her primary email address, which is displayed next to it.
Everyone is being included because they have the role of "Member", which is the selected setting for this list.
Mailing lists will automatically update as users are added to the system and they meet the criteria for the list to be either recipients or senders.
For example, if a new account is added and they are given the role of member, they will automatically be added as a recipient where the role "member" is set as the recipient. Alternatively, if an account has the member role removed, they will be removed from that list.
Sending an email to a mailing list
You can send a message via a mailing list two ways - through the site, or via your personal email client (like gmail, apple mail, etc).
- Via the site
There's a few ways to access writing an email through the site, but the easiest is:
Under the Communication area, click the blue send arrow across from "My Email"
This will bring you to the "Send email" page where you can select the list you want to send to, include a message and any attachments, and the choose to send the email, save if as an unsent draft, or send yourself a test copy of the message.
Choose the type of message you want to send - in this case it would be a mailing list, and then choose the specific mailing list from the dropdown options.
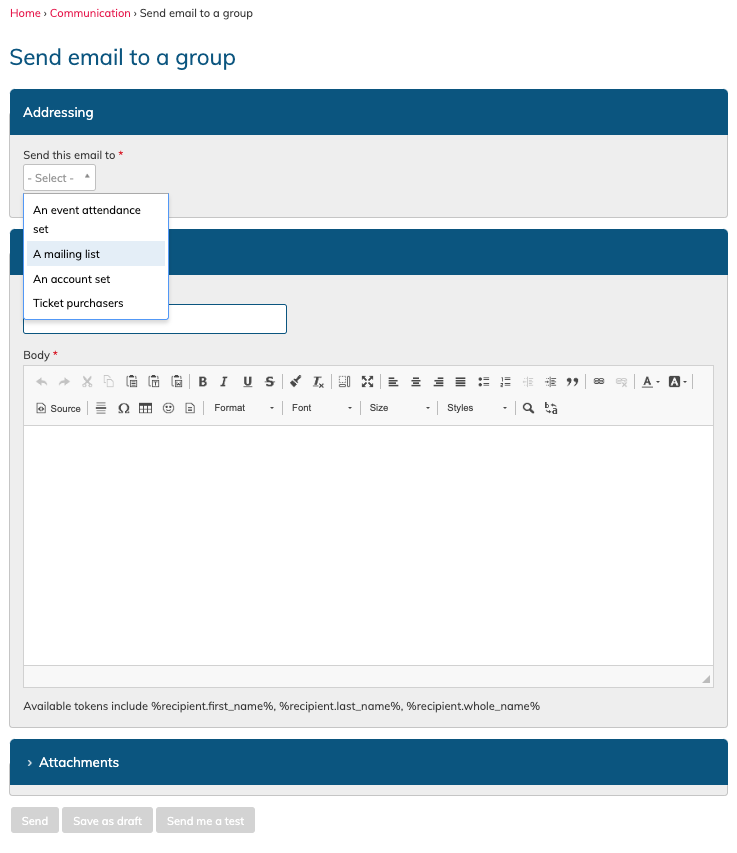
Admins, Managers and Coordinators will also have the ability to:
- send an email to an event attendance set
- send an email to any account set
- send an email to ticket purchasers for a particular event (executive level license)
Emails saved as drafts will be visible in the mailing list messages (accessed via "Mailing Lists") with the red text "DRAFTS" next to the title. Click into the message, and then click the edit pencil icon on the far right to access the draft message to edit it and save it again, or send it.
After sending yourself a test email, a green confirmation message will appear at the top of the page. You will remain on the edit page of your new email.
When a message is sent, it will be posted within the site's "Inbox" area to be read online by those with access to that list, and it will also be emailed in full to all mailing list recipients.
- Via your personal email client
Write your email as you normally would in your personal email client, and in the "to" line, use the address of the mailing list.
This message will then be sent to the site where it will be posted within the site's "Inbox" area to be read online by those with access to that list, and it will also be emailed in full to all mailing list recipients.
Please note, you can only send email from an email address that is attached to your profile in Choir Genius. This allows the site to verify who you are, and that you are an allowed sender for that list.
Mail Deliverability and Tracking
Review all sent mail
Admins, Managers and Coordinators can review all sent mail via the "All Mail" page under the Communications heading in the menu.
They will be able to see all sent messages, as well as drafts.
Review deliverability of a mailing list
On the "Mailing Lists" page, you can review the general tracking for your list, including opens/clicks per emails sent, as well as flags for any delivery issues.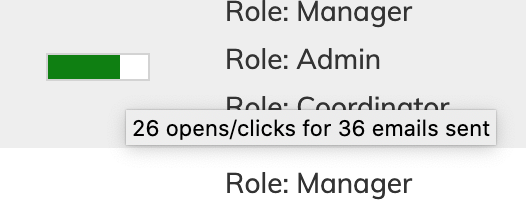
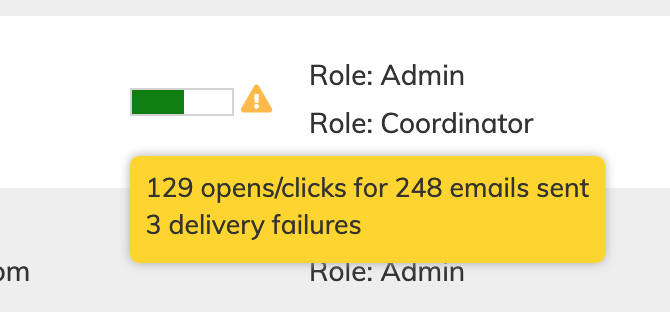
A red flag will appear for any users that mark messages from a list as "spam".
Clicking on the bar will take you into the list, where you can then review the deliverability of each message.
Review deliverability of a specific message
Emails with active tracking will display a bar in the tracking column on the far right.
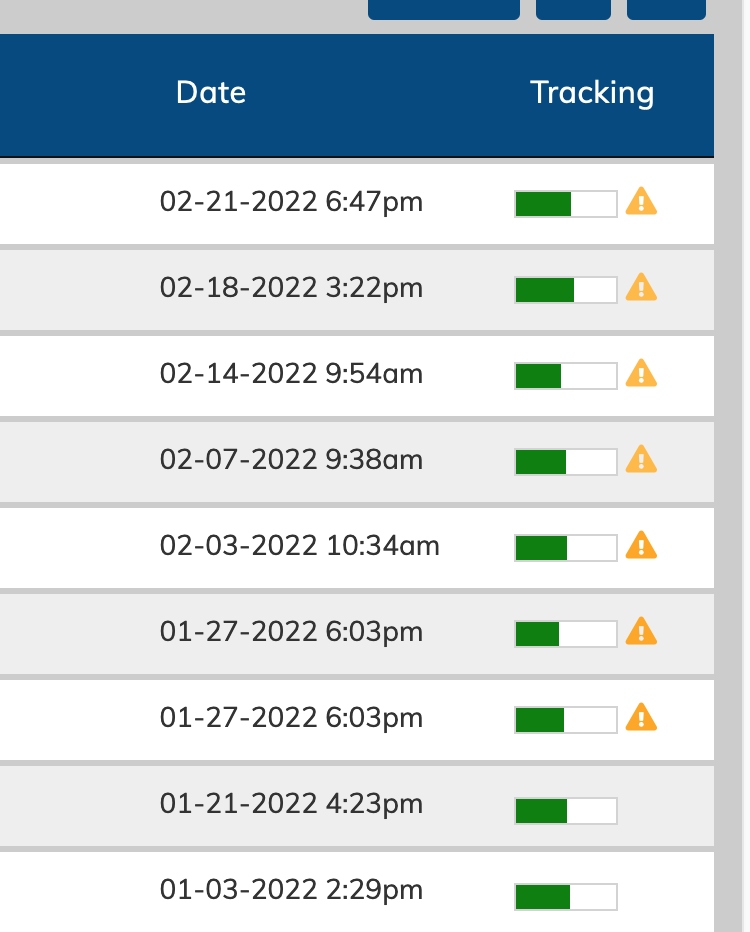
Messages with deliverability issues will appear with a yellow or red flag, depending on the issue. Clicking into the email and then then clicking on the bar will take you to a list of the delivery status for that message for all users.
Statuses can include: delivered, opened, failed to deliver, unsubscribe and spam complaint.
You can use the search field on the top left to look for particular statuses.
Suppressions and Unsubscribes
Another way to spot deliverability issues is to check the "Bounces and suppressions" tab on the "Mailing Lists" page.
Communications > Mailing Lists > Bounces & Suppressions tab
This page will show a log of all accounts that the system has tried to send to that have either:
- Bounced
- Unsubscribed
- Made a spam complaint
Resume sending:
In order to re-active sending to their account, you must process the suppressions.
To process the suppressions, click the "process suppressions" button on the top left of the table.
Depending on the reason for the suppressions, there will be different follow-up steps:
For Bounces, processing it removes the suppression and the system will try sending future emails without any further action on your part. It is recommended to review the address to ensure it is correct, and let the account owner know that emails were bouncing. Common cases for bouncing include their personal email inbox being full, of the email address in incorrect.
For Complaints and Unsubscribes, the account will have its email contact preference set to "Do Not Contact". If someone complained or unsubscribed erroneously, you can go to their profile to edit this setting back to "email". The system will then resume attempting to send email.
The Engagement tab
One final way to check mail deliverability for a user at a glance is to check the "Engagements" tab on the "Manage People" page in the People area.
[People > Manage People > Engagement tab]
This table will show you the time of the last sent email (Email action time), and the last mail status (if it bounced, was delivered, or if it was opened).
There is also an option to send a login invitation or a password reset if needed on this page, and the tracking on this page also shows the status of those emails if that was the last message to be sent to their account.
One-time Emails
One time emails allow you to send a message to a particular set of users without creating a mailing list. These messages will appear in their Inbox on the site, and they will also follow the recipient's email preferences to forward to their connected email addresses.
Messages sent this way will appear in the recipients "Inbox" in the site, and it will also be sent to them via email based on their email preferences.
One-time emails saved as drafts will appear only on "All Email" page. You can edit the message to save and send it.
Sending an email to a pre-defined account set
A predefined set means a group of accounts that is already identified within the system by an assigned role, subgroup, label, or voice part.
Under the Communication area, click the yellow send arrow to the right of "All Email". This will bring you to the "send email to a group" page where you can select the list you want to send to, include a message and any attachments, and the choose to send the email, save if as an unsent draft, or send yourself a test copy of the message.
Choose the type of message you want to send - in this case it would be "An account set", and then select the appropriate set from the new dropdown that appears. You can choose from roles, subgroups, labels, and voice parts, or select "all accounts" to message every active account in your site.
You can then write your subject, body text and add any necessary attachments, and click the button at the bottom of the page to send the message.
There can be deliverability issues when using "account sets" to send instead of a predefined mailing list.
Sending emails to a set based on an action they have taken
You may want to send a message to a group of users that have taken a particular action. Here are the people you can send a message to:
- An event attendance set
Choose the event, and then select one of the following:
- everyone who is invited to attend (this includes "add to calendar"
- everyone invited to RSVP
- people who will attend (this includes an RSVP yes, must attend who confirmed their attendance, and those approved who have applied to attend)
- people who have not responded yet (this is everyone with "no response" in the "invite status" column when viewing attendance for an event. - Ticket purchasers
Choose the event, and this option will send an email to all those who have purchased a ticket at that point in time for that specific event.
To send a message via this method, click on then Communication area, and then click the yellow send arrow to the right of "All Email".
This will bring you to the "send email to a group" page where you can select the group you want to send to, include a message and any attachments, and the choose to send the email, save if as an unsent draft, or send yourself a test copy of the message.