Table of contents
- Attendance settings
- Tracking attendance
- Notifications
- Responding to attendance notifications (RSVP)
- Reviewing who plans to attend with the Attendance Forecast
- Reviewing who plans to attend with the RSVP Summary by Voice Part
- Approve or Deny a Leave Request
- Accept or Decline an Application to Attend
- Taking attendance
- Manually
- Check-in page
- with a QR Code scanner
- via the free CG app
- Reviewing attendance: Report Options
- Leaves of Absence
Attendance settings
These settings can be adjusted to customize your attendance options for your events.
These settings are located under:
Admin Settings & Tools > Calendar and Event
- Allow “Might attend” as a RSVP response
- Allow “Virtual” as an RSVP response - this is useful for hybrid and virtual events
Tracking Attendance
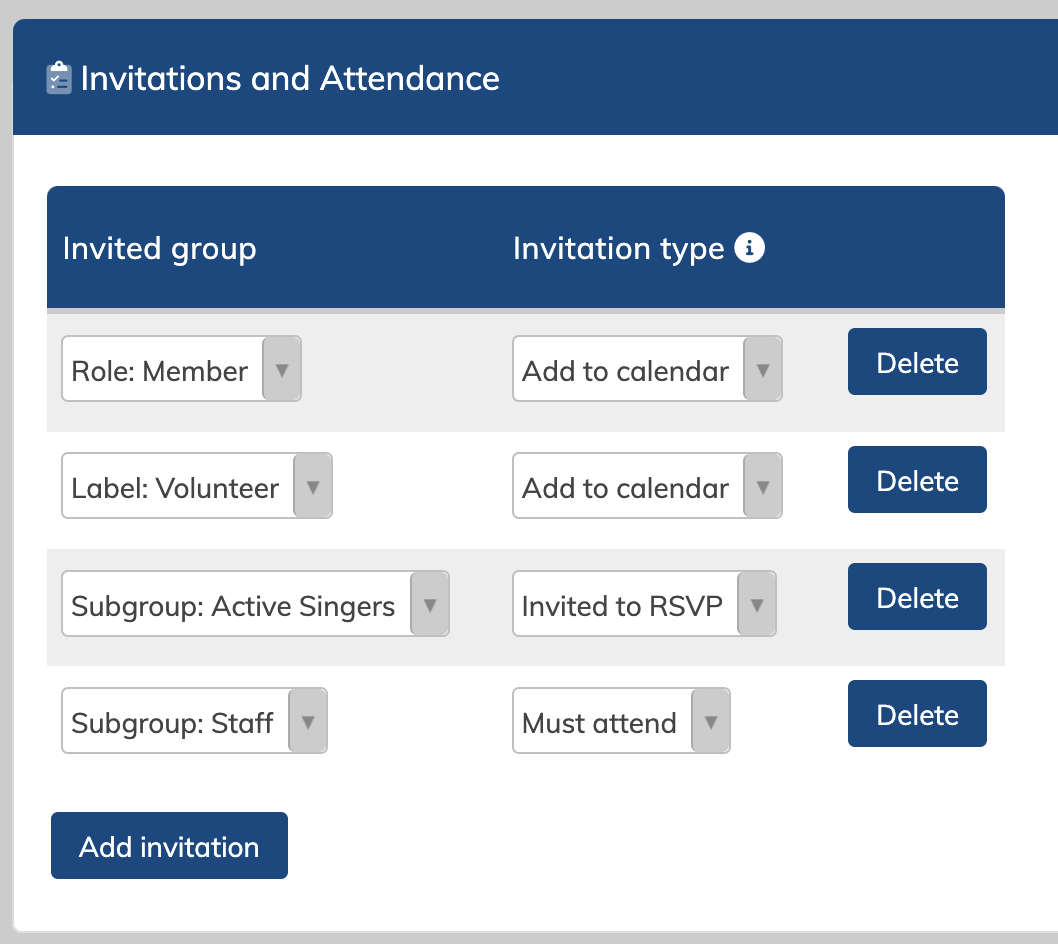
- There are different attendance invitation modes, each with their own behaviour. These modes are selected the Event under the heading "Invitations & Attendance. You can add multiple types of invitations to a single event, and invite different sets of people with a different mode. Click the "add invitation" button to add as many as you need.
The modes are:
- RSVP - great for knowing who intends to attend an event, and then marking them as present or absent.
- Must Attend - great when attendance is assumed, and you must notify leadership if you are going to miss. Attendance can still be taken at the event as well, to confirm who was there, and who was absent.
- Apply to Attend - great for events where space is limited. Leadership chooses who is approved to attend.
- Or, just Add it to their calendar
- This mode does not track attendance, it just shares the event on the calendar of those invited.
Notifications
- Invitees are notified via digest that they’ve been invited to events EXCEPT for add to calendar - that invitation method does not trigger nay notifications.
- Admins receive a notification for declines to attend a Must Attend event, and must approve/deny it. On the notifications setting page, you can fine tune who receives these notifications by role. It should be a role with access to attendance. Invitees then receive a notification to confirm their acknowledgement of this decision
- Email notifications are not sent for “apply to attend” responses, but necessary actions are highlighted on the Manage Attendance page.
The various notification settings for events and attendance can be reviewed on the Notifications page by Admins.
Admin Settings & Tools > Notifications
Responding to attendance notifications
- Members respond via the Events > My Attendance page
- Depending on the settings, they can indicate if they will attend, might attend, will attend virtually, or do not plan to attend for an RSVP event
- They can confirm they will attend for a Must Attend event, or request leave.
- They can apply to attend for an "Apply to attend" event, and if accepted, will also need to confirm they will attend.
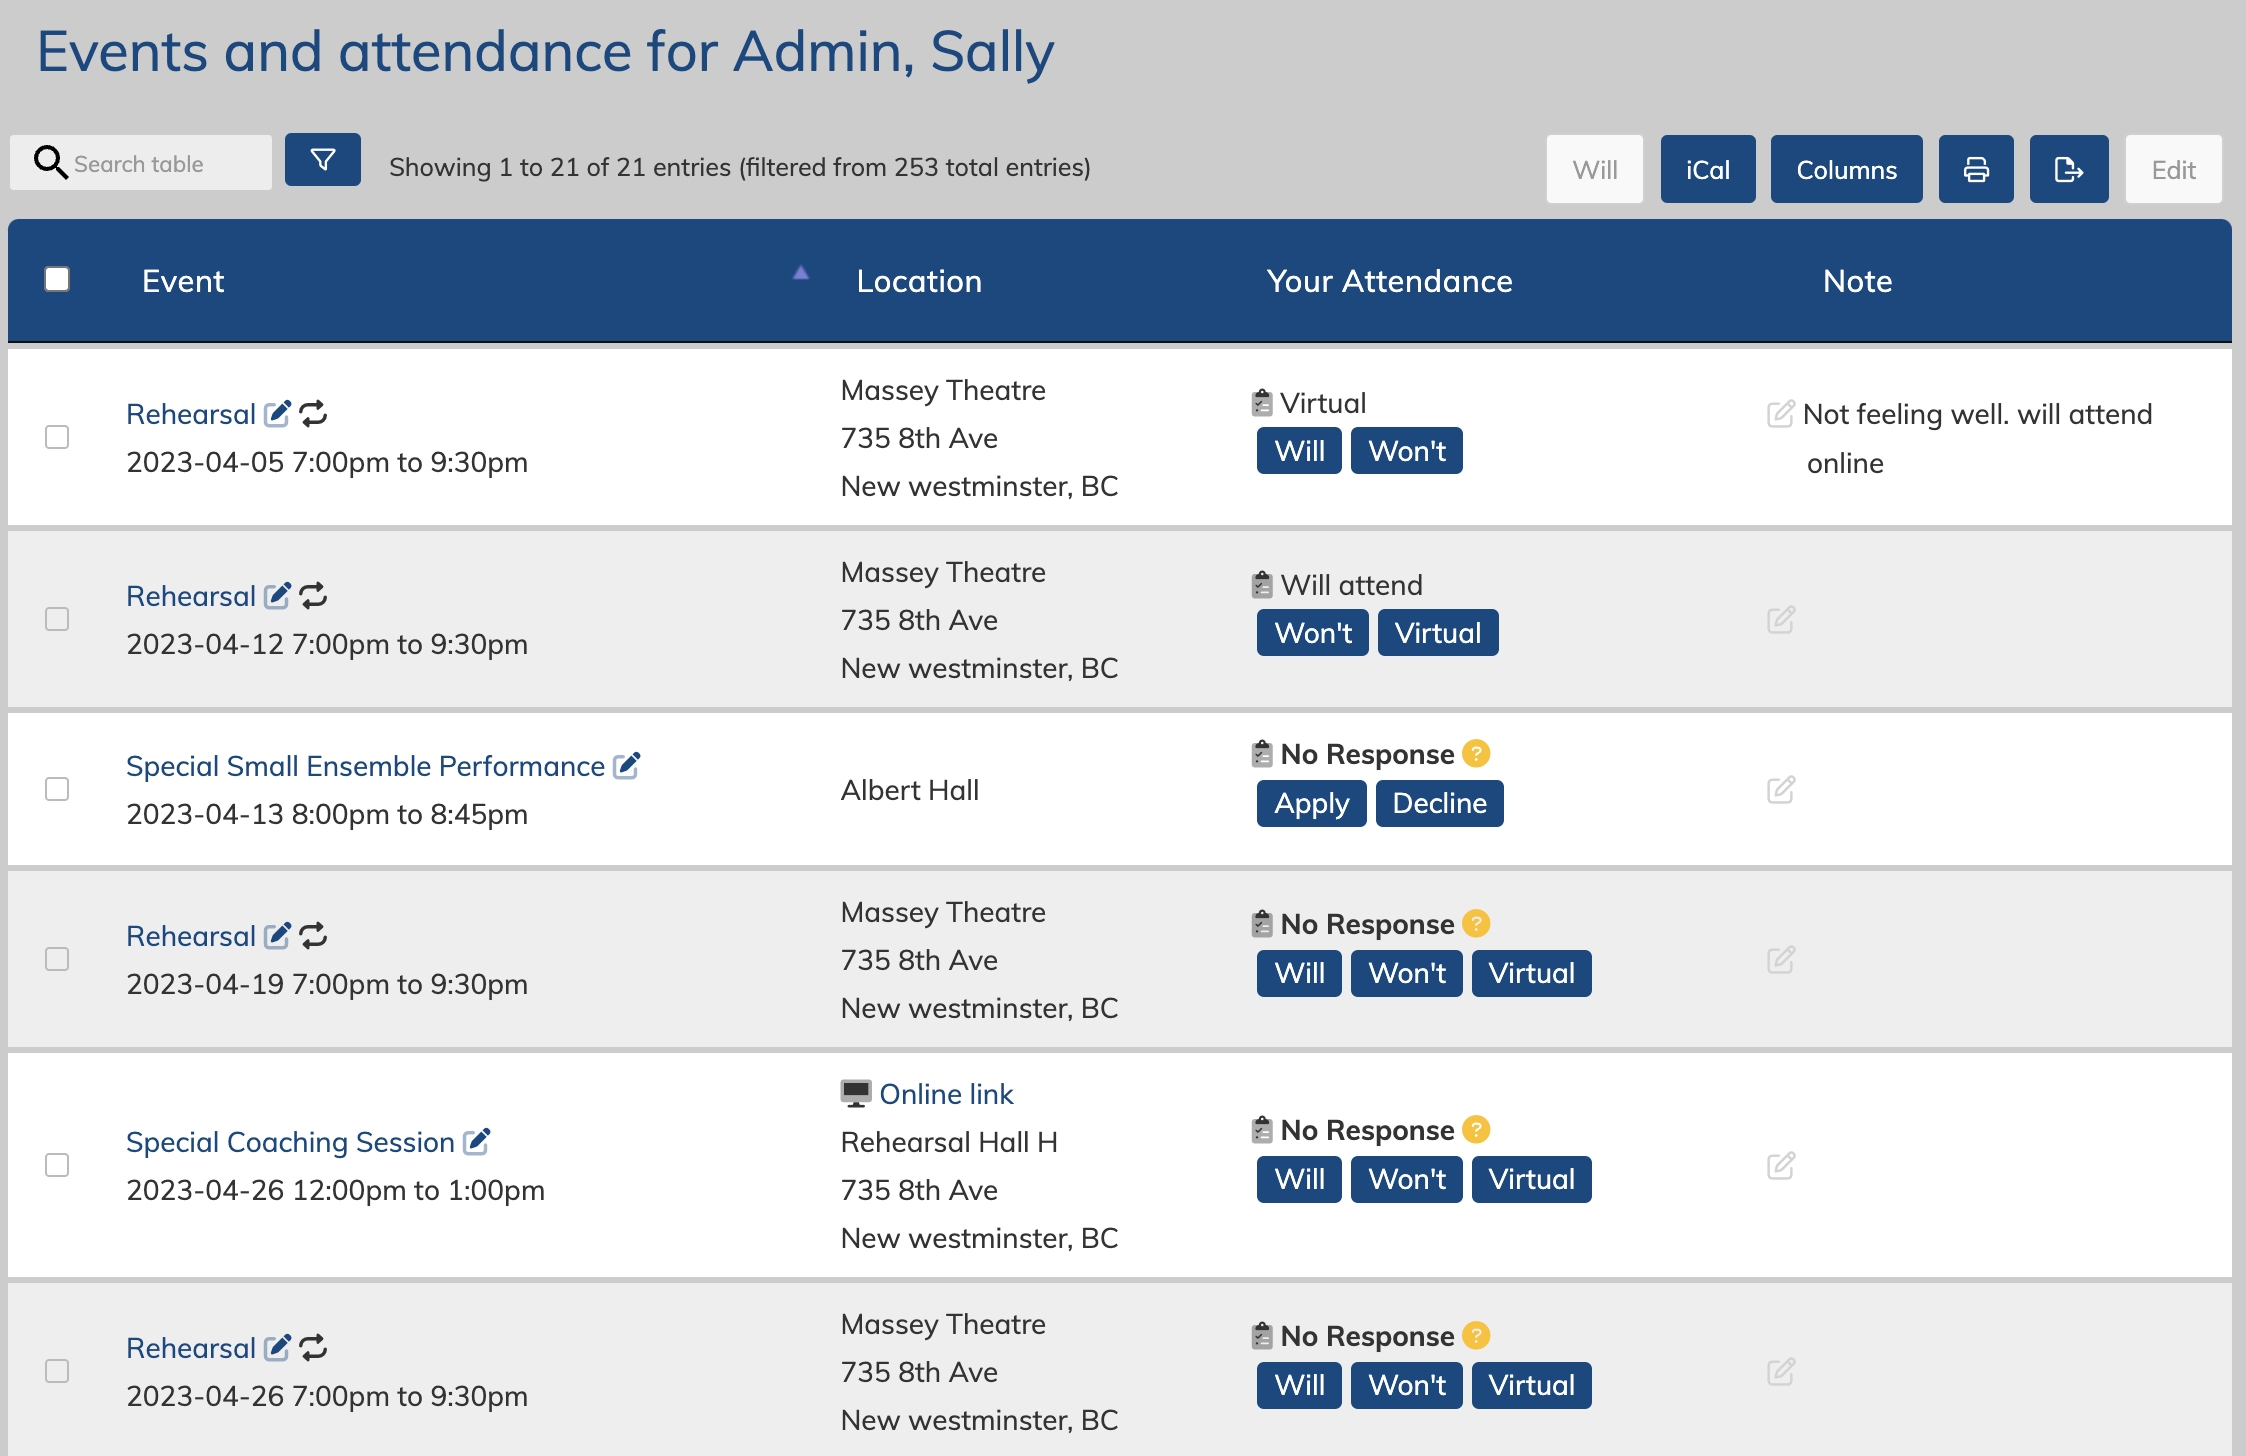
- Leadership can view attendance plans and needed actions on the Events > Attendance page. This is discussed more below.
RSVP invitations: Reviewing who plans to attend with the Attendance Forecast
Admins, managers and coordinators can review attendance plans of event invitees via the "Manage attendance" page.
Events > Attendance
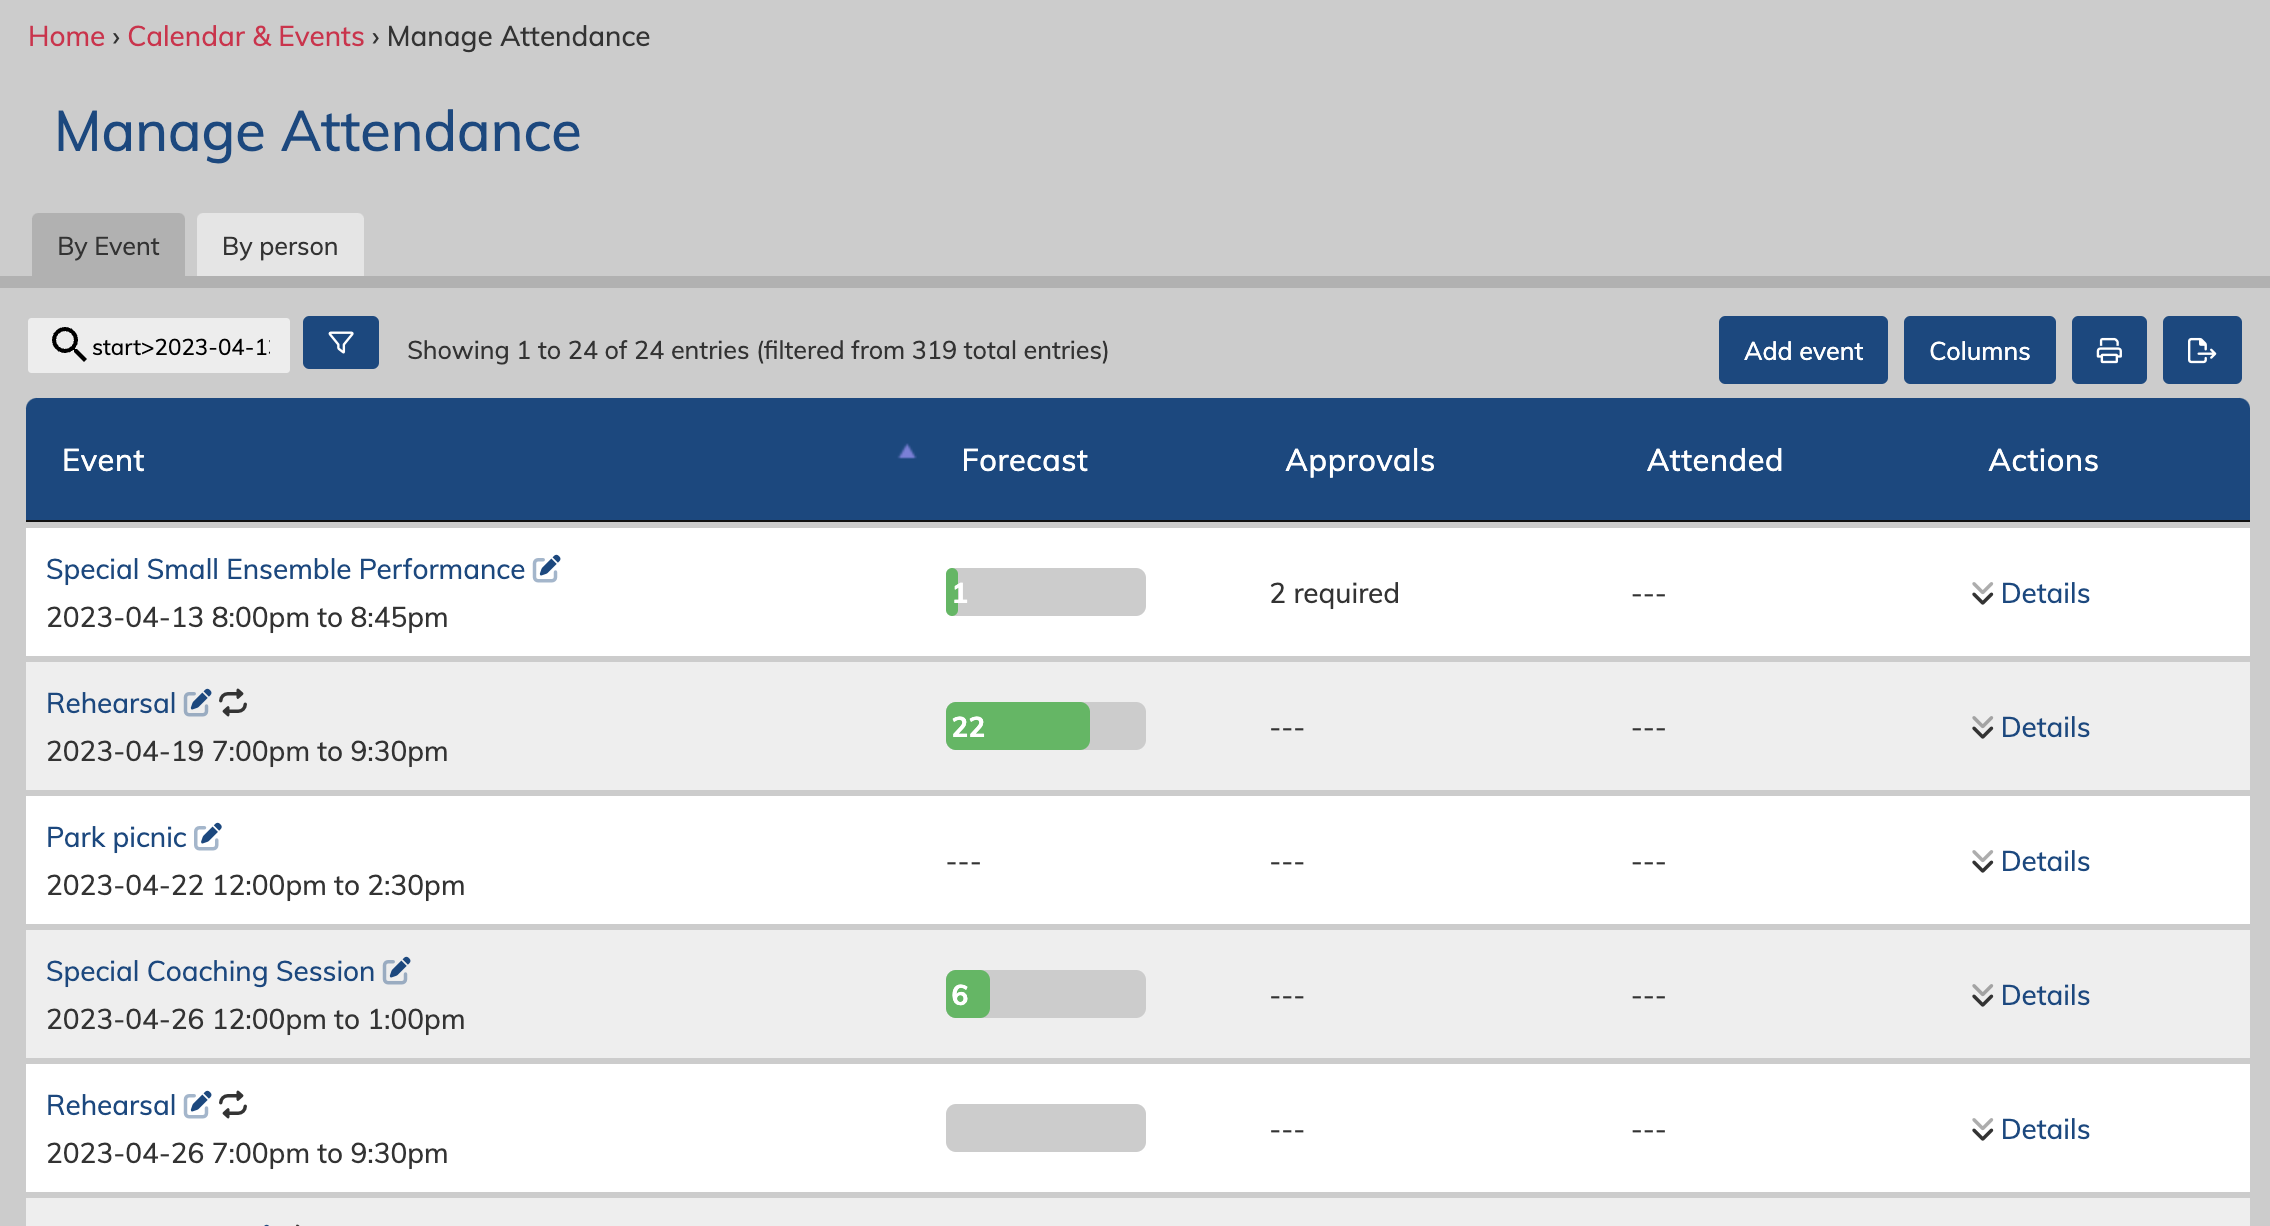
Here we can see larger green bars where many invitees have responded that they will attend the event. The exact number of anticipated attendees in in white.
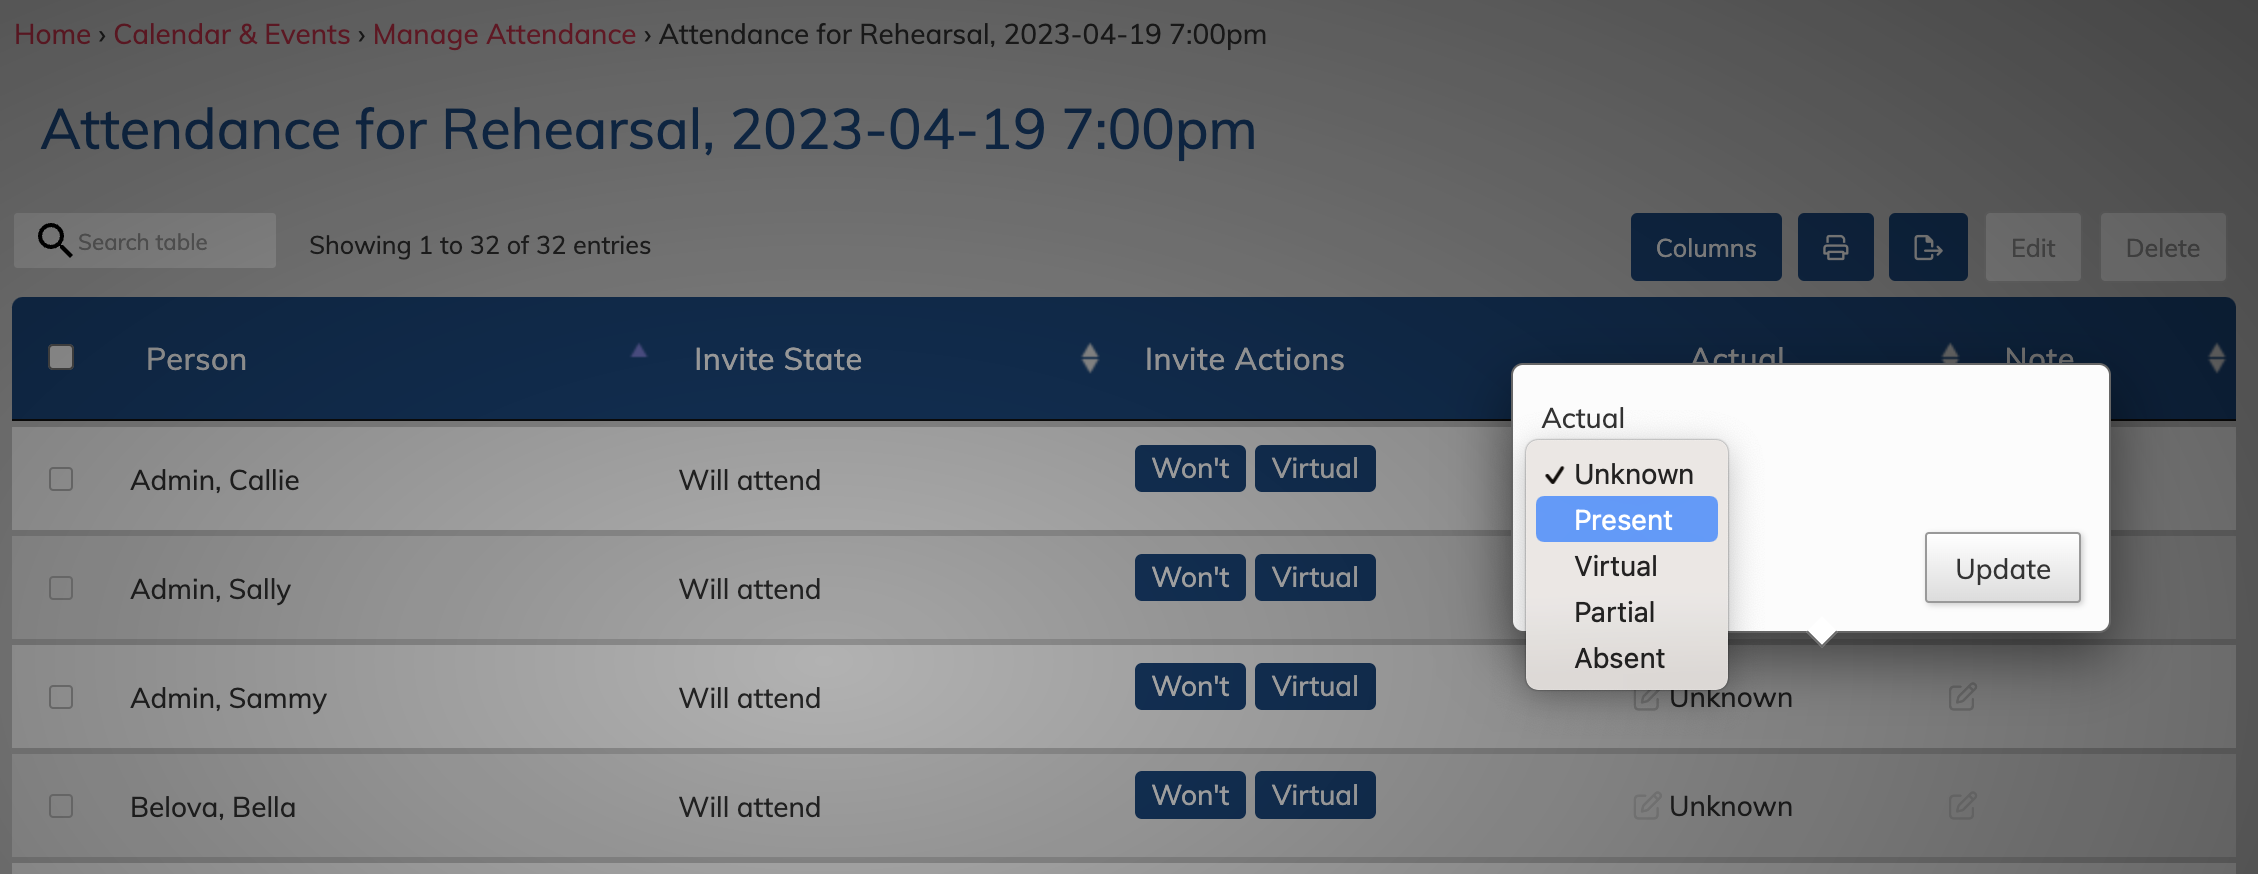
Click on "details" on the right hand side to see the list of names of invitees and their plans for that event.
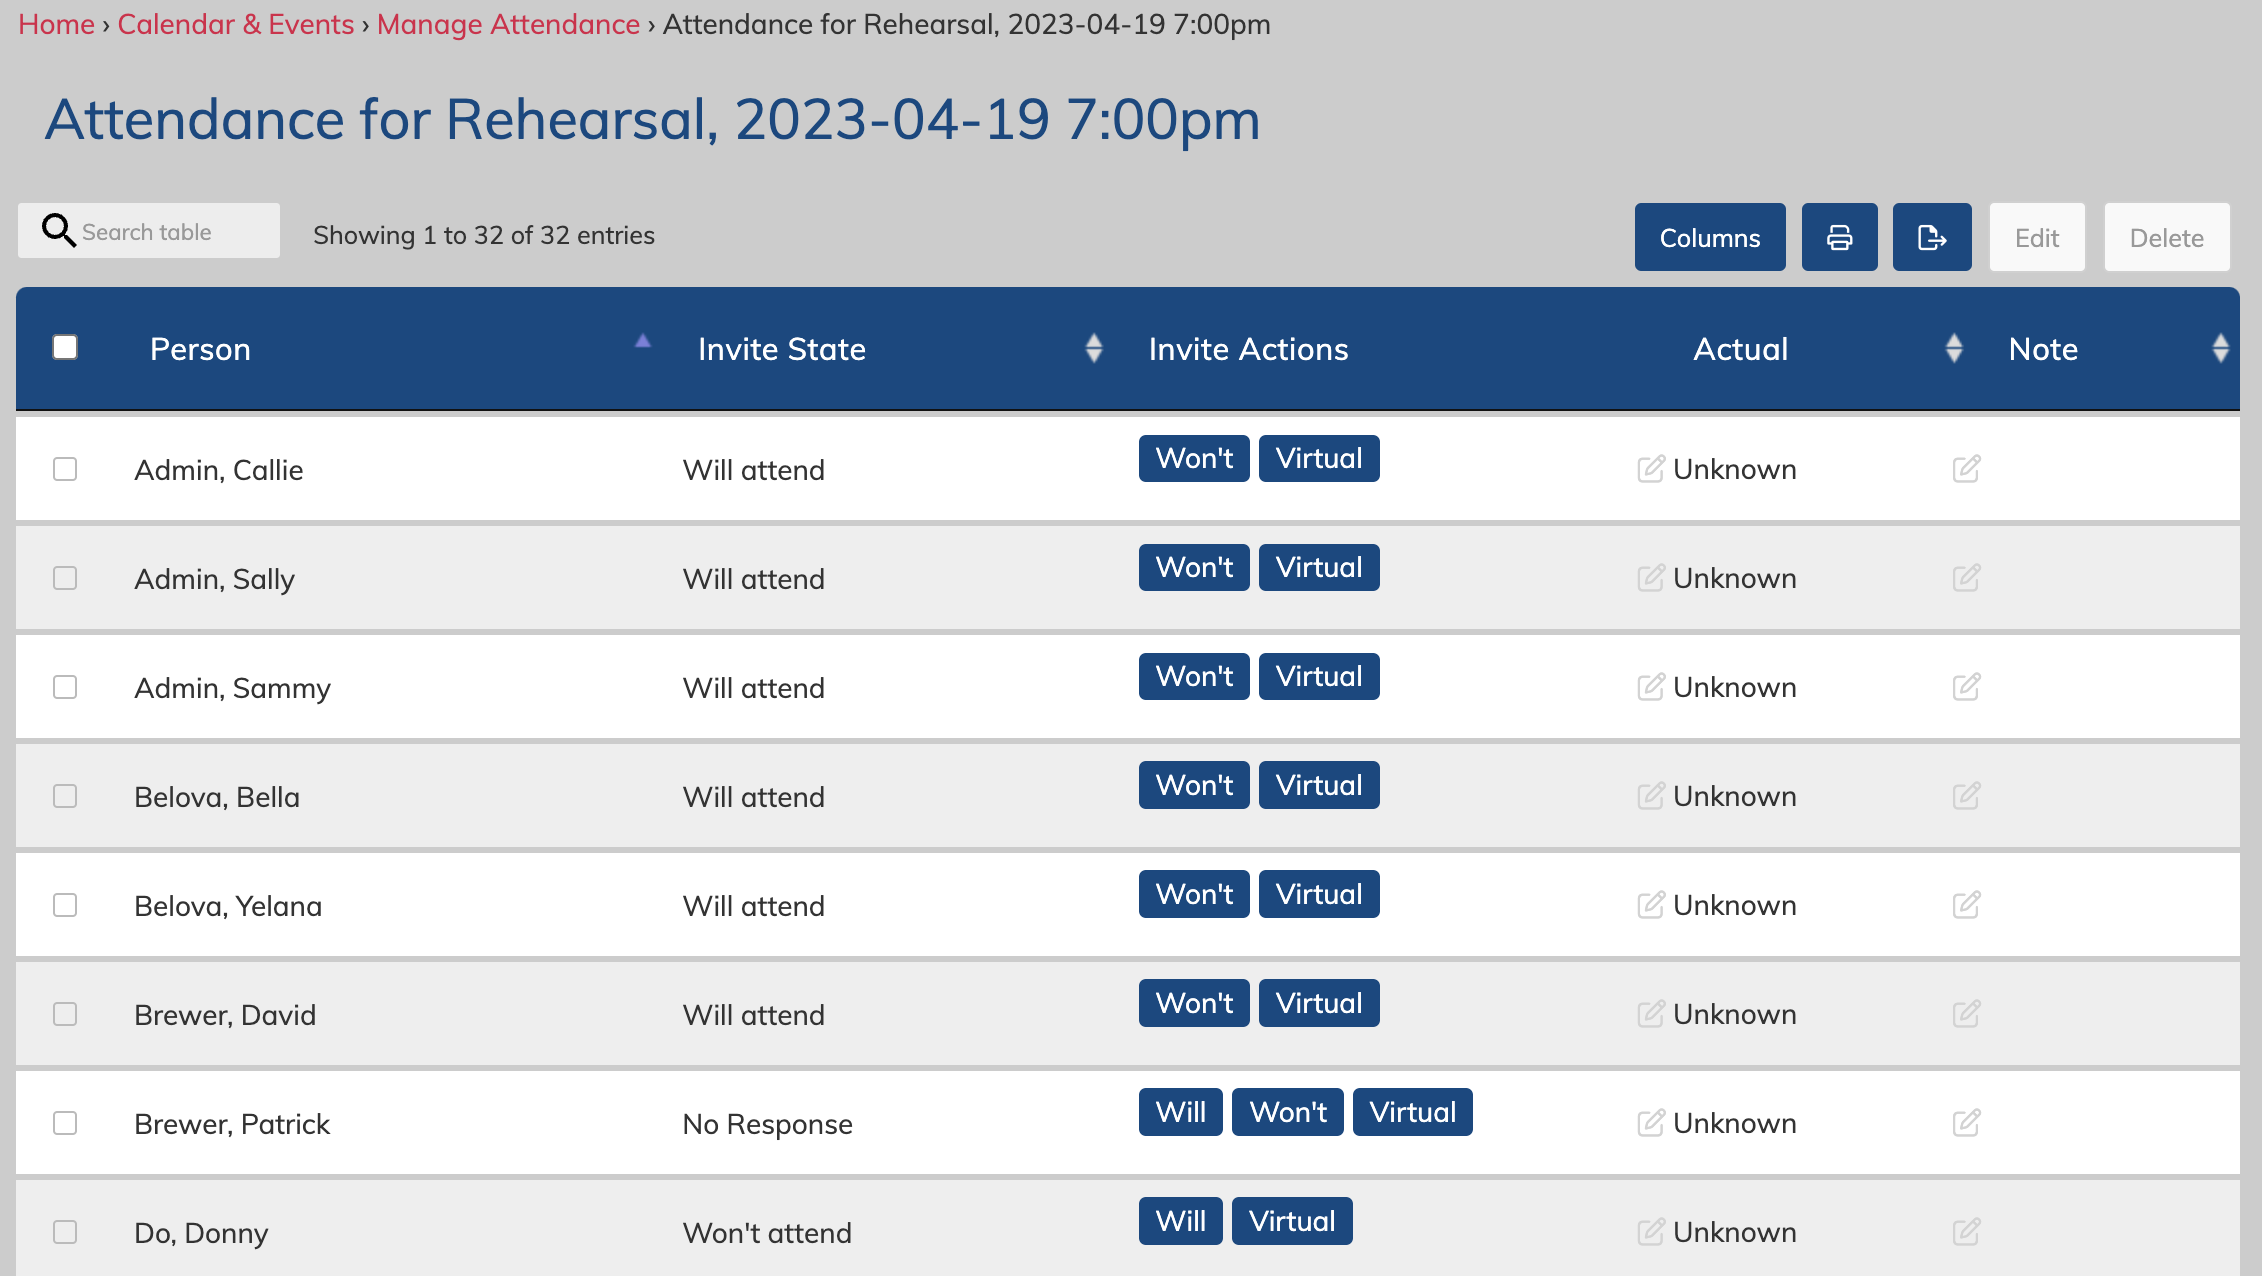
Their current invite status (their "plan") appears in the first column next to their name. As an admin, you can change this for them using the blue buttons if necessary. Their "actual" attendance status appears next. The last column is the area for notes. click the small edit icons to make changes if necessary.
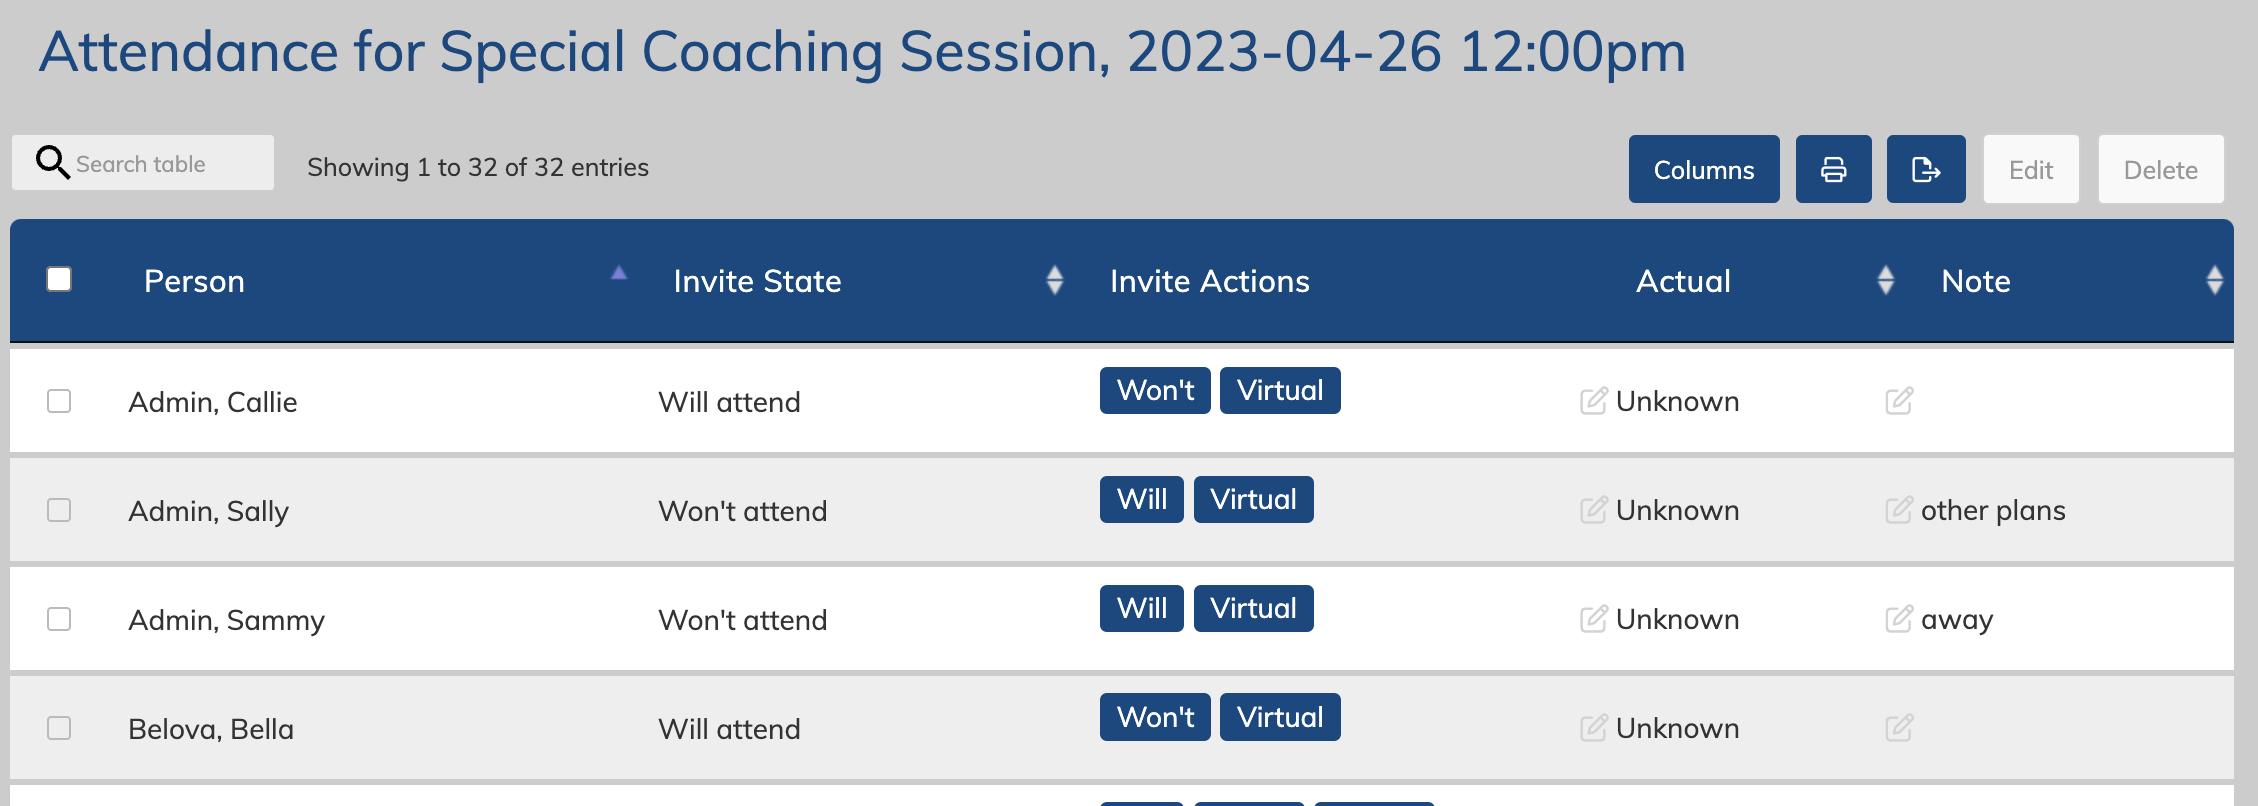
This is the same page where you can take attendance for an event manually.
This is discussed in more detail here.
Reviewing who plans to attend with the RSVP Summary by Voice Part
On each event, you can review a summary by voice part.
To access it:
- go to the event, then click the "manage attendance" link on the event view, or,
- go to: Events > Attendance > and then click on "details" across from the event you want to view.
Then click to expand the "RSVP Summary by Voice Part" heading.

Must Attend invitations: Approve or Deny a Leave request
Admins, managers and coordinators can approve or deny leave requests on the "Manage attendance" page.
Events > Attendance
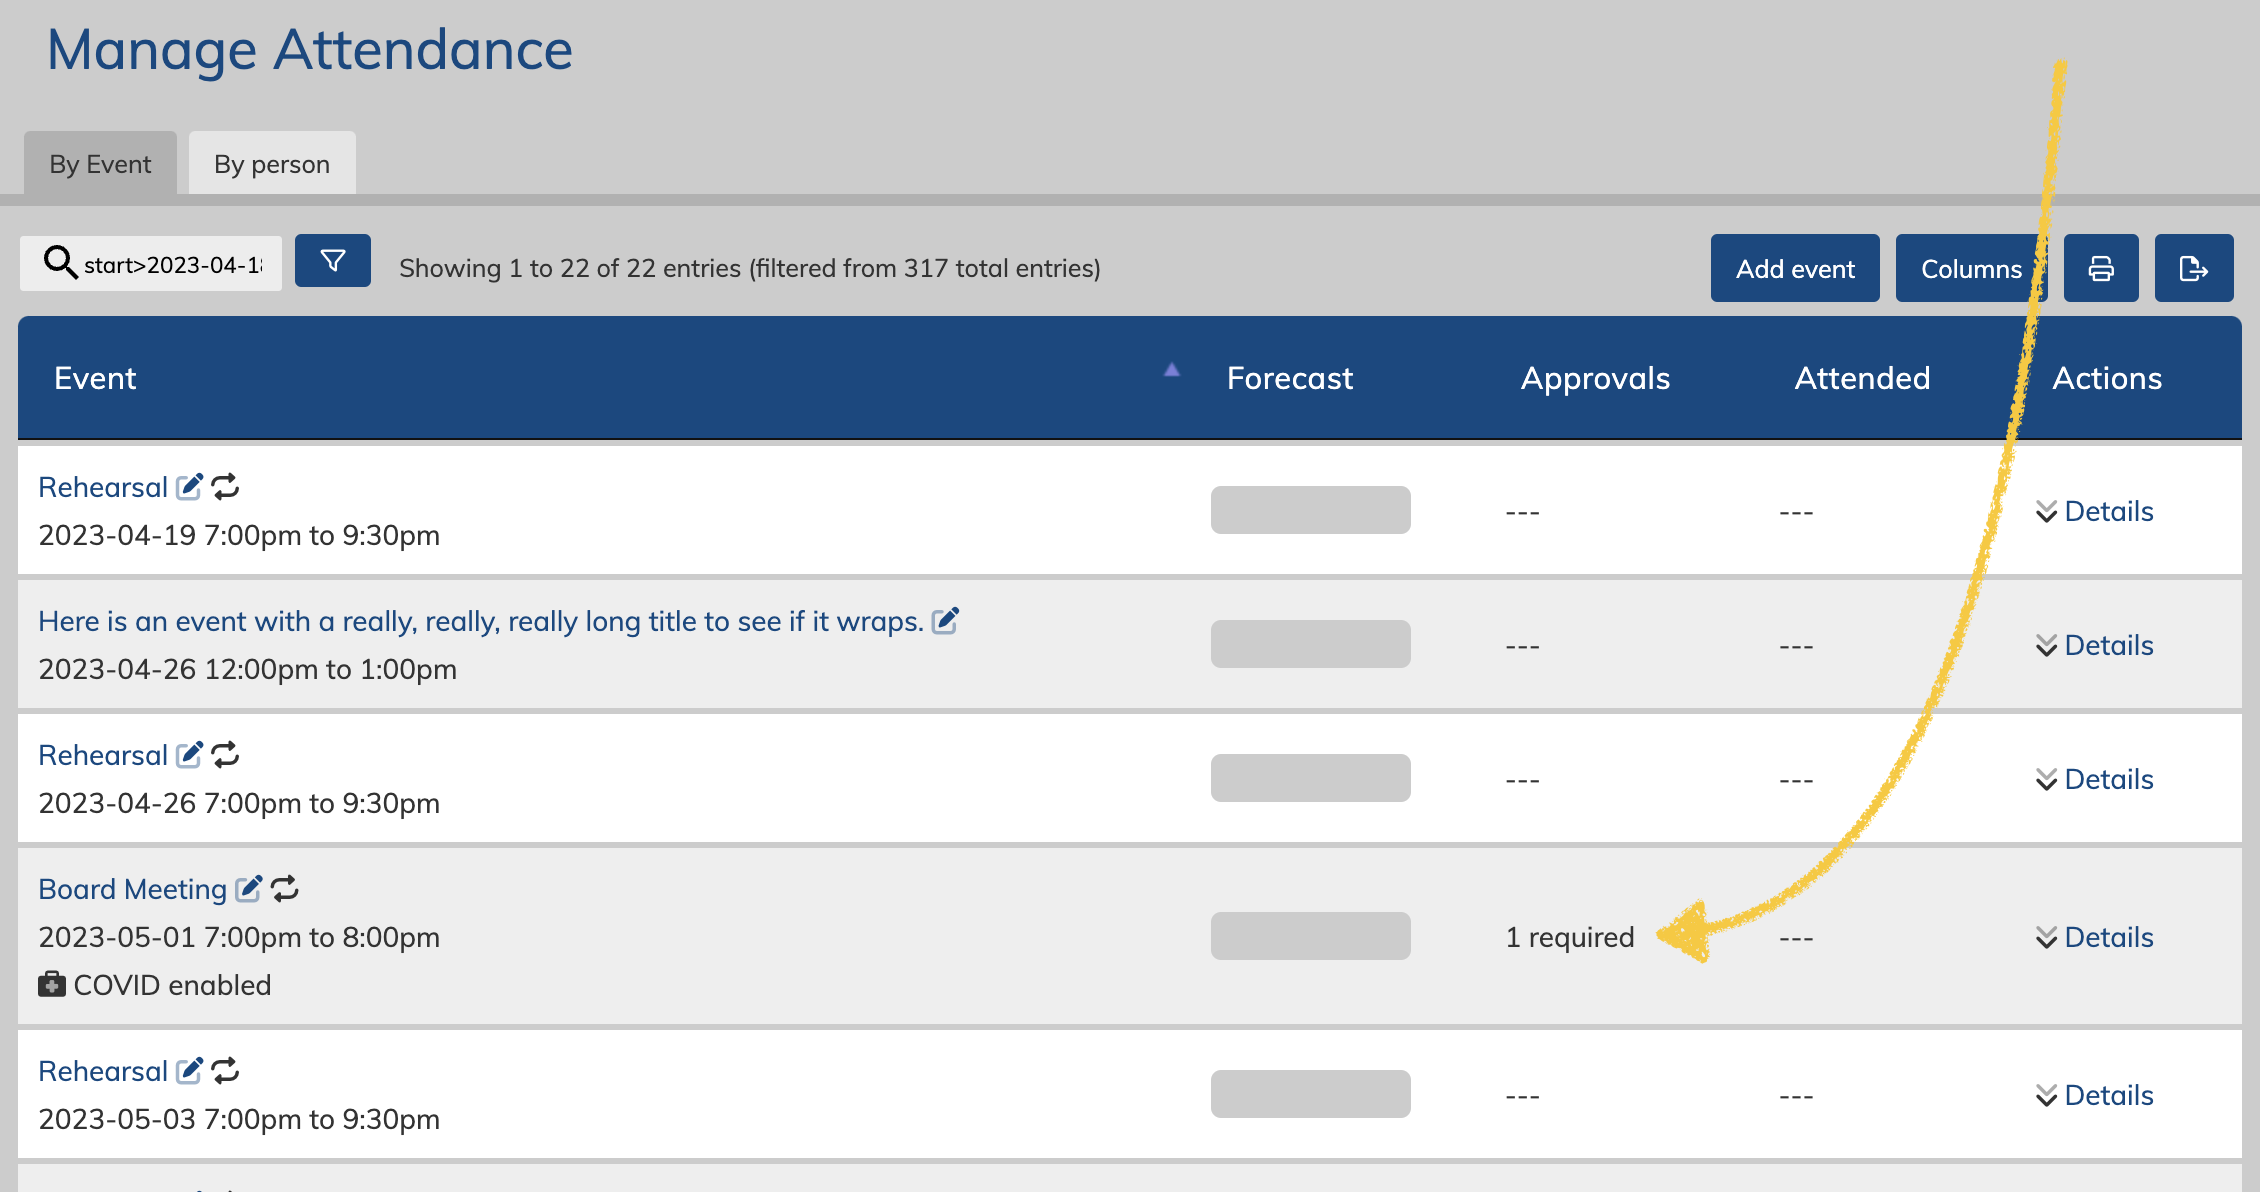
Events with a leave request will appear with the number of requests that need review in the "Approvals" column. Click the "__ required" to review the requested leaves.
You can then click one of the yellow buttons to approve or deny the leave request. If the user did not mean to request the leave, you can also click the blue "cancel" button to cancel the request.
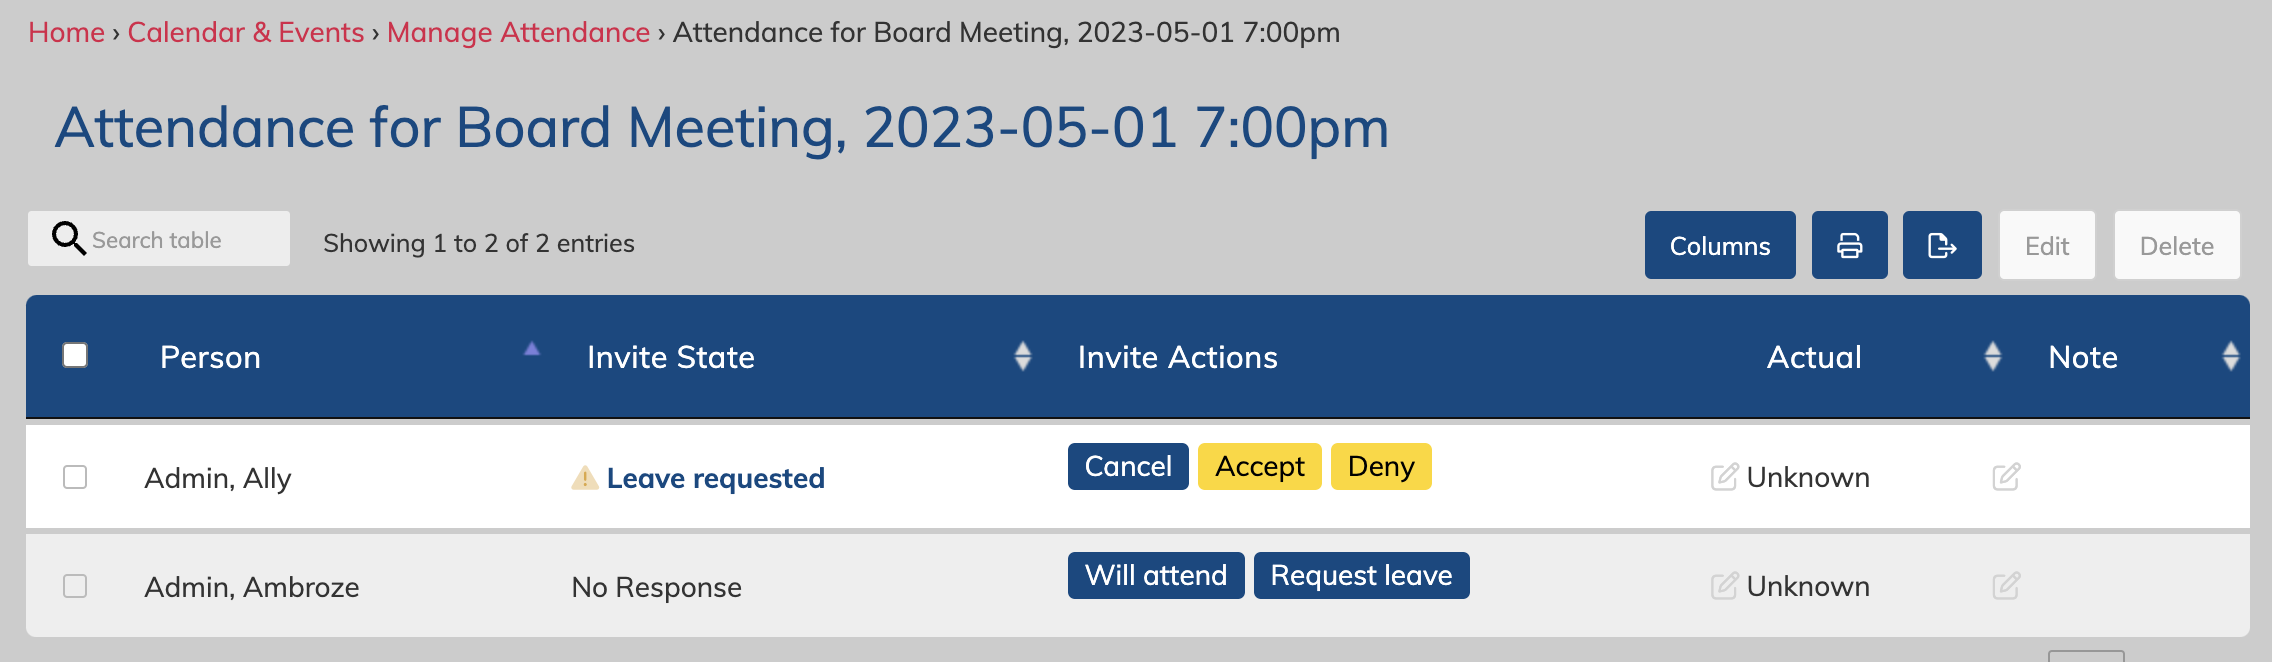
The user will then be asked to "confirm" your decision as an acknowledgement.
As an admin, you can also confirm it or deny it, and then even cancel a confirmed acceptance or denial if someone's application status changes. This will set them back to "no response" with the "will attend" and "request leave" buttons, and you can start the process over.
May Apply to Attend invitations: Accept or Decline an Application
Admins, managers and coordinators can accept or decline applications to attend on the "manage attendance" page.
Events > Attendance
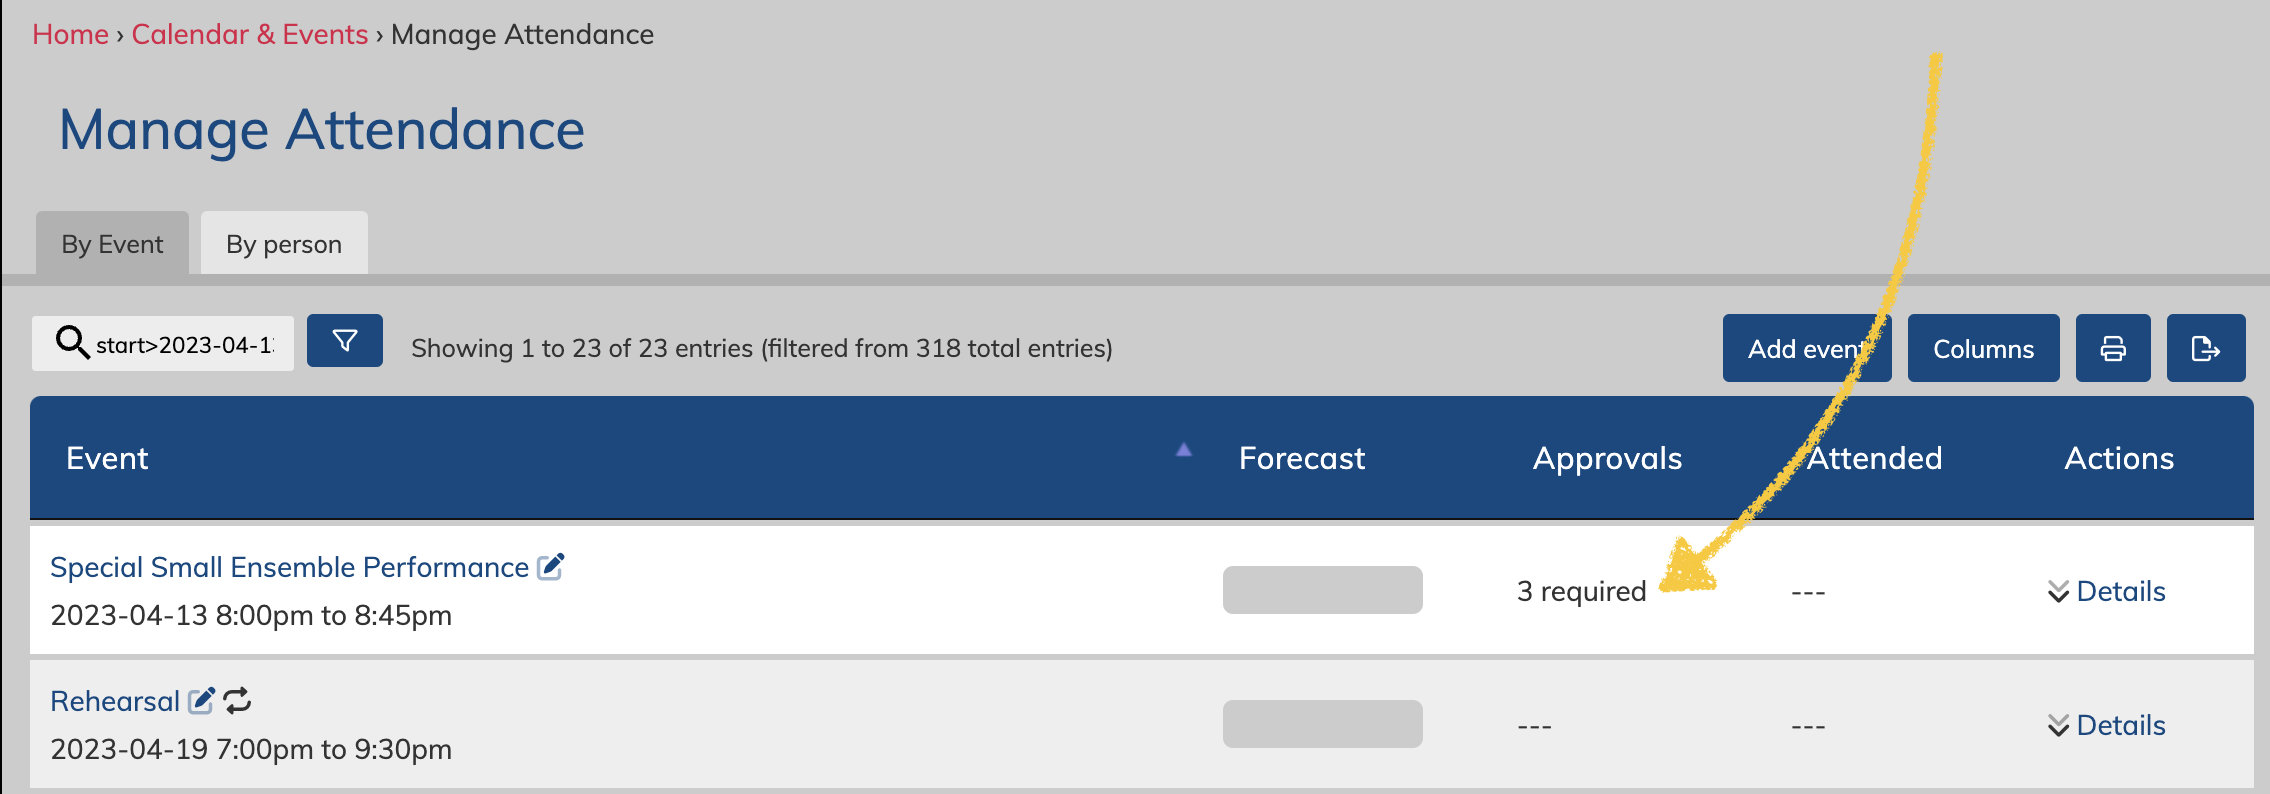
Events with an application to attend will appear with the number of applications that need review in the "Approvals" column. Click the "__ required" to review the applications.
You can then click one of the yellow buttons to accept or decline the application. If the user did not mean to apply, you can also click the blue "cancel" button to cancel the application.

The user will then be asked to "confirm" your decision as an acknowledgement.
As an admin, you can also confirm it, decline it, and then even cancel a confirmed acceptance if someone's application status changes. This will set them back to "no response" with the "apply" and "decline" buttons, and you can start the process over.
Taking attendance
Roles who can take attendance: Admin, Manager, Coordinator, Assistant
- Taking attendance manually via the Events > Attendance page
- on the "manage attendance" page, click on the "details" link across from an event to review the specific attendance plans for attendees for that event. You can also record attendance on this page per user, or select multiple rows of users and clicking the "edit" button.
- Note: You can mark attendance as “virtual” if that option is enabled for RSVP events. This allows for hybrid events where you can easily track who was there in person, and who was there virtually.
- All invited people will appear on the attendance lists (as long as they were invited and not set as "add to calendar"), even if they have no response, or have said they do not plan to attend.
- There is a note field to the left of the attendance setting where you will see any notes entered by the user. You can also click this field to edit it if necessary.
- Taking attendance manually via the Events > Attendance Check-in page
- If an event is happening within 3 hours (or has recently finished up to about 23 hours), you can access the attendance for the event on the "Attendance check-in" page. If you have multiple events around the same time, you will be asked to select the specific event first. You can switch between events at any time.
- If your event finished over 24 hours ago, take attendance manually instead
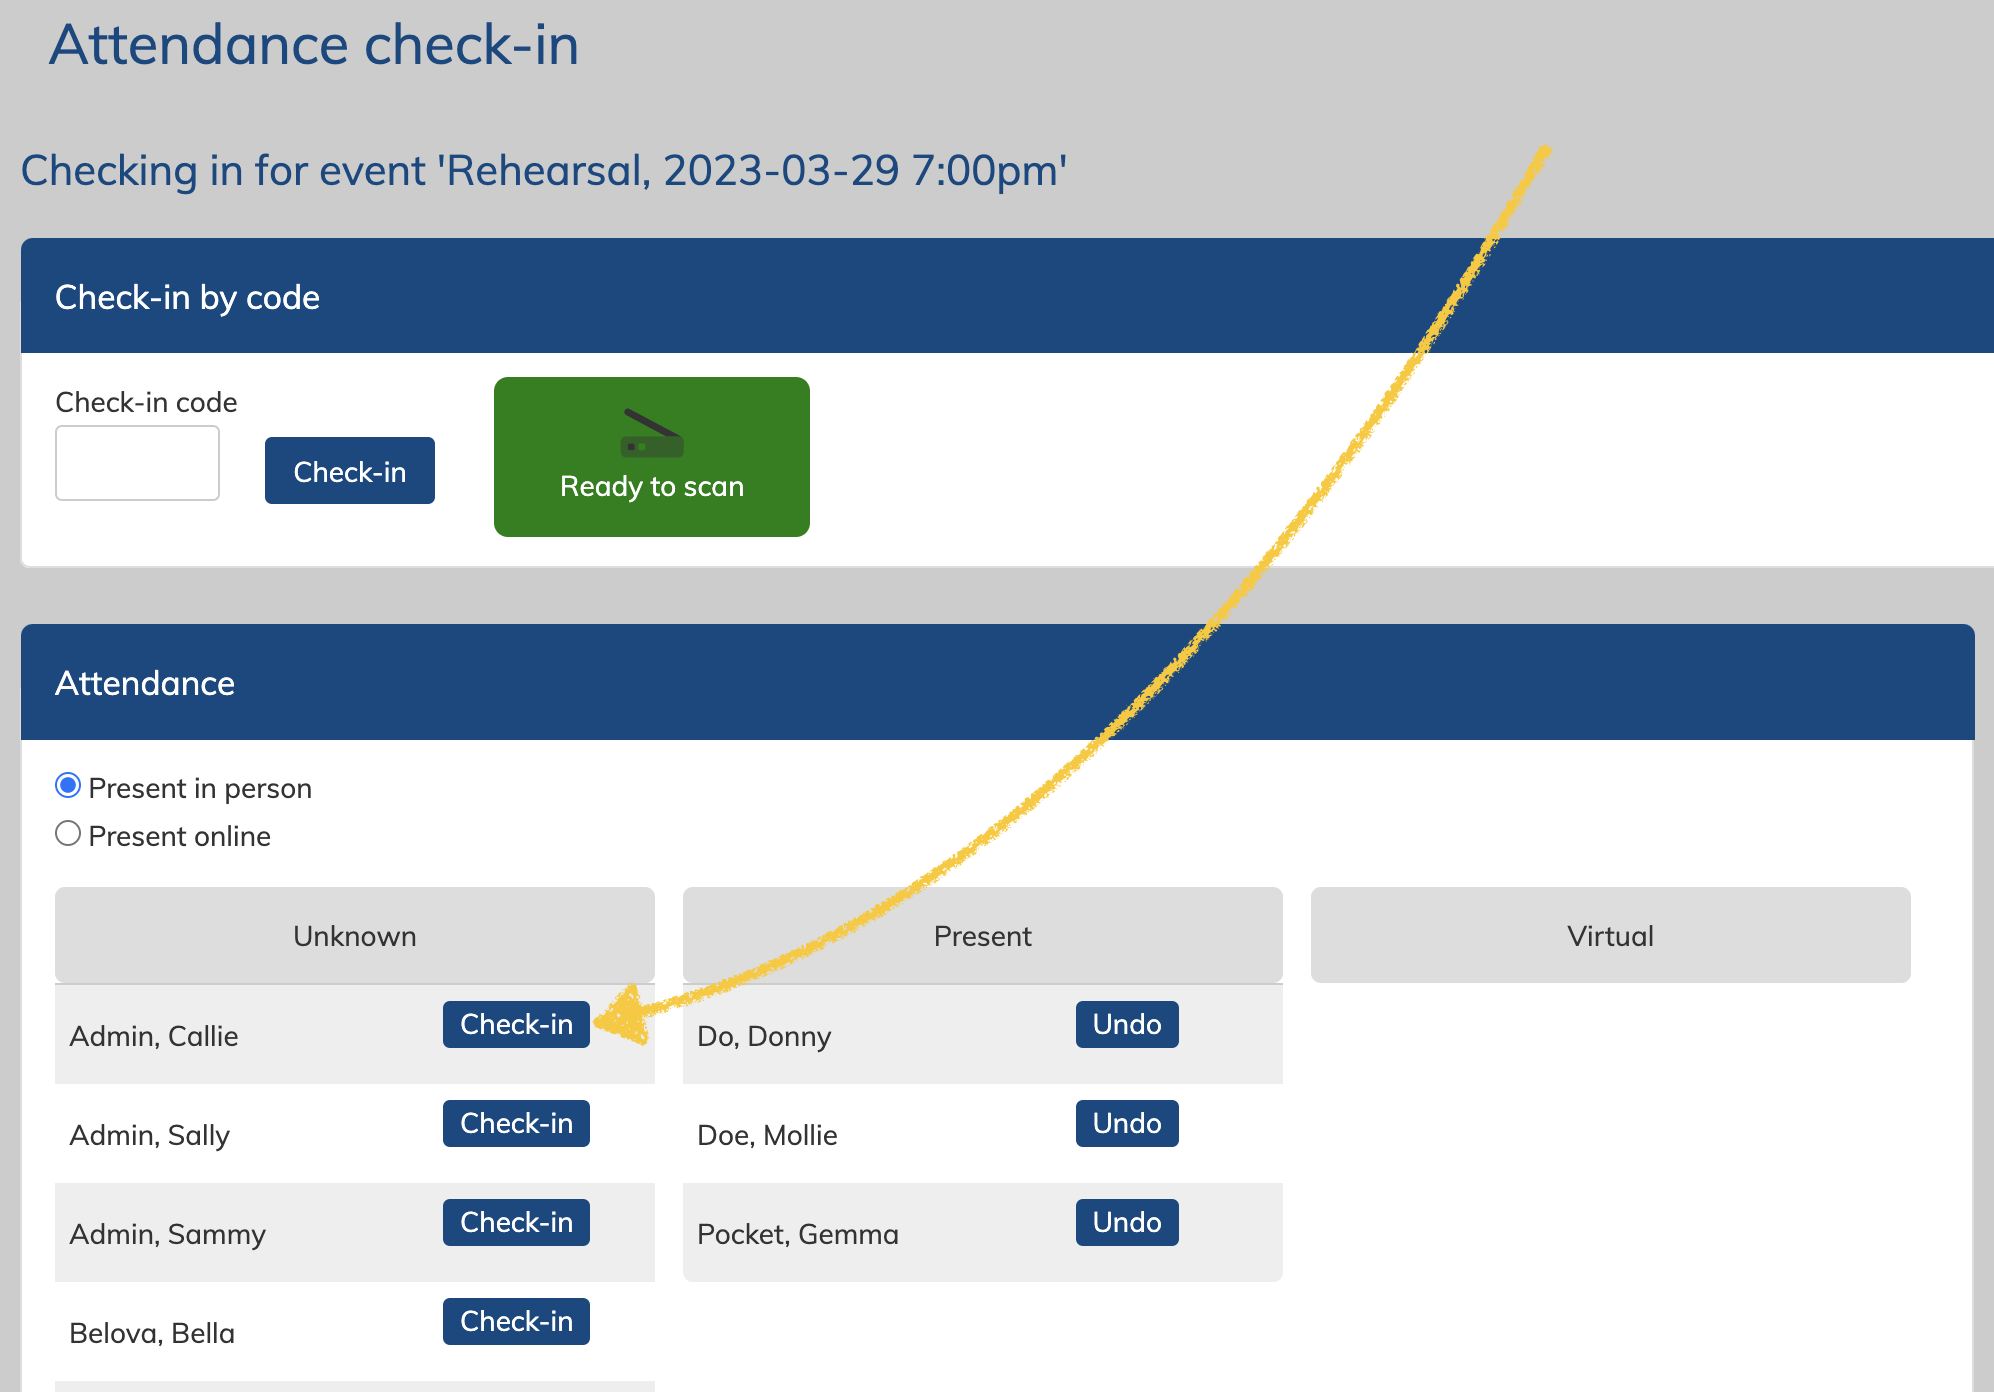
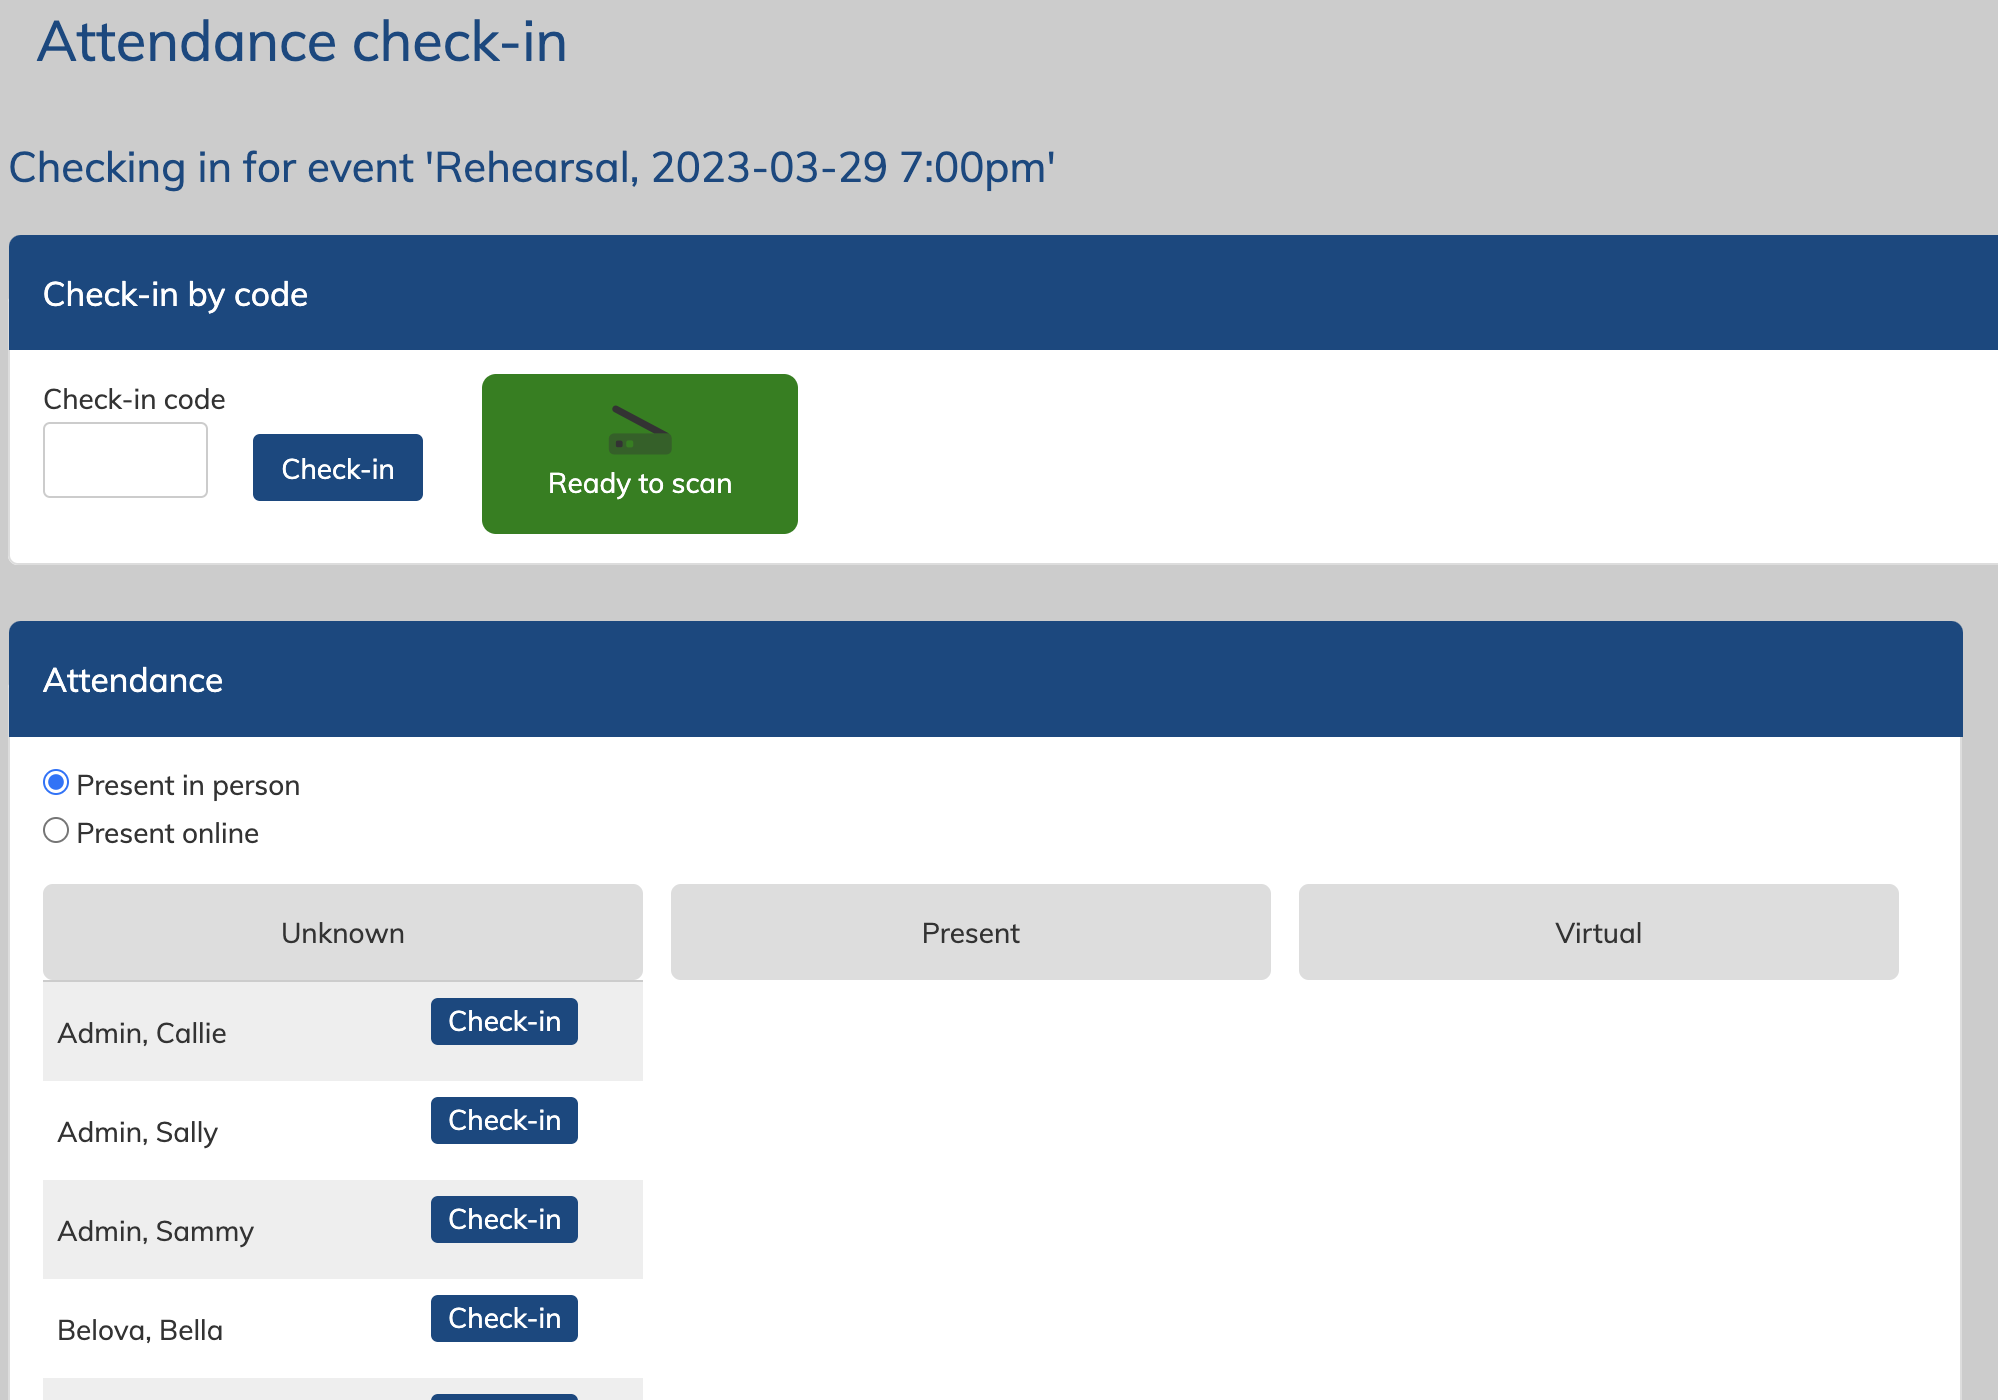
- On the Attendance check-in page, you will see a list of names of those who were invited to attend. Click the "check-in" button next to their name to check them in. Click "undo" next to their name in the check-in column if you make a mistake.
- If you have the "attend virtually" option enabled, there will be a toggle on just above the list of attendees that will let you shift between "present in person" and "present online"
- All invited people will appear on the attendance lists (as long as they were invited and not set as "add to calendar"), even if they have no response, or have said they do not plan to attend. On the Attendance check-in page the “will not attend” responses appear with a small x next to their name.
- If an event is happening within 3 hours (or has recently finished up to about 23 hours), you can access the attendance for the event on the "Attendance check-in" page. If you have multiple events around the same time, you will be asked to select the specific event first. You can switch between events at any time.
- Taking attendance using QR codes via the Attendance Check-in page

- Users can pull up their QR code on their profile, or an Admin can access the Badge Report to be printed off.
- The badge report is located on the "Reports" page, under the "other" tab
- Requires a QR code reader. These can usually be found for an affordable price on online retailers. They should read 2D barcodes, and have a "keyboard input" function.
- or, those with the free Choir Genius app and the correct permissions, can use the app to take attendance.
- If an event is happening within 3 hours (or has recently finished, up to about 23 hours), you can access the attendance for the event on the "Attendance check-in" page. If you have multiple events around the same time, you will be asked to select the specific event first. You can switch between events at any time.
- If your event finished over 24 hours ago, take attendance manually instead
- If you have the "attend virtually" option enabled, there will be a toggle on just above the list of attendees that will let you shift between "present in person" and "present online"
- Your scanner will input the code into the "check in code" filed at the top of the page and automatically enter it. If the QR code entered matches an invitee, it will check them in. You can press "undo" next to their name in the checked-in column if you make a mistake
- If a QR code will not scan, you can type in the six-figure code listed under the QR code manually at any time, or click the "check-in" button next to their name from the list below.
- All invited people will appear on the attendance lists (as long as they were invited and not set as "add to calendar"), even if they have no response, or have said they do not plan to attend. On the Attendance check-in page the “will not attend” responses appear with a small x next to their name.
- Users can pull up their QR code on their profile, or an Admin can access the Badge Report to be printed off.
- Taking attendance via the free CG App
- The free CG app will also allow you to take attendance for events one of two ways:
- Manually for each invited person on the event listing, or
- using the qr code scanner within the app
- You can read more about the app and how to take attendance using it here.
- The free CG app will also allow you to take attendance for events one of two ways:
Reports: Reviewing attendance
- The Events > Attendance page allows you to view attendance plans by event, and by person.
- This allows you to view upcoming events and those who plan to be there. These are "forecast" pages for planning.
- To view past attendance for an event (who actually attended) in detail, you can filter for the event in the "by event" tab using the date option, and then click on the "detail" link on the right site of the table.
- Attendance Reports
- You can also review attendance via the "Attendance Report". This report is available in the "Reports" area of the site.
- This report includes info on the number of times a user was invited, the number of times they attended in person, the number of times they attended virtually, the sum of the number of times they attended, their "attendance percentage" (number of times present divided by the number of times invited) as well as their raw "absent" numbers.
- This report does not include cases where attendance for an event or a person is not recorded.
- If a person is marked "partial", it counts as .5 present, and .5 absent.
- There is also the "Attendance Grid" report, which displays a grid of past events and all users.
- It can be filtered by: account sets, event types, and a date range.
- It displays a black dot for Present, an empty circle for Absent, a grey clock symbol for Partial, and a filled circle with a horizontal line in it for Virtual
- You can also review attendance via the "Attendance Report". This report is available in the "Reports" area of the site.
![]()
- The "Attendance Forecast Grid" is very similar, but instead focuses on attendance plans for upcoming events, instead of actual attendance data.
Leaves of Absence
Sometimes singers are still members but will not be attending events for a while. Check out the new "Leaves of Absence" feature here for more information!