- Intro
- Manage forms
- Create a form
- Assigning forms
- Adding questions / items
- Quick tips on question formats
- ADVANCED: Conditionals
- Embed a form
- Demo video
- Answering forms
- Tracking results
- Reviewing responses
- Download submission responses
- Clear all submissions for a form
- ADVANCED: Form Actions
Intro
Forms are a quick and easy way to collect information from account holders. You can also allow the public to contact you with a "contact us form". You can also include Agreements and Permission Releases that your users can then checkmark their acceptance of.
If filled out by an account holder, that completed form submission will then appear on their profile, for easy review of their answers by leadership.
This feature is not available for Conductor level subscribers.
Manage forms
All forms will be visible to Admins, Managers, and Coordinators on the "Forms" page available under the "Forms & Documents" heading in the menu on the right.
Forms & Documents > Forms
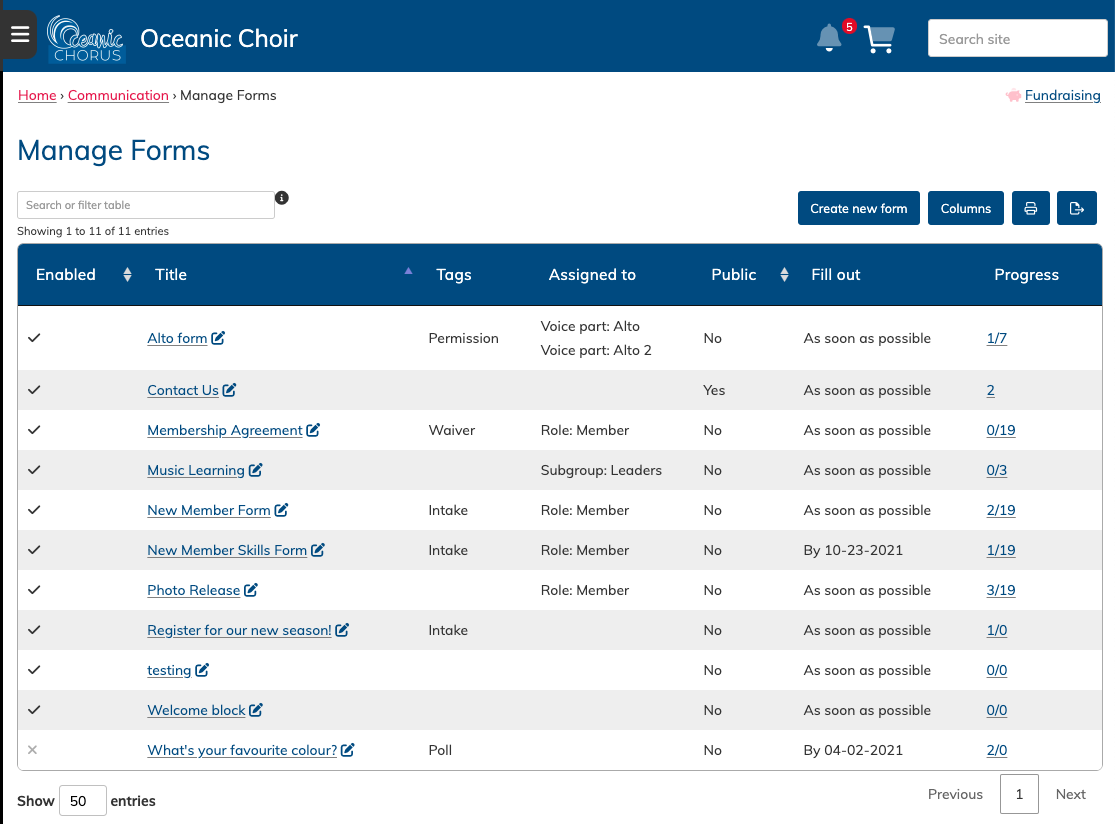
Forms can be organized with tags, which can be used to tie similar forms together. Default tags include: Intake, permission, poll, and waiver.
Admin Settings & Tools > Vocabularies, and then managing the terms for Form tags.
To view a form, click on the title.
To edit a form, click on the small edit pencil next to the form title.
To view the submissions for a form, click on the blue fraction under the "progress" column.
Create a form
To create a new form, first go to Forms & Documents in the menu, and then click the plus symbol across from "Forms".
You can also use the "Create new form" button on the top rights of the Forms page.
There are two main steps when creating a form:
- Setting your title, assignees and who is notified, and other settings
- Adding your questions
Setting the title and other basic settings of your form is the first part of creating a form, and is the first tab you land on when clicking to add a new form.
 The title should be clear and concise. You can add a description for internal organizational purposes. It only appears on this edit screen for Admin reference.
Tags allow you to organize forms into certain types. Again, this is for administrative organization.
You can assign the form to specific roles, subgroups or labels to fill out. This will allow them to see the form, and will also trigger reminder notifications.
You can also checkmark the form to allow the public to fill it out. The public is anyone without an account.
It is important to have your form assigned to an account set (role, subgroup, label, etc) if you want people with accounts to answer the form. Assignment is the only way they will receive a notification that they have a new form to fill out.
You can select to have accounts fill out a form "as soon as possible", or, by a certain date. "As soon as possible" is great for forms that you want to collect answers to continuously as people join your site, such as intake permission slips/photo releases where someone may join at any point within your season.
Embedding forms can be done after you initially save your form. Read more about it here.
Write a custom thank you message for your form submitters. This message will display after the form is filled out and submitted. Some groups include an html link if they want to have people navigate somewhere else after filling out a form (the link must be clicked, it cannot auto-redirect).
You can also choose to have a particular role, subgroup or label be notified when answers are submitted. They will receive an email telling them there is a new submission. They will need to login to the site to review the submission. You can select more that one set of people to be notified. You cannot select a person by name, but you could create a custom label and assign it to a single person if necessary.
Displaying the progress bar is an excellent idea for long, multiple-page forms. It lets a user know how much of the form they have left to fill out.
Notes on assigning forms
As mentioned above, there are two parts to assigning forms, you can assign them to be filled out, and you can assign those who receive notifications regarding submissions.
You can assign the form to specific roles, subgroups or labels to fill out. This will allow them to see the form, and will also trigger reminder notifications.
If an account has linked Parent account, those parents will also be able to fill out the form.
If you checkmark a form to accept submission from the public, this form will be accessible to anyone that can access the url for the form. If you're using the CG public site, you can also add the Form to your public site so that people have an easy method by which to contact you. However, please note that Forms exposed to the public can often be a target for spam bots.
When answers are submitted to a form, you can also choose to have a particular role, subgroup or label be notified of that submission. They will receive an email telling them there is a new submission. They will need to login to the site to review the submission. You can select more that one set of people to be notified. You cannot select a person by name, but you could create a custom label and assign it to a single person if necessary.
It's important to note that only Admins, Managers and Coordinators can review form submissions, even if an account without one of these roles is assigned to receive submission notifications.
Adding Questions / Items
After filling out the main settings for your form, you will want to click the button that says "Save and add items". This will save your settings here, and then automatically take you to the "Build form" tab of your form, where fields, questions, and text is added.
To add items to your form, drag the field type you want from the panel on the right over to the grey area on the left. You can also just click a field, but dragging it allows you to change the order.
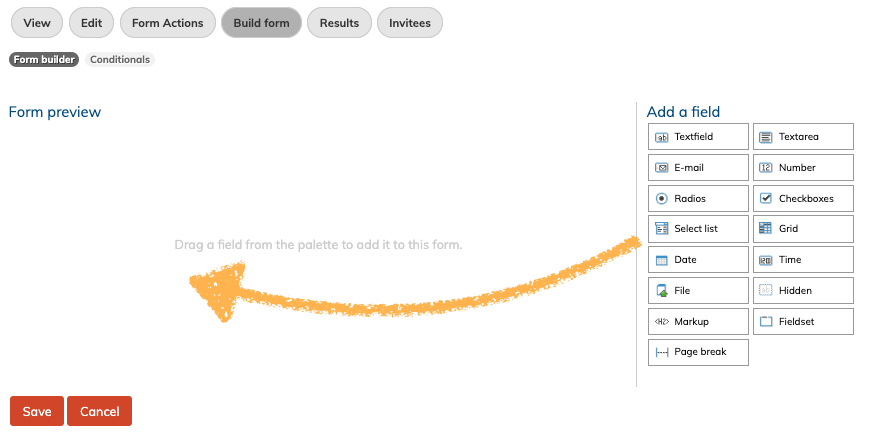
Items will appear with a generic title. Click the edit pencil icon on the right of the item to change the field titles and settings.
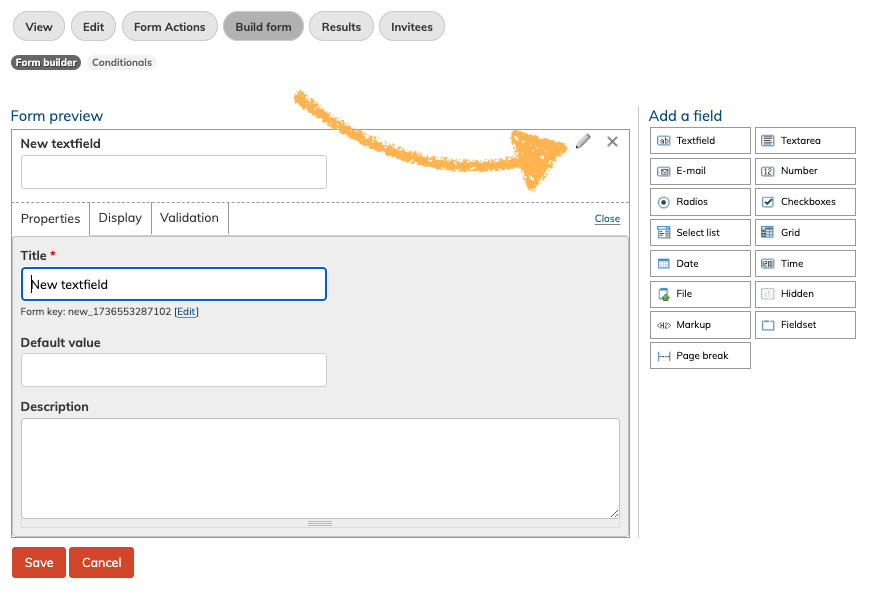
You can click through to the other tabs (Display, allowed values) to make further adjustments to the field settings.
Below is a brief description of what each field type allows you to do:
Textfield - a single line field for text entry. Example: Full Name
Textarea - multi-line field for for text entry. Example: Please leave a comment.
E-mail - a field specifically for collecting email addresses. This helps to ensure the email is formatted correctly.
Number - Allows for number entry specifically. Example: Phone number
Radios - Multiple choice format where only one answer can be selected. Example: Yes/No/Maybe questions.
Checkboxes - Multiple choice format where multiple answers can be selected. Example: "Select all that apply" style questions.
Select list - a multiple choice format where options appear in a drop-down style list. This is good for compressing forms with many questions as they take up less space. It is not as easy to read if the answer options are long or numerous.
Grid - a multi-choice format where the answers appear along the top of the grid (forming the columns), and the questions appear on the left (forming the rows). Users can click one column per row. Works well for multiple questions with the same answer options.
Date - a date select field.
Time - a time select field.
File - allows a user to upload a file.
Hidden - allows you to add notes that are only seen when editing the form. Great for reminders or internal notes.
Markup - allows you to add text with instructions, or information that your users need to read. Useful for including text from your membership handbook, or other terms that the user should read before answering questions.
Fieldset - A formatting option that allows you to groups questions together with a heading. It works well to place all questions in a fieldset to place questions on a white background.
Page break - allows you to create multi-page forms by adding a "page break" between two questions.
When you have added all your questions, be sure to click the save button.
Quick tips on question formats
- If you do not want a title, you can enter <none> in the title field
- You can add a single "checkbox" field item with a single answer that is a statement of agreement in order to have a user agree to a paragraph.
- When working with the markup field, you can use basic html for formatting your text.
There are lot of formatting tags that can be used in the "markup" form component, but here are some fo the most common ones:
<p> Your text </p> Paragraph spacing
Your text <br> Adds a line break after your text
<b> Your text </b> Bolds the text between the tags
<i> Your text </i> Italicizes the text between the tags
<u> Your text </u> Underlines the text between the tags
For more on html, click here
Advanced feature: Conditionals
"Conditionals" settings allows you to add an extra level of complexity to your forms. Essentially, if you want a specific question to appear when a particular answer is given for a previous question, you want to use conditionals.
Conditionals are located on the "Conditionals" subtab on the "Build Form" tab of your form.
In many cases these settings aren't necessary, and it's fine to have all questions display all the time, but it can certainly help simplify forms where not all questions are necessary in every case.
Click the plus to add new conditional actions. You can then choose your questions and the relevant answer, and then the following action.
You can test your saved conditionals on the "view" tab to make sure the actions are being carried out as you intended.
Test Your Form
It's wise to test your form before you release it into the wild! This is especially important if you're using any conditionals to control question appearance, or if you're using form actions to update profile information with your form.
try out your form to make sure it's collecting the information you intend, and you can always clear all your form submissions before you assign it to your members to use.
Embed a Form
The edit page for a form now includes a section to enable your form to embedded on a different. Your form must be saved first before you can enable the "embed" section.
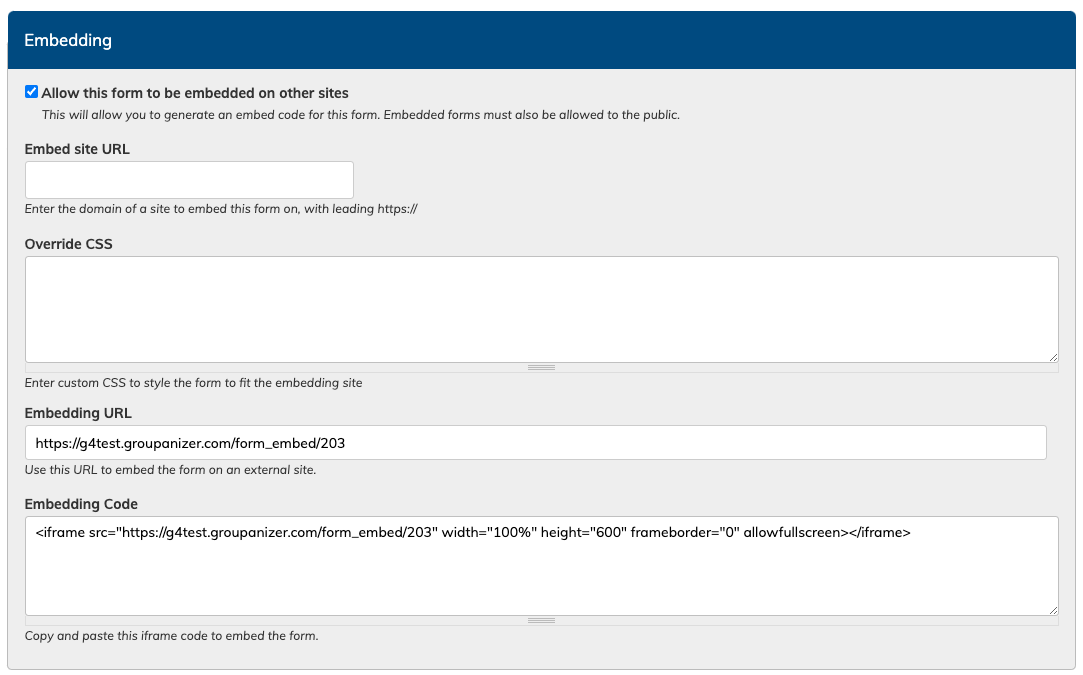
Your form must be set to "public" so that people can answer your form (this setting is higher up the edit page), and the embed will display correctly. You cannot embed a private members-only form.
You must enter the url for the site where the form will be embedded.
If you are familiar with CSS, you can add CSS to adjust the style and display of your embedded form.
Copy the embedding code text and place it on your site (usually using their embed options). How and where you embed that code will change depending on the website service you are using. People using CG public sites do not generally need to use the embed feature as forms can be displayed using the public url.
Demo Video of Form Embedding
Answering forms
Users who have been assigned a form will be able to access the form via their "Forms" menu item on the left. Users must be assigned a form to have access to it and receive notifications. If the form is just marked public, it will not appear under their "Forms" menu item, but they will be able to access it via the form's url.
When a form is assigned, they will receive a notification alerting them to a new form to fill out under the notification bell on the top right of the screen. If it's configured under the notification settings, they will also receive an email alert about the form.
If the Member dashboard includes the Forms block, the new form will also appear there.
Users will need to login to the site to fill out the form unless it is marked as public. Public forms are accessible to anyone with the url link to access it.
If a user is not logged in when they fill out a form (ie, it is public, but still assigned to users) then their response will not be linked to their account, and will not register it as their account's submission of the form.
Tracking form submissions
Curious about who has filled out your form, and who still needs to?
Forms allow you to see a list of all accounts (or anonymous members of the public) who have filed out your form.
On the Manage Forms page, you will find a list of all your forms. In the farthest column on the right, you'll find a fraction indication how many responses have been received out of the total accounts assigned the form.
Forms that are public and without assignees, there will be no "out of" formatting - it will just display the number of responses collected.
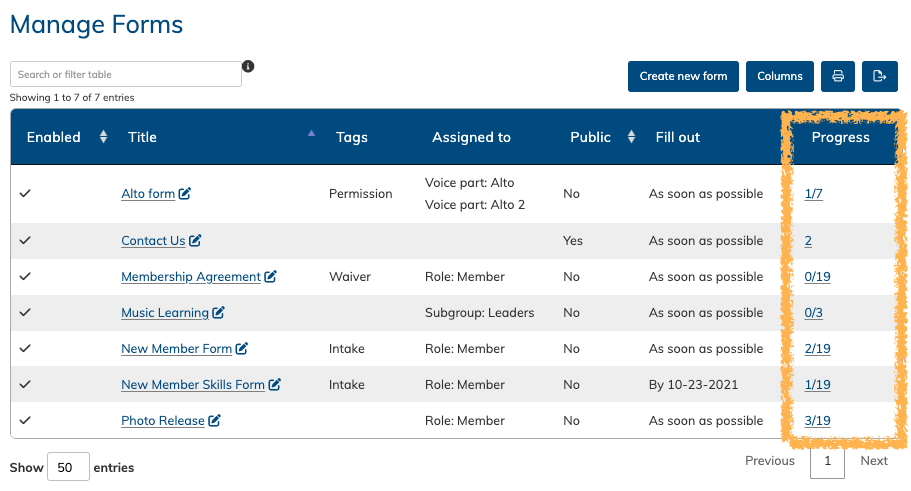
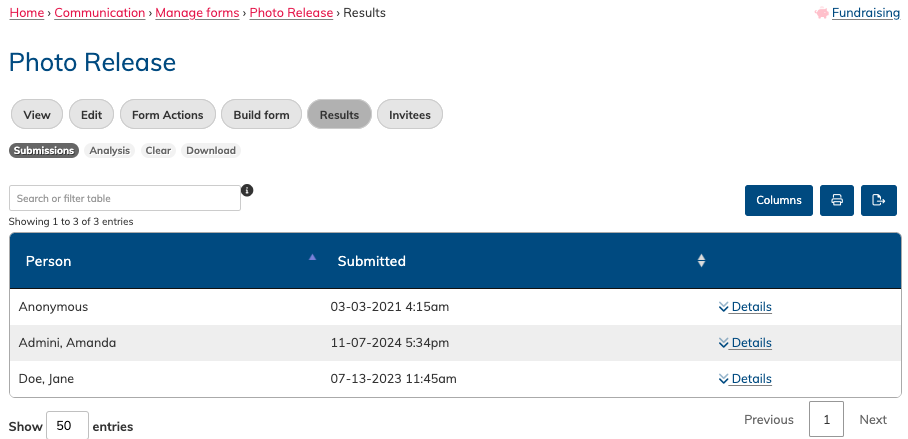
You can then click on the fractions in the "Progress" column, which will take you to the "results" tab of that particular form.
On this page, you will see a table of all the current submissions, and the date they were submitted.
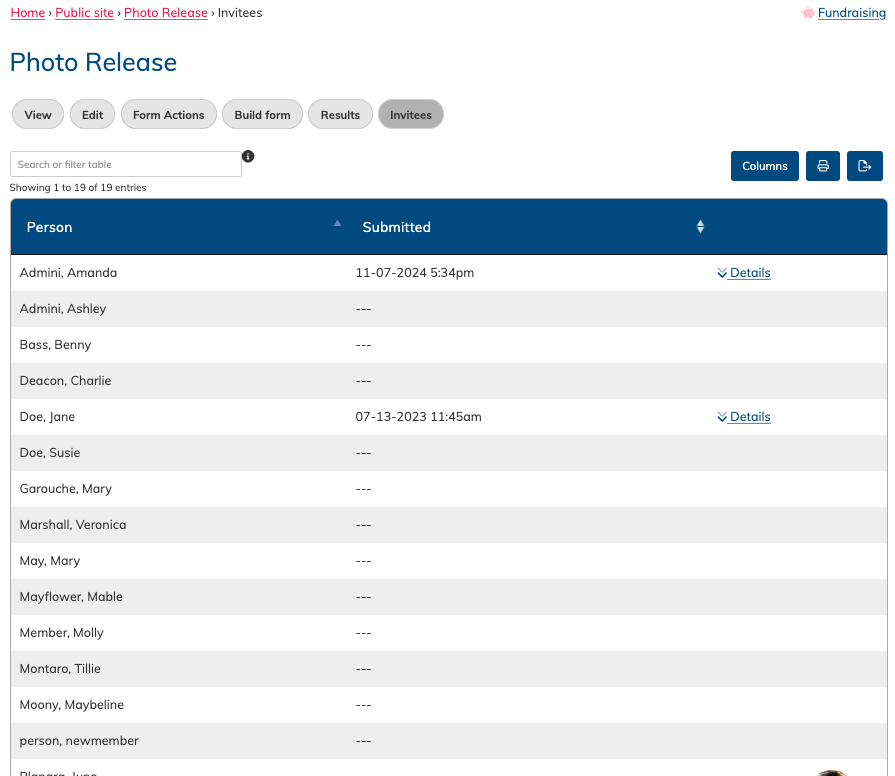
If you then click the tab labelled "Invitees", you can see a list of all those invited to fill out the form. You will see dates next to the names of those that have filled it out, or a blank entry if they have not yet submitted an answer. You can click the small arrows next to the "submitted" column to sort by that could and group submissions together. This makes it easier to find any missing submissions.
There isn't currently an automatic messaging option to reach out to those who haven't filled out forms, but as long as the notification option is enabled, they should receive reminders that their form submission is due.
Reviewing form results
On the form
You can review all the results on the "Results" tab of your form. Click the "details" link on the far right to view each individual submission.
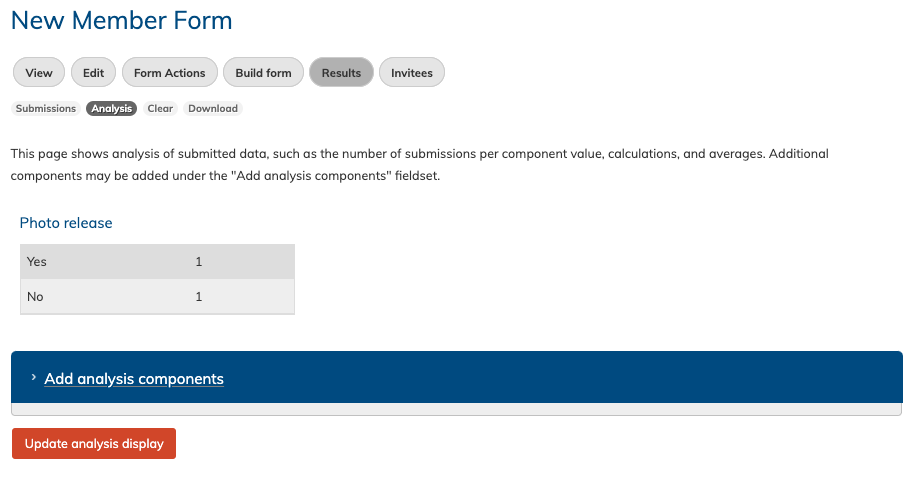
Other views for reviewing submission results include the "Analysis" subtab on the Results tab.
The page can show summary tables of submissions for collected data where this is possible, such as select options.
On a user's profile
When a user submits a response to a form, this is logged on their profile page. The link can be clicked on their profile to then be taken directly to that persons' submission.

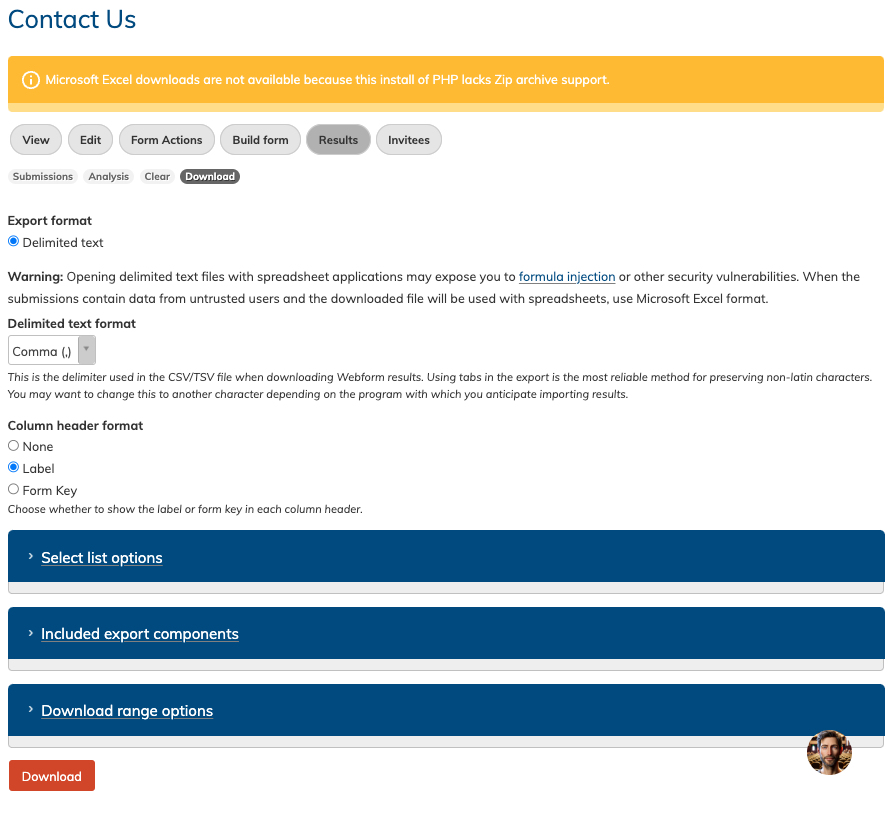
Download form results
On the "Download" subtab on the Results tab, you can download all current form submissions into a single file. CSV format is the most common, and works well with excel, or google sheets.
It's fine to ignore the message regarding excel. Export your file as comma delimited, and you will be able to open the file in Excel, or in Google Sheets, or Apple's Numbers.
Clearing all submissions for a form
This can be done on the "Clear" subtab on the Results tab.
This is a permanent action, and will remove all submissions for the form.
You may wish to do this to clear all old, out of date submissions and to collect all new ones, but please keep in mind that the old ones cannot be retrieved after they've been deleted.
You can delete a single submission by editing the form, and then choosing "delete". Keep in mind that this will permanently delete the submission.
ADVANCED FEATURE
Form Actions
Form Actions let you update member profile fields automatically when someone fills out a form — saving you time and helping you keep your member data up to date.
This is an advanced feature and takes a bit more setup and understanding of the profile fields within your site.
Read more about Form Actions here.