Choir Genius is a powerful software program designed to streamline your choir management tasks, and one of its handy features is the ability to import events effortlessly. Whether you're migrating from another platform or simply want to save time, importing events can be a game-changer. Follow this step-by-step guide to seamlessly import events into Choir Genius.
Step 1: Locate the Imports Area
Click on "Admin Tools & Settings" in the main menu on the left of your site. This option is only available to Admins. On the admin settings and tools page, look for the section called "Tools", near the top. Within this section is an option called "Import and Export" - click on it.
Step 2: Choose the Import Option
Click the link "Import" across from the the "Events" item in the table. This will bring you to the page where you can upload your CSV of events.
Step 3: Prepare Your Event Data
Before you proceed, make sure your event data is in a compatible format. Choir Genius supports the file type CSV (Comma-Separated Values). Ensure that your data includes essential details such as: event name, start date and time, end date and time, event type, and any additional information you want to import.
If you would like to import the event with the event invitations in place, that column data should be formatted as "[account set name] as rsvp"
The valid modes are:
- as rsvp
- as apply
- as required
- as invited (note: this is "add to calendar")
So, as an example, if you have a an event where you want Members to RSVP, and a subgroup called "Staff" to have the event added to their calendar, it would look like this:
Role: Member as rsvp,Subgroup: Staff as invited
Please note that the account sets need to be listed using their internal name, which is all lower case and does not have spaces.
If you are not sure, check the "vocabularies" page for the term - the internal name appears in parenthesis next the the display name.
On the Event import page, under the heading "Fields in this Import", you can see every field you can include within your CSV for events, including the preferred format of the data.
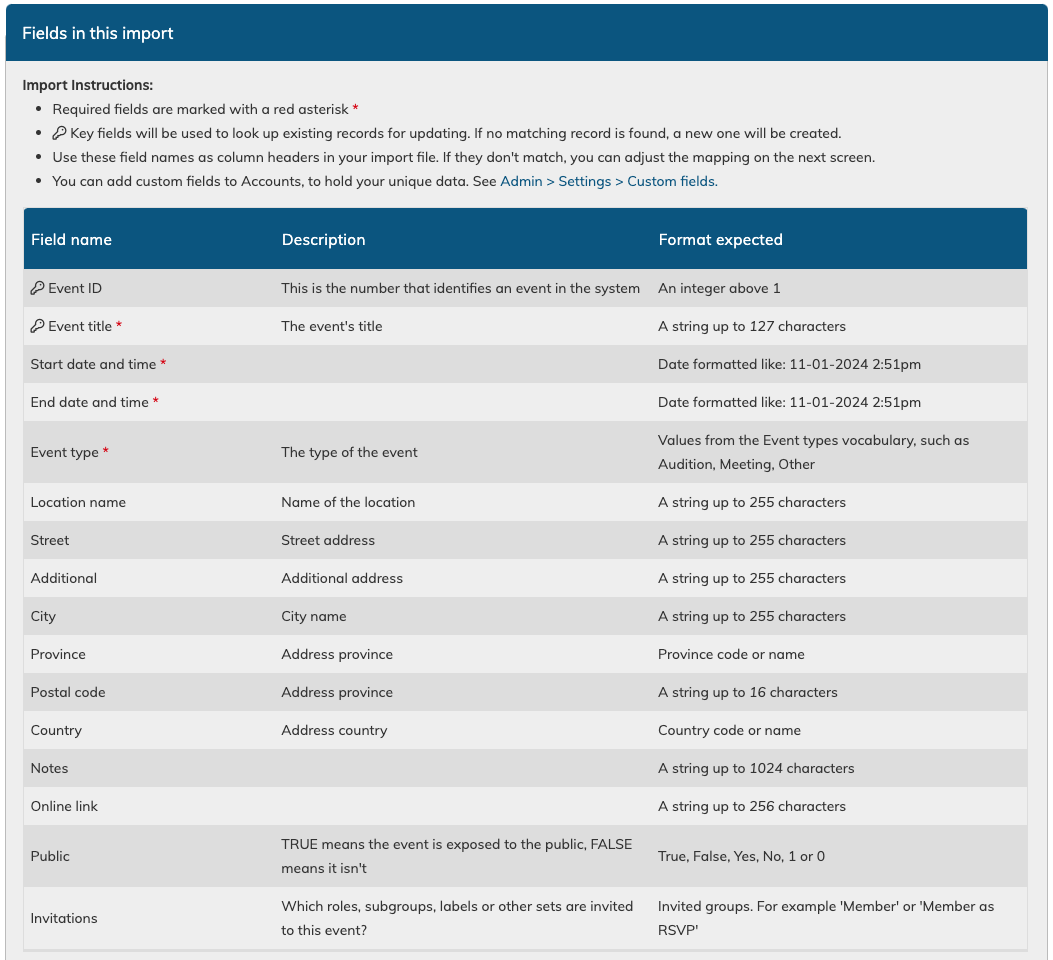
Your column headings in your csv should either match the available fields, or they should be clear enough that you know what's in them so you can map them to the correct field during import (Mapping columns in explained in step 5).
There is a link to download an events import template just below the field to upload your file. Even if you don't use it, it can be a good visual aid as to how best to format your file for a smooth import.
Step 4: Select Your File
Now that your file is ready with the correct information, you can upload it to the system. At the top of the page, you should see a "choose file" button. Click this button, and then select your CSV file from your computer. Next, click "Proceed to file test".
Step 5: Map Data Fields
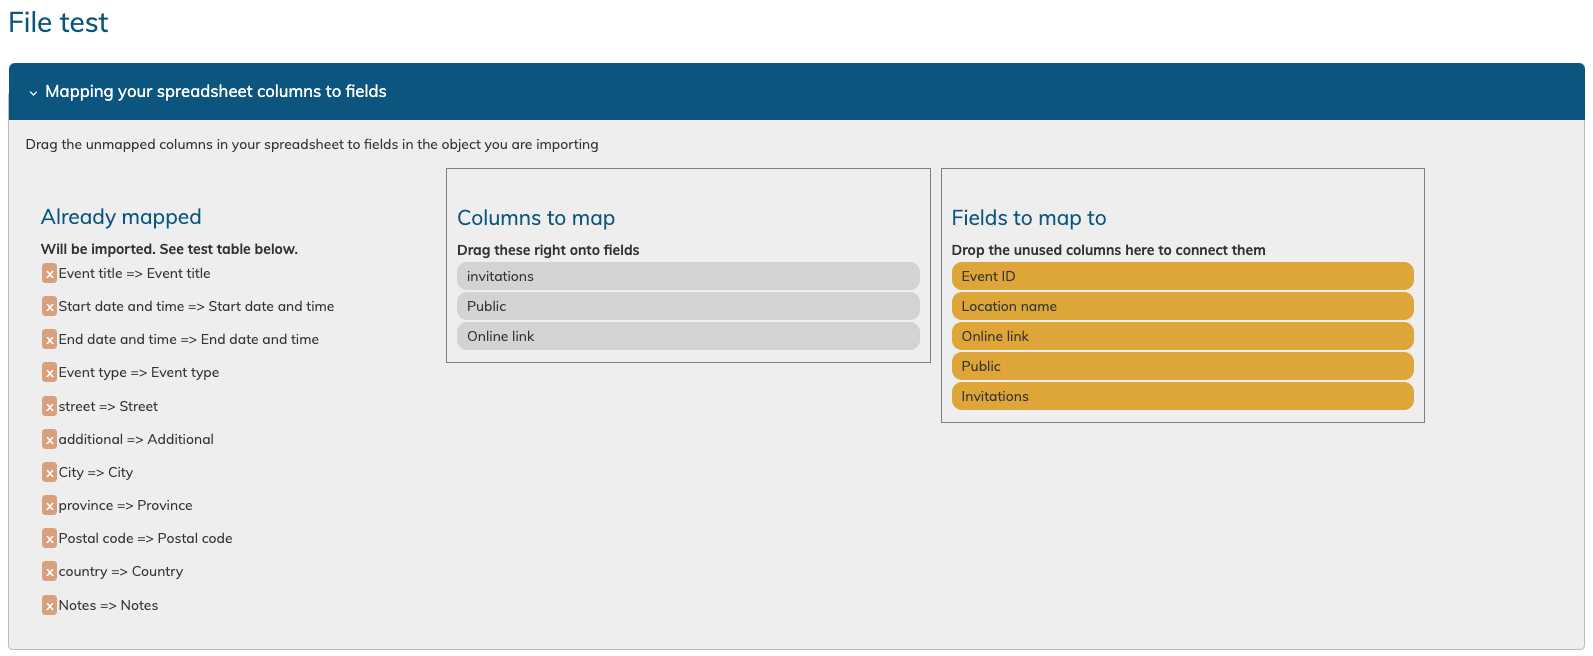
Choir Genius will now prompt you to map the fields in your file to the corresponding fields in the software. This ensures that the information aligns correctly. Match each column in your file (in the grey boxes) to the relevant Choir Genius field (in the gold boxes). You can do this by dragging and dropping the boxes.
e.g., match the "Event Name" column in your file to the "Event Title" field in Choir Genius.
Columns with exact-match headings to fields will map automatically.
When they are mapped, they will appear in a list on the left. You can click the blue x next to the mapped field if they are not mapped correctly to un-map them. You can also do this if you wish to skip importing an unnecessary column that was included in your file.
Step 6: Review and Confirm
Before finalizing the import, take a moment to review the mapped fields and ensure everything looks accurate. Confirm that all the essential information will be imported correctly.
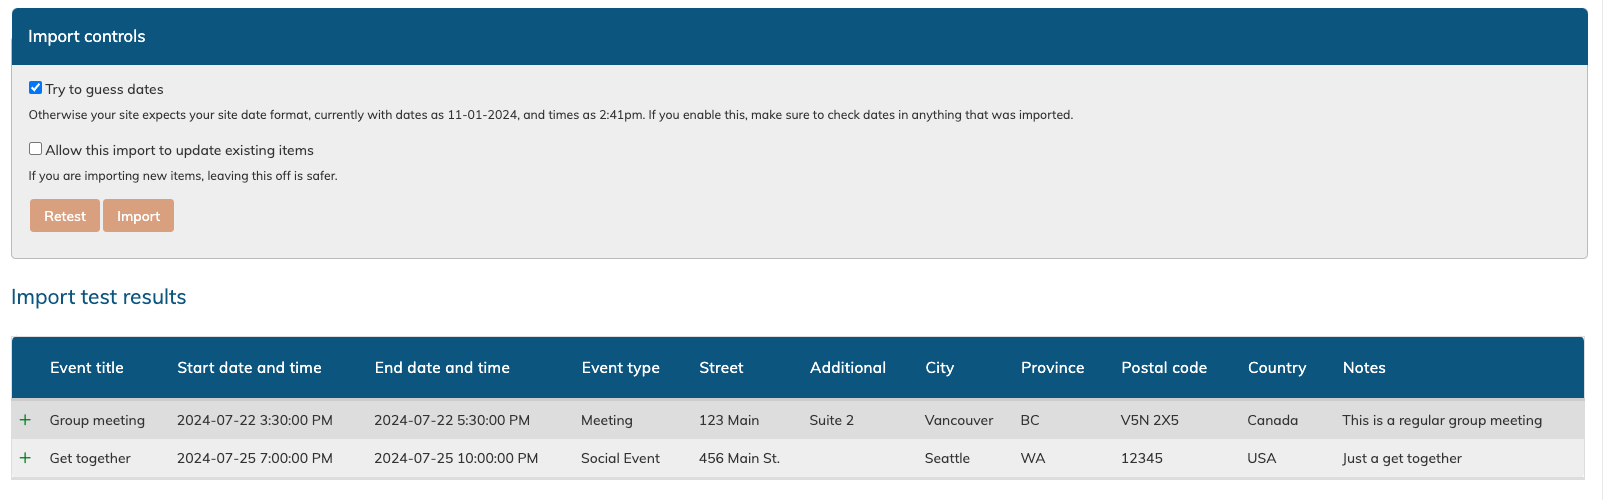
At the bottom of this page, the first 10 to 20 rows of data in your csv will be visible for review. issues will be highlighted in red. Hover over the red boxes to see the error. Date formatting is the most common issue.
Be sure to checkmark the option above the table titled "try to guess dates" to allow the system to match the date formatting to other possible formatting styles. This can save you a lot of time.
UPDATE: The system will now always try to guess the best dates, and this step is no longer necessary. the checkbox has been removed as of Dec 10th 2025
Only checkmark "Allow this import to update existing items" if you are absolutely sure it is okay to overwrite an existing event if there is an exact match. It is usually safer to leave this option unchecked.
If you make any changes to the mapping, be sure to click the "retest" button to review your changes.
Step 7: Initiate Import
Once you're satisfied with the mapping, click on the "Import" button to initiate the import process. Depending on the size of your file, this may take a few moments.
Step 8: Verify Imported Events
After the import is complete, you will land on Imported complete page where it will list every entry in the file, and the action taken, (inserted, updated, error). You can click on each record to verify that it imported correctly. If everything appears to be correct, you can accept the batch using the button, otherwise you can roll back the new records that were inserted. Note that updates to existing records cannot be rolled back.
You can also navigate back to the Manage Events section to confirm that your events are now listed. Review a few entries to make sure all details were imported accurately.
Congratulations! You've successfully imported events into Choir Genius. This streamlined process should save you valuable time and ensure that your choir calendar is always up-to-date.