- Summary
- Product types options
- Their basic settings and configuration
Product types
- Donations
- General
- Memberships
- Merchandise
- Tickets
Summary
Products types are used to allow you to sell various items in your Choir Genius storefront. Each product will have a type designation with specialized behaviours for that type. These include donation receipts, emailed QR code tickets, stock tracking, and recurring subscription billing.
Products have two main parts - their basic settings and configuration, and then their "versions" which allow you to have one product with different pricing or variations to select from. For example you could have one product that is for tickets to your upcoming show. That one product could then have three versions: One for general pricing, one for seniors pricing, and one for child pricing.
Below you will find an outline of the available product types and their general characteristics before delving into more detailed behaviours for each.
Product type options
There are 5 product types available in the store:
- Donations - collect donations, both one-time and recurring, with set or custom amounts.
- General - for items that may not fit another product type, such as non-refundable registration fees.
- Memberships - for purchasing memberships to your groups, both one time and recurring subscriptions.
- Merchandise - for selling items that may need to be delivered to the purchaser, and have characteristics such as colours and sizing, and tracking stock levels.
- Tickets - for selling QR code tickets to your event. Includes stock tracking as well.
Each one has their own set of features and capabilities.
When adding a product, you will first be asked to select the product type, which will then expand the page to reveal the settings options for that type, which are discussed below.
Settings and Configurations for all Product types
Every product type has some basic information and behaviour settings options.
BASIC SETTINGS
- A title [required] - this is the name of your product
- A category - this isn't mandatory, but you can select a "category" for your product if you want to link certain items together, perhaps by a subgroup they might pertain to, or if they are similar items (like uniforms, or they belong to a certain season). Categories are a vocabulary term within the system, and are fully customizable on the Admin Settings & Tools page.
- A product image - these are also not mandatory, but they help to visually spruce up the store page. Square images work best, 250 by 250 pixels.
- A storefront description [required] - tell your customers a bit more about your product. This is a great place for general details about the product. If your product has multiple versions within it, you can list details about the version in the version description field further down the page.
- Purchase notes - When a product is purchased, this information will be displayed to the buyer, and it will be included on their invoice. This is a useful place to include information that's relevant to only the purchasers of a product, such as reminders about parking at an event they purchased a ticket for.
- Requires another product - This is useful for adding non-refundable application fees, selling by donation, etc. The required product needs to be added to the system first in order to select it here. Only "general" type products can be listed as required. When a user adds the product to their cart, the required product will automatically be added as well, and a user will not be able to remove it.
BEHAVIOUR SETTINGS
- Enable this product for sale, so it appears in the storefront - checkmark this if you want this product to display on your site's "Storefront" page. Cases where you might want to leave this unchecked would be a special product that you only offer to certain users by assigning them an Order with an invoice, or if a product isn't active/available currently.
- Expose to the public / accounts with no role (only accounts with roles will see it if not checked) - This option allows you to select which products are visible to no-role accounts (the public). When check-marked, anyone with an account can see and purchase that product. When un-check, only those with roles (Member, Parent, Applicant, Manager, etc) assigned to their account can see the product in the storefront.
- Feature this product at the top of the storefront - This option highlights the product by placing it at the top of the storefront page. otherwise, items appear alphabetically.
- Suggest this product in the checkout flow - if this is check-marked, this product will appear in a suggestion box when a customer is going through the checkout process. It's often used for "last minute" reminders, like adding a donation option to their order. If a user already has a suggested item in their cart, it will not suggest that item again.
- Add tax to this product - be sure to checkmark this option if you need to collect tax on a product. Your tax settings can be configured in the "Store and commerce settings" area of the Admin Settings & Tools page.
- Allow offline purchase - This allows this product to be purchased with cash or a check/cheque. It will not force a user to enter a credit card in order to complete their purchase. When payment is received, an Admin/Manager can manually mark the order as paid. This option only works for Members.
- Trigger purchase notifications when this product is purchased - when check-marked this setting will trigger a notification to a selected set of users when the product is purchased. This can be useful for notifying when merchandise has been purchased. The main notification setting for purchases needs to be enabled on the "notifications settings" page. This is where you will choose who is notified. The same people are notified for any product purchased that has this setting enabled.
Donation Products
Description
Donation type products allow accounts to do just that - donate money to your group. Donations can be set amounts, or a version can be offered that allows a user to enter their own custom amount to donate.
Donations can be a one-time transaction, or, they can be a recurring subscription. They will recur automatically based on the selected timing options. Their start date will be the date of purchase.
Donations are a special product as they have special fields that occur during checkout to add extra information, such as an "in commemorations of" note, or the option to select that their donation be anonymous.
Admins can also set up the site to include a donation tax receipt for any donation purchase. Information on setting this up can be found here.
How it behaves in the store
Donation products require a title, a description, and at least one "version".
Donations can be a one-time purchase, or they can be billed on a recurring schedule, such as every year, or monthly. Id they are a recurring subscription, their start date and recurred date will be from the date of purchase. They will need to be cancelled by an admin to be stopped.
You can also set a label to be applied to the account that purchases a "donation" product. This is a great way to automatically note who within your accounts has donated. You could event set different labels for different donation amounts - as long as you are setting those donation amounts as different versions.
To allow customers to choose their own donation amount, be sure to checkmark the "buyer can set price" checkbox for that version.
When a donation product is purchased, the purchaser will be asked:
- if this donation is in commemoration of anyone
- if this donation should be earmarked for something in particular
- if this donation should be considered anonymous

None of these fields are mandatory. If filled in, this information will display next to the donation product on the order. It will also appear on the Donation Report.
After purchase, the customer will receive an invoice receipt via email. If you have set up your donation tax receipt settings, for charity information will also be included. You can read more about setting this up here.
Example scenario

Above, you can see an example setup of donation versions that include various pre-set levels, along with some "choose your own".
This example uses just the Donor and Patron labels, but you can create as many labels as you wish to help keep you organized.
The description fields below the version names can be used to help purchasers differentiate between the different options. If you want to list the different perks donors at different levels may receive, this is an excellent place to write them it.
Perks are not automatic, and will need to be manually managed.
General product
Description
General type products are your standard online store product, with no specialty behaviours. If the item you want to sell doesn't fit one of the other categories, it is probably a "general" product.
How it behaves in the store
General products require a title, a description, and at least one "version".
General products are the simples to set up, and the version options only include a name and a price option.
They are typically used for very simple one-time purchases, such as an application fee, or perhaps a deposit on sheet music.
After purchase, customers will receive and copy of their invoice via email.
Example scenario
Here is an example of a simple application fee being added as a general product.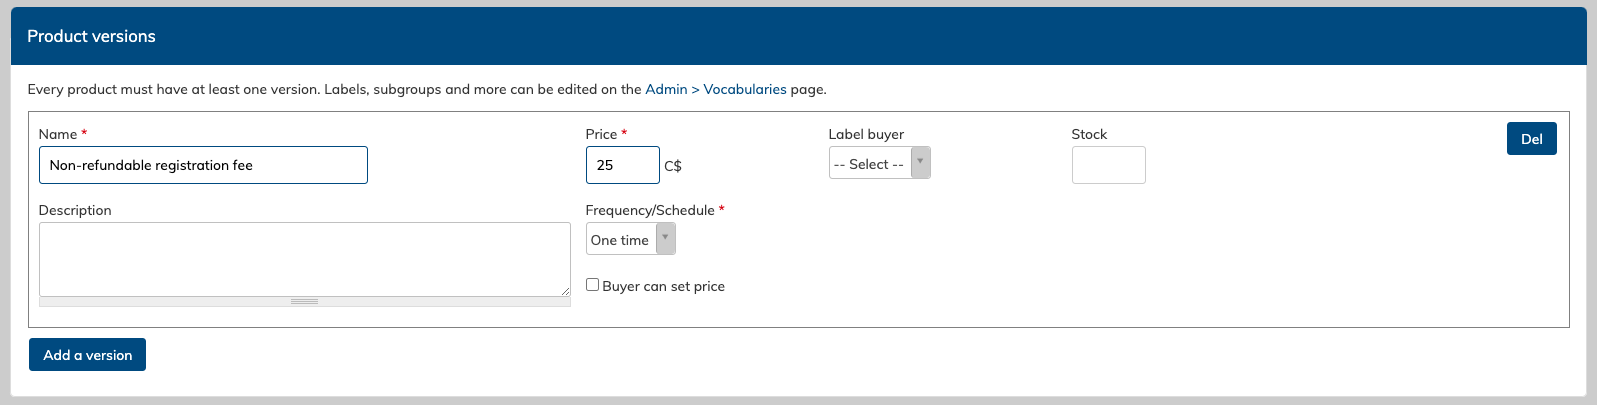
This items could be check-marked to be unlisted in the storefront, and then listed as a required product for a membership product
Other uses of "general products"
The store does not automatically add any shipping fees for products that could require delivery (such as merchandise). If you have products that require an extra shipping charge when purchased and you wanted to have it listed separately (instead of just having it built into the price of the product) you could add it as a general product. It could be named "Flat rate shipping fee" and then linked to your merchandise products using the "requires another product field".
General products could also be a fee for a camp, which you'd then want to list within the storefront.
Memberships
Description
Membership products are a very specific product designed to help streamline your registration process and to do a lot of the heavy lifting for you.
Membership to your group might be a one-time lifetime fee, or maybe your members pay monthly dues. This can be used for either, but you will want to configure the store settings to determine when and if membership purchases need to be approved before payment is collected.
Navigate to:
Admin Settings & Tools > Store and commerce settings
Scroll down to the section called "Membership policy" and select one of three options:
- all membership purchases require approval
- people without the member role require approval
- membership purchases do not require approval
People who purchase a membership where approval is needed are assigned the role of Applicant after checking out their order. This is so that you that you can assign them specific events, music or forms before they are approved. This is useful if they need to sign up for an audition time, fill out a more detailed registration for, or prepare a specific audition piece.
Admins can approve/deny a membership purchase using the buttons on the specific order, or the buttons in the "actions" column of the "manage orders" page in the Store area.
When approved, the purchase will go through and is payment is due, it will be taken using the card on the order, and the purchaser will be assigned the "member" role.
How it behaves in the store
Memberships require a title, description, and at least one version. Versions of a membership include settings for the price, billing frequency, "member type" designation, subgroup assignment, and a stock count.
Counting stock is not required and can be set to not be tracked, or you can select to track it at the overall product level, or the individual version level.
Memberships also have "date ranges", which allow you to assign a membership to a certain time frame, and can also control billing timing based on those dates.
You can add as many versions as you need. A general rule that works well is to have a product for each choir, and within that product, have a version for each payment option, such as one-time, annual or monthly billing.
Memberships will create invoices based on their subscription settings.
Below is the behaviour for membership subscriptions that do not require approval:
If no start date is entered, the subscription will start on the date of purchase and continue based on the selected timing until the end date. The recurring billing date will be the date of purchase.
If there is no end date, then the subscription will continue until the subscription is cancelled/ended by an Admin. If there is an end date, the order will continue to generate invoices based on the select timing until the end date has passed.
If the start date is in the future, automatic invoicing will begin on the start date. Invoices will automatically recur based on the select timing, following the day of the start date.
Example: if the renewal is purchased August 12, but the period start date is September 1st. The first invoice will be generated and charged on September 1st. If the timing is monthly, the next invoice will be created and charged on October 1st, etc.
If the start date has already passed, the first invoice will be created immediately, and it will include amounts for the time that has already passed according to the start date. The second invoice will follow the selected timing.
Example: If the period start date is September 1st and is set to bill monthly, but the renewal product is not purchased until November 15th, the first invoice will include billing for September 1st, October 1st and November 1st. The next invoice to be generated will be on December 1st.
Subscriptions will end once their end date has passed, or an Admin clicks to "cancel" the active subscription. The subscription status will switch from "active" to "done". The order will then be marked as "closed" (as long as there are no other active subscriptions within that order) and no further invoices will be generated.
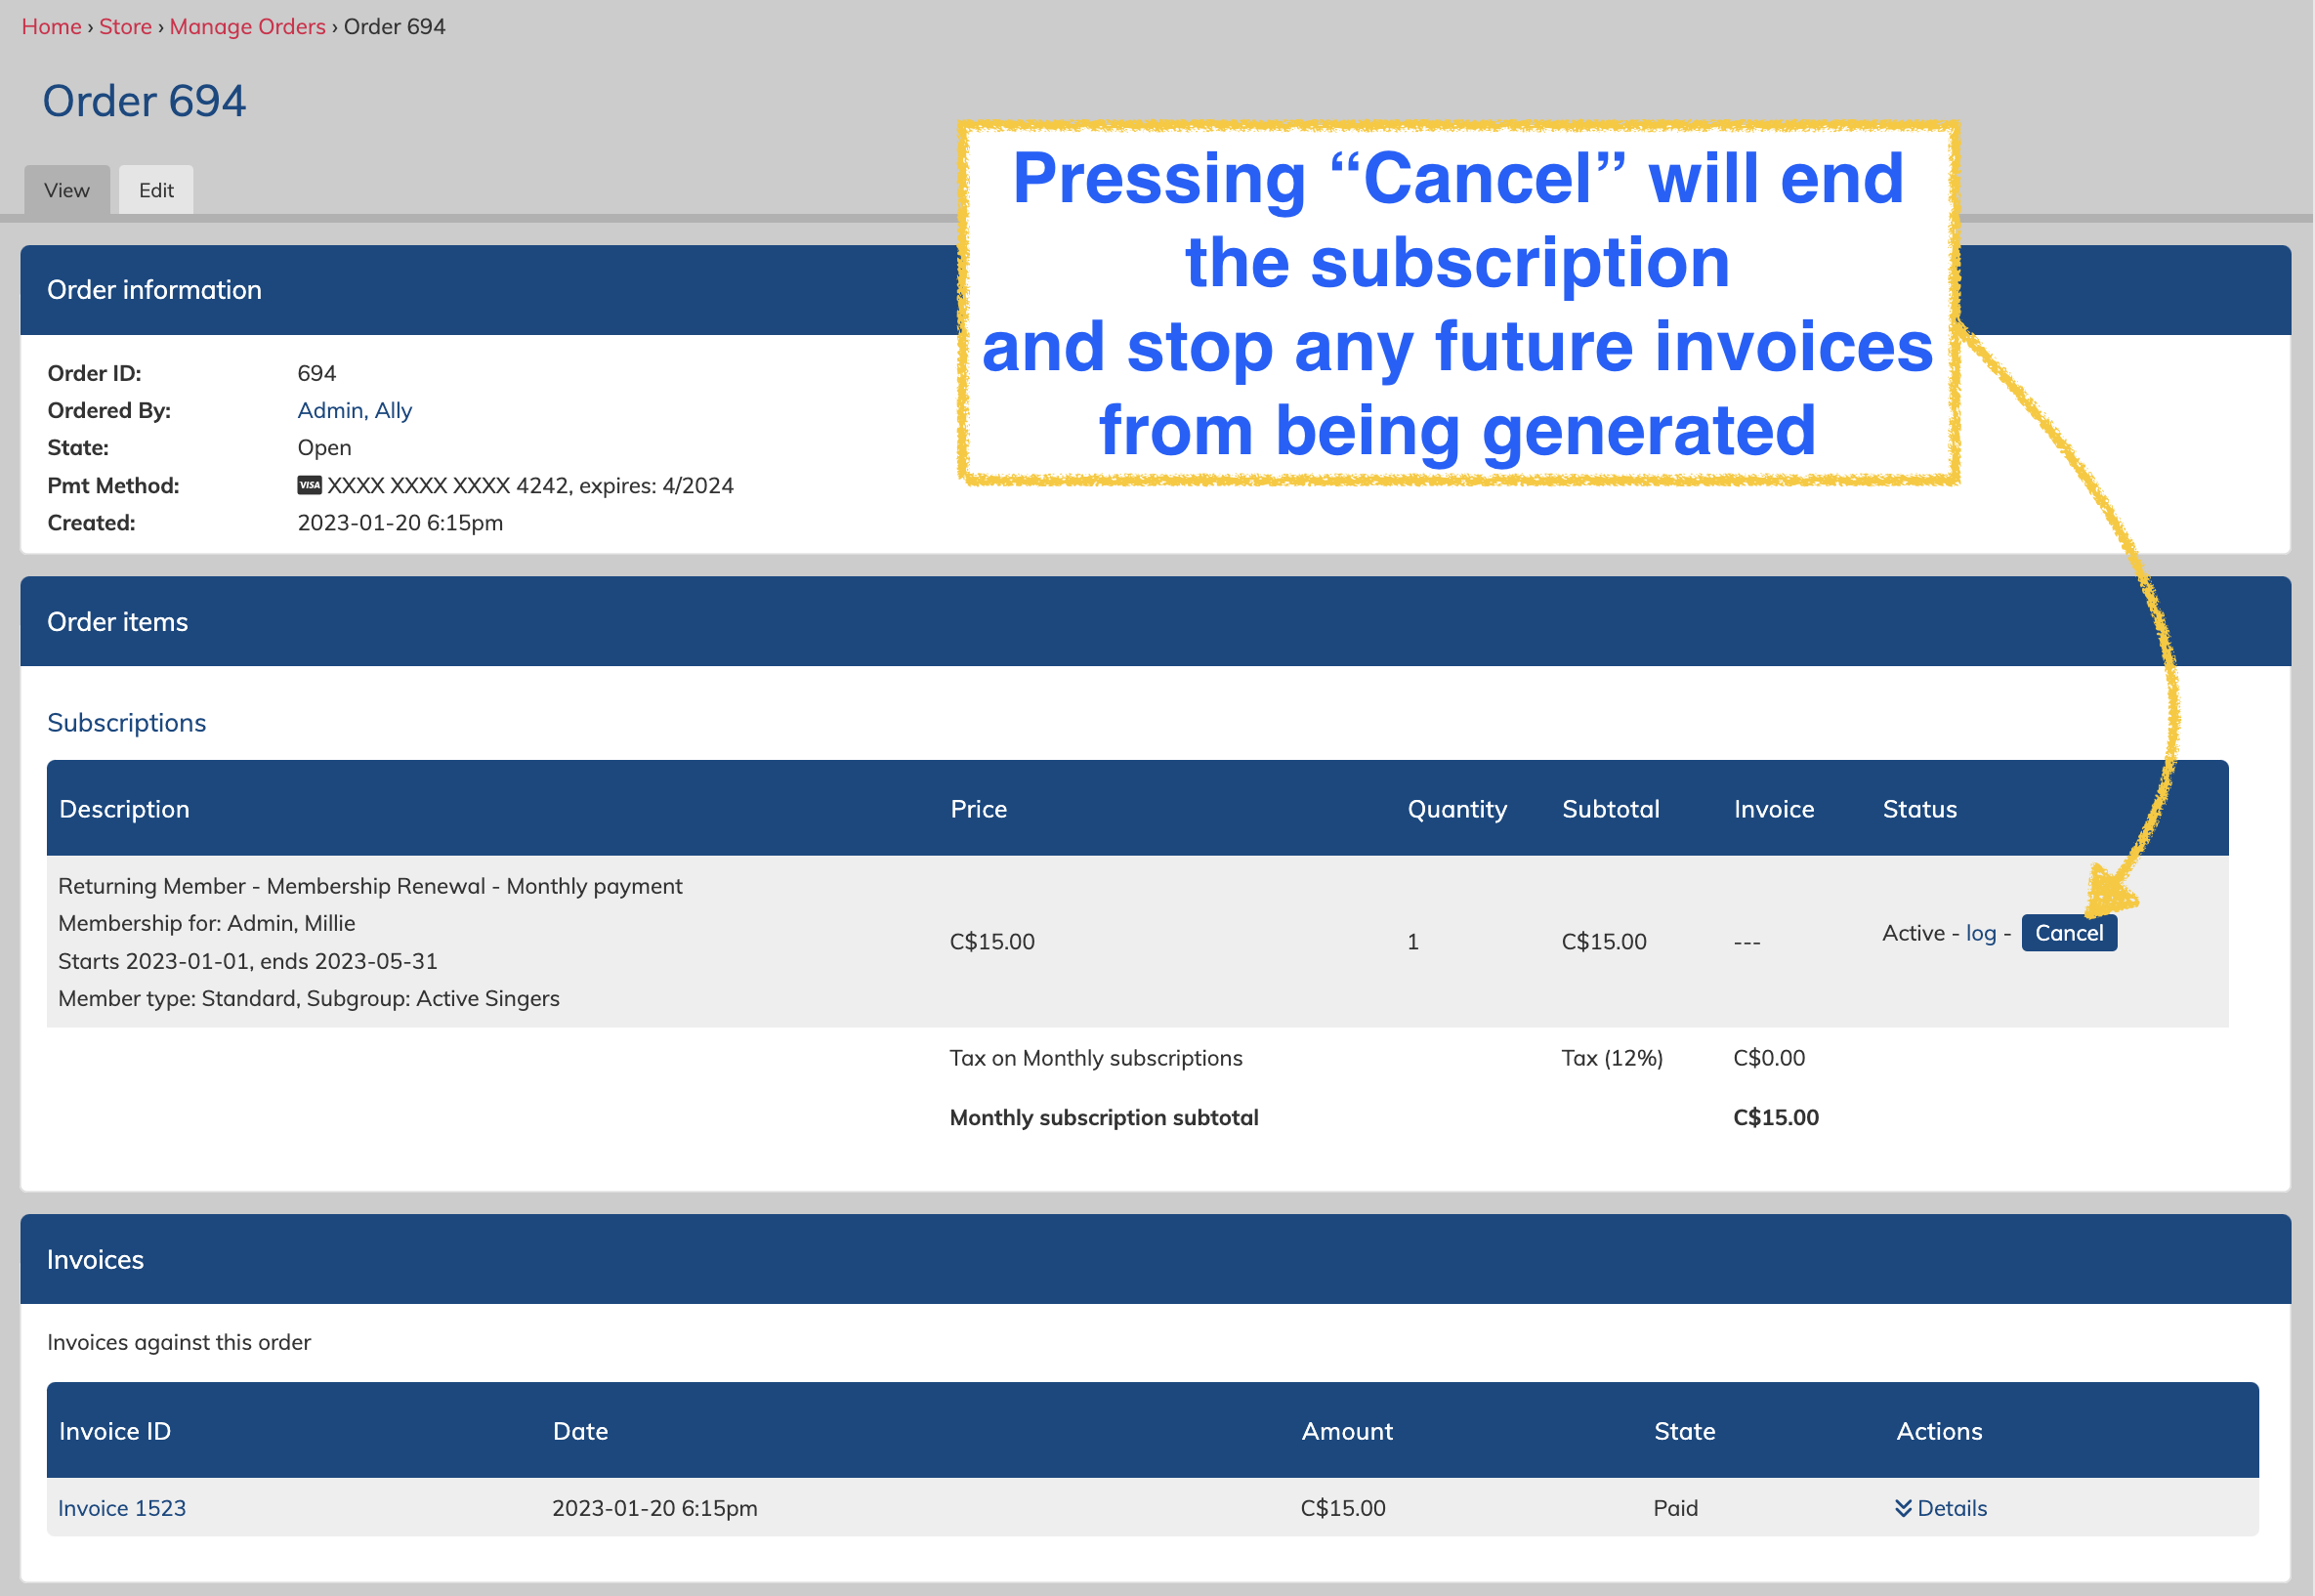
Cancelling a Membership subscription
Go to the order, and click "cancel" across from the membership subscription product. This will stop the order from generating any future invoices.
If an invoice was recently created but you do not need to collect payment on it, and Admin can go to the invoice, scroll to the bottom, and use the administration options to mark the invoice as "void".
Memberships that require approval will not create any invoices until approved. Once they have been approved, they will follow the same behaviour as listed above.
One-time payment memberships will always be invoiced immediately, regardless of what the subscription dates are (one-time payments are not a subscription).
If you want to collect one payment but on a specific date in the future, change the frequency to "annual" and make sure that the end date of the subscription is less than 1 year from the subscription start date. This order will require a saved card on the order so that the system can pay the invoice automatically once it it created on its billing date.
What happens when the date range ends for a membership?
When the period end date occurs, no further invoices will be created for that order, and no further payment will be taken.
The accounts "membership" will expire at this point, which will be listed on the "Memberships" tab of the "Manage Accounts" page.
The account's "member" role status will not change automatically, so access will not be revoked or change in any way.
This is to allow you to choose when access is revoked for you members, and to allow for more leeway between renewal periods.
If a membership does not have a period end date, then versions with recurring billing will continue until the subscription is ended by an Admin, and the membership will never be listed as "expired".
Example scenario
Here is an example membership product where there are two options - a one time annual feel, or a monthly fee.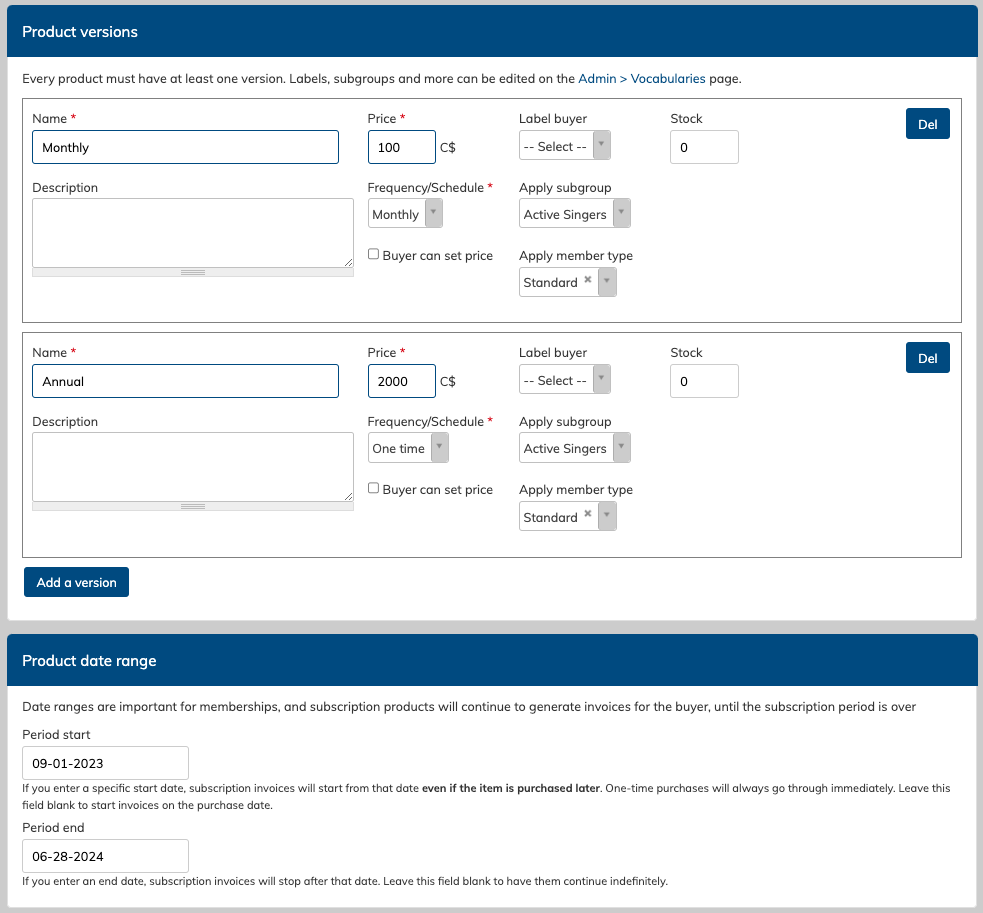
The monthly fee will begin billing on September 1st and continue on the first of every month until June 28th. June 1st will be the last billing day.
The one time fee will be billed immediately when purchased.
Refer to the section above about memberships and subscriptions for more information on billing timing.
The subgroup assignment has also been set for these versions, so purchasers of this item will automatically be assigned the role of member, and the subgroup "Active Singers".
The member type is "Standard" which i an internal designation to help categorize membership records in case some accounts have a different level of membership. These do not relate to any changes in access, but it does classify their membership record so when reviewing the data, you can easily see what rate was paid for historically.
Member types are a vocabulary term list that can be customized by Admins on the Admin Settings & Tools page.
All of these versions will be available for members to select from if the main product is listed for sale in the storefront. Specific versions cannot be made available to only certain users.
Admins also always have the option of cancelling and refunding any incorrectly ordered items through the "Manage Orders" page.
Membership records
Membership records are generally displayed in two places:
1) an accounts profile
2) on the "Memberships" tab of the "Manage accounts" page.
Profile view:

This view shows a member's history with your group, noting the dates of membership, the member type, and the subgroups.
Manage Accounts page view:
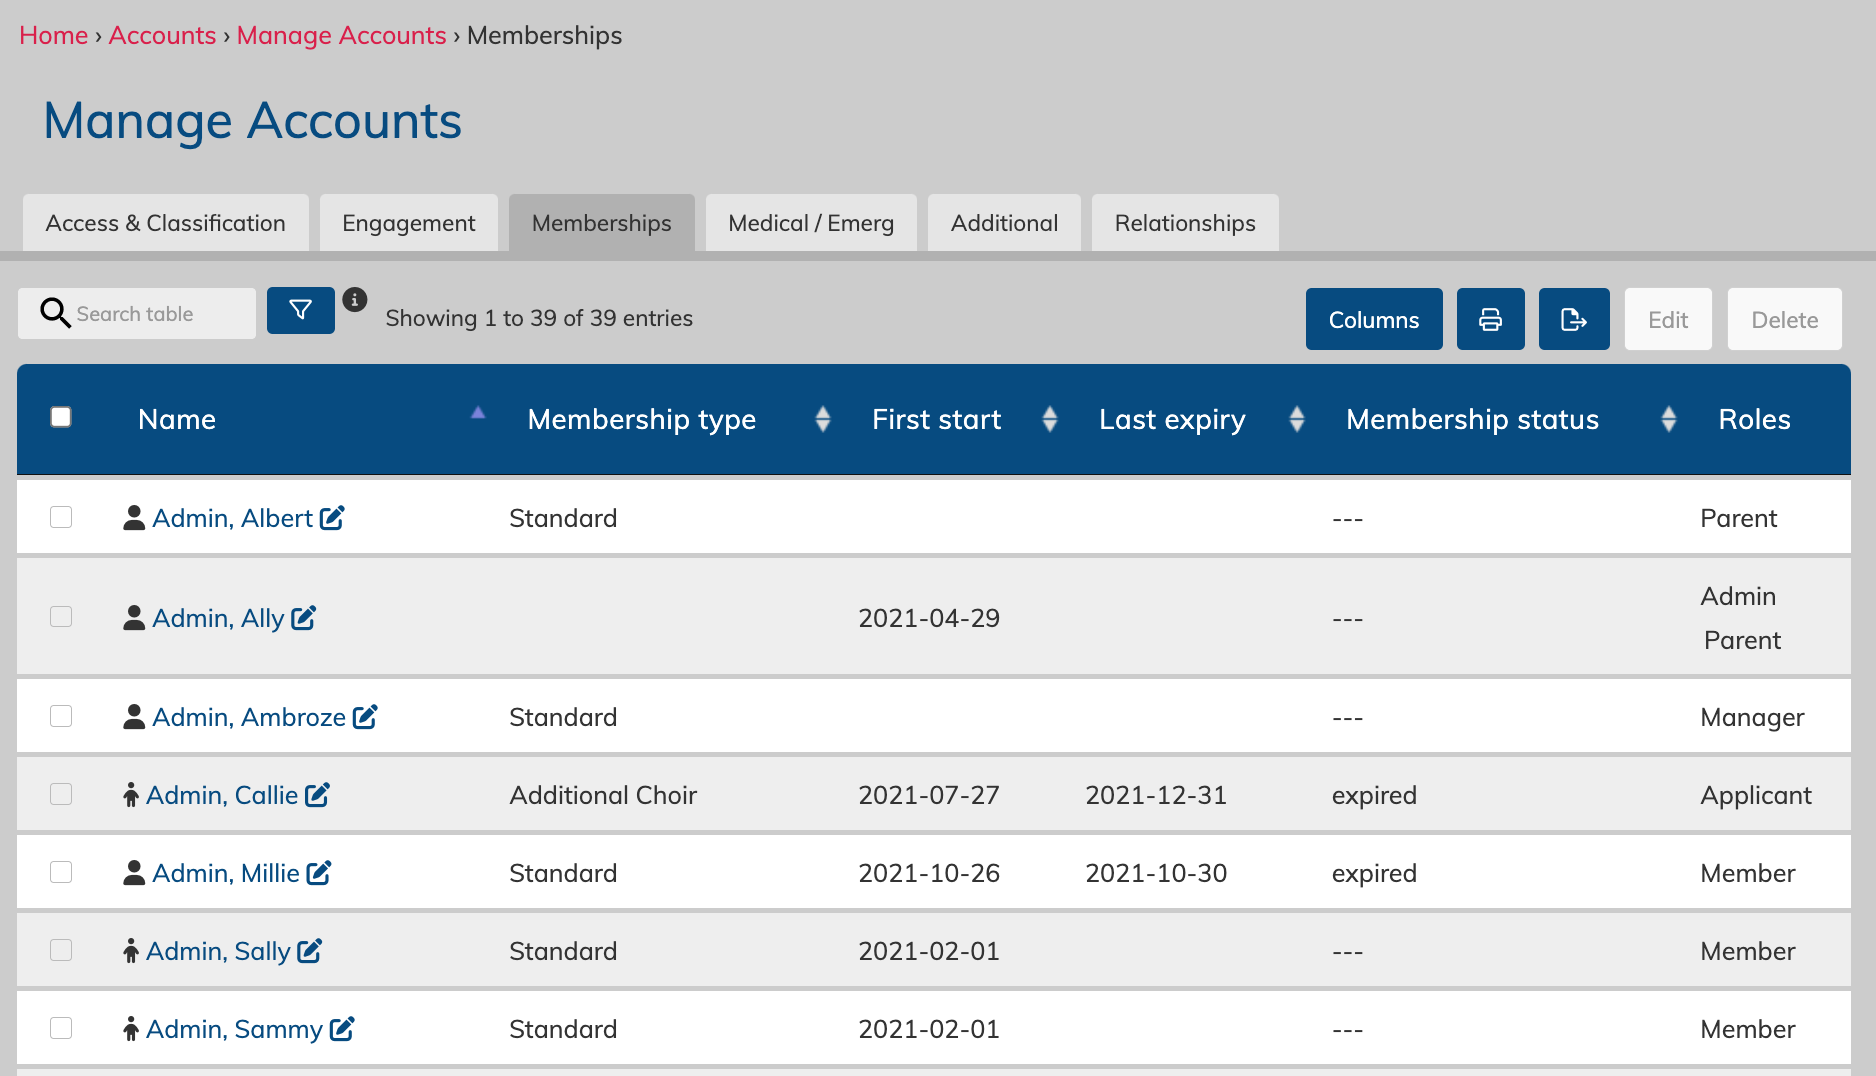
This view shows the last membership record for all accounts within the system.
Merchandise
Description
Want to sell an item like t-shirts, bags, or cds? The merchandise product type allows you to have one listing with different versions which can be used to list different colours and sizes of an item all on one page. Like all product options, stock tracking is also available.
Merchandise items have an automatic "deliver" status as part of the ordering process. After any merchandise item is ordered and paid for, Admins and Managers can click a "deliver" button on the order on the "Manage Orders" page to mark that item as successfully delivered to the customer.
How it behaves in the store
Merchandise products require a title and a description, as well as at least one version with a price.
A product image is highly recommended, although it should be noted that there is only one image available, no matter how many versions you may be offering under the product.
Merchandise product versions allow for colour and size descriptors, as well as stock tracking. You can track stock at the version level, or, overall. When purchased, stock will automatically decrease as items are purchased (if tracked) and the remaining total will display in the storefront.
However, there is a setting on each product type to be notified when an item is purchased. This is often useful for merchandise purchases.
During checkout, the purchaser will be asked for their address. If they always have one on file, it will ask them to confirm it. This is done automatically for all merchandise product types to ensure an address is on file for delivery.
When a merchandise item is purchased and paid for, it will have its status marked as "Deliver" on the "Manage Orders" page.

When you have delivered the item to the customer, you can click the "deliver" button to mark the item as "done".
If all items within the order are then done, the order status will change from open to closed.
If an item is refunded, stock will increase accordingly if the stock is being tracked.
Example scenario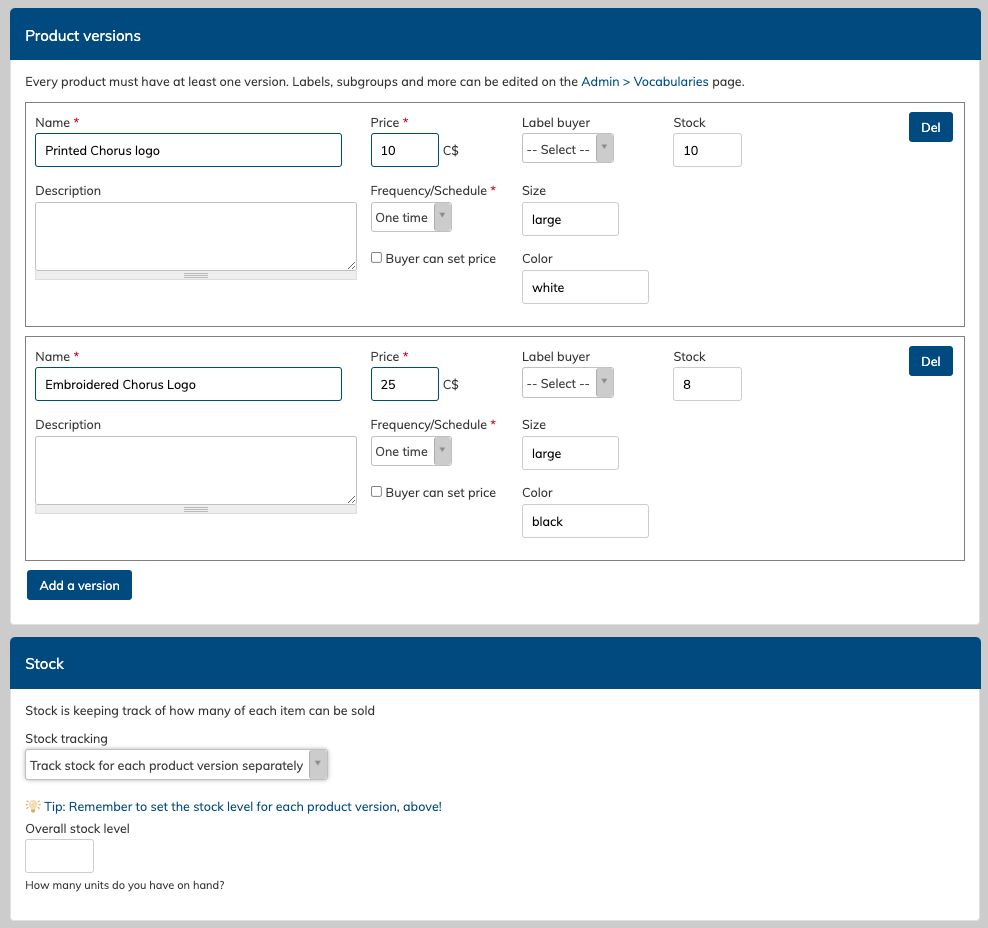
This example is for a canvas tote bag with two options - one is a large white tote with a printed chorus logo, and the other is a large black tote with an embroidered chorus logo. The title of the product is "Canvas tote".
In the example above, the stock is being tracked at the version level. This is usually necessary with physical merchandise items where each version will have its own stock number.
Remember that required products cannot be removed from the cart. If the delivery fee is only necessary if an item is going to be delivered/mailed but most will be handed out in person, then perhaps make the general product "delivery fee" suggested in the checkout process for those that need it.
Tickets
Description
Ticket products are attached to events, and allow accounts to purchase a ticket to your event. They receive an emailed copy of their ticket with a QR code that can be scanned at your performance using a QR scanner and the "Ticketed event check-in" page.
How it behaves in the store
Ticket products require a title, a future event, a description, and at least one version with a price. The event must be in the future.
You can track stock at the version level, or for the ticket product as a whole.
Tickets cannot be sold based on a seating chart, but you could sell tickets within a particular block of seats using the versions, and use the stock to limit the number in each section.
During checkout, the user will be asked for a name for each of the tickets being purchased, or they can select to use "guest of _____". The tickets are tied to the purchaser, but also list the name assigned to each ticket allowing for smoother check-in at the event.
When purchased and paid for, an invoice is sent to the purchaser, along with an emailed ticket with a QR code for each ticket purchased. If an account purchases multiple tickets, each ticket will be emailed separately so that the tickets can be forwarded by the purchaser to the appropriate recipients if the need arrises.
At the event, attendees can present their ticket to be scanner with a QR code reader, or the code can be entered manually on the Ticketed Event check-in page to mark them as present.
All tickets for an event can be reviewed at any time within the Manage Orders page, or on the Tickets tab of the event.
Example scenarios
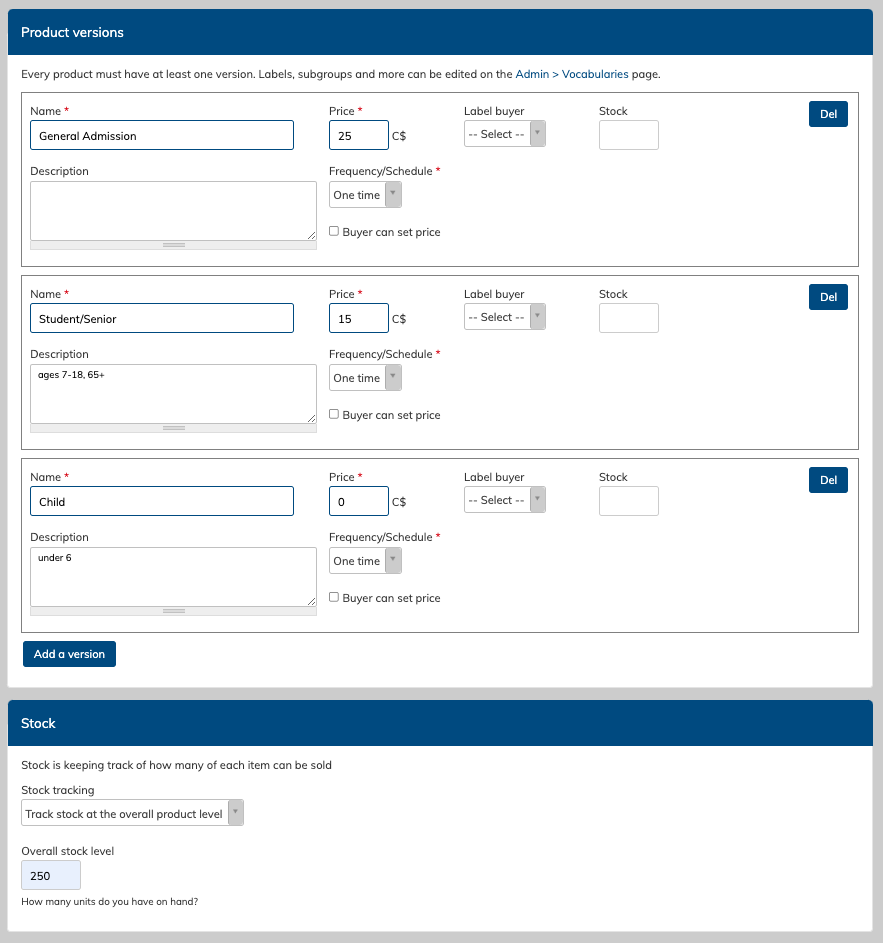
This ticket example displays a setup that will allow 250 tickets in total (stock is being tracked at the overall level, and purchasers can choose either a general admission ticket, a student/senior ticket, or a free under 6 child's ticket.
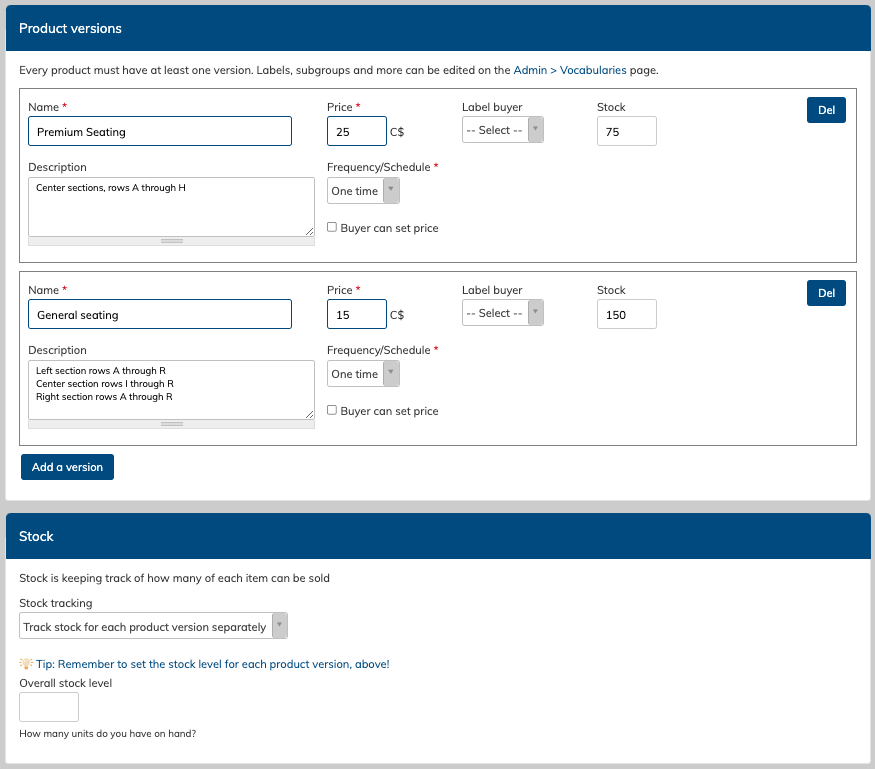
In this next example, stock is set at the version level to allow for limits on a certain number of tickets per version to be sold. This example is selling "premium seating" for seats closer to the front, and general seating for the rest of the auditorium.
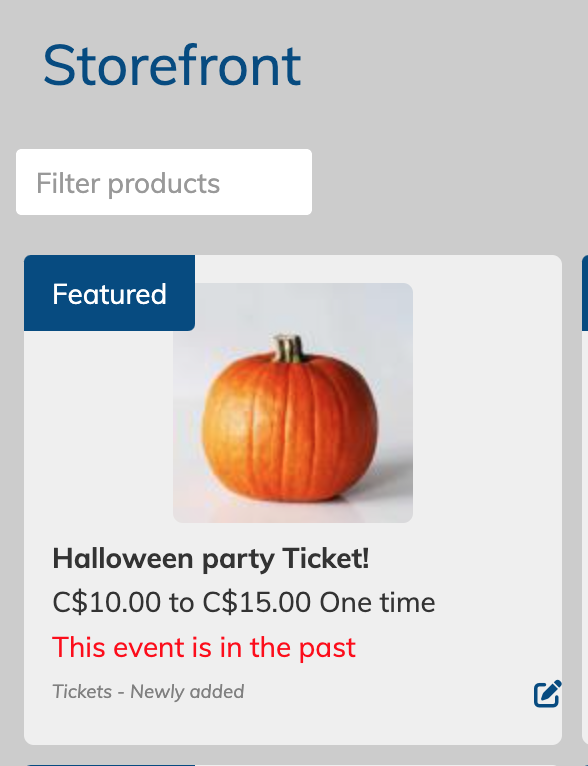
When an event date passes, tickets will no longer be sold in the store. That product should then be disabled for sale by an admin.
If stock on a ticket reaches zero, no more of that ticket will be sold.
If a ticket is refunded, stock will be increased accordingly. Refunded tickets cannot be used at the event, and will not work on the Ticketed Event check-in page.
Ticket check-in
The following roles have access to the Ticket-check in page within the site, and the Ticket check-in function via the CG app: Admin, Manager, Coordinator, and Assistant.