- - Summary
- Video
- Enable / Disable the feature
- Customize the welcome message / track page message
- Create a Registration Track
- Setting Up Registration for a Community Choir (Adult Members)
- Setting Up Registration for a Children’s Choir (Family Registration) or a Multi-Choir Society
- FAQ
The Registration System in Choir Genius 4
Welcome to the all-new Registration System in Choir Genius 4—designed to make sign-ups smooth, customizable, and stress-free for you and your members!
It is not available for Conductor level licenses.
Whether you're managing an adult community choir, a children's choir, or anything in between, this new feature is built to handle your unique needs from the very first click.
Why We Built This
Before this update, registration typically involved:
- Sending people to the store
- Notifying them to update their profile
- Manually chasing down missing forms and info
It worked, but let’s be honest—there was a lot of room for improvement.
The new Registration System simplifies everything by bringing together:
- Collecting important profile information
- Filling out mandatory forms
- Membership payment collection (with various payment plans)
...into one seamless, intuitive flow. That means less admin work, fewer mistakes, and a better experience for everyone involved.
Feature Overview
Here’s what you can do with the new Registration System:
-
✅ Custom Welcome Page
Each registration process starts with a branded welcome page you can personalize for your choir. -
✅ Individual & Family Flows
Register adult singers or entire families (ideal for children’s choirs). -
✅ Support for New & Returning Members
The system handles both with ease, no matter their history with your choir. -
✅ Multiple Registration Tracks
Use “tracks” to show different products, forms, and options to different groups of people. -
✅ Custom Forms per Track
Ask the right questions at the right time, depending on the registration type. - ✅ Database Integration
Every registration automatically syncs with your member database. No double entry required.
Once configured, registration runs itself. Sit back and let the system handle sign-ups while the money flows into your bank account.
Video Overview
Enable / Disable the Registration Feature
To enable or disable the registration feature, go to:
Admin Settings & Tools > Registration
Click to checkmark, or uncheck the the "Enable Registration System" setting.
When this setting is enabled, new and returning users can register for your choir/chorus using the configured registration tracks. A link will appear on the login page, and in the menu (internal, and public).
Reminder: The registration feature is only available for Team level subscribers and above. It is not available for Conductor level licenses.
Customize the Landing / Welcome Page and Track Message
Customization options for your landing / welcome page message, as well as the text that appears on the registration track selection page can be found on:
Admin Settings & Tools > Registration
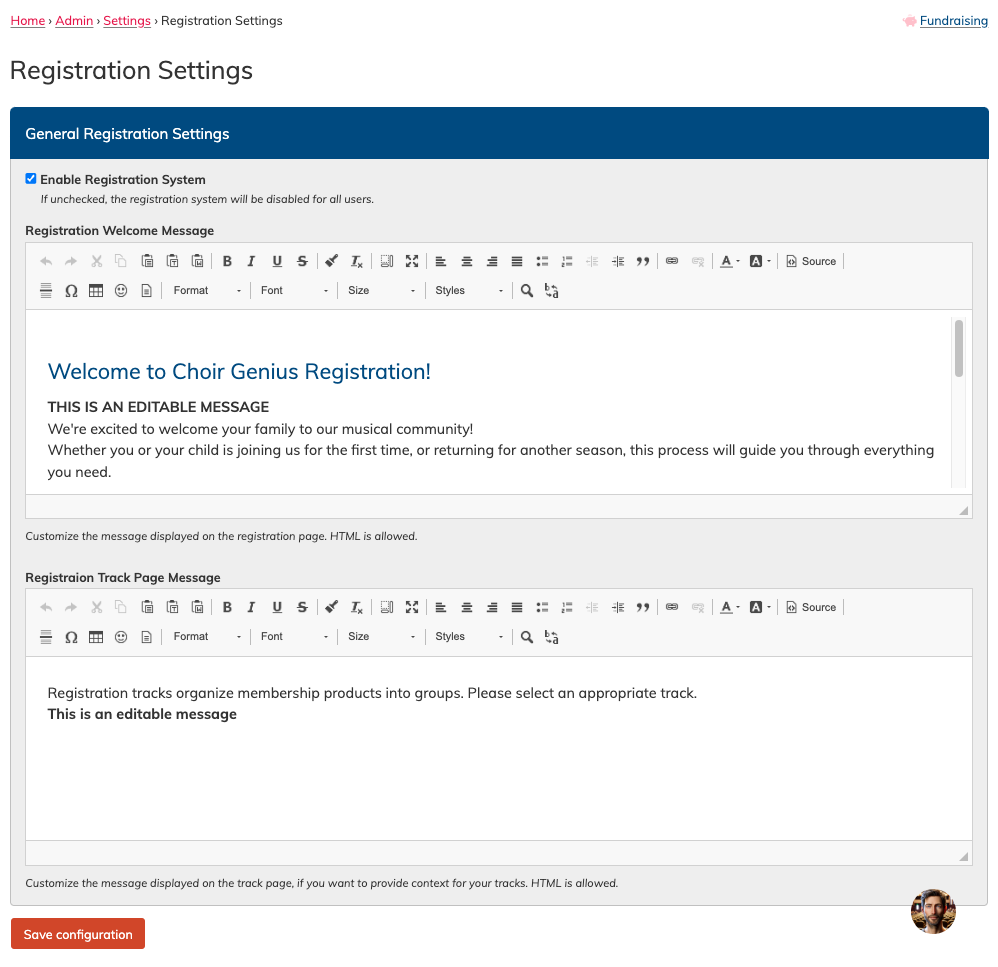
The Welcome message appears on the "Registration" landing page, which the public can see. It's a great place to provide instructions and guidance bout registering for your choir/chorus.
The Registration Track page message appears after login, and appears above the list of available tracks. If You only have one track configured (and therefor it will be auto-selected) then it will not be visible. It is useful for adding contacts when users need to choose between various tracks.
Create A Registration Track
Registration tracks are used to provide a workflow for your members. Tracks contain settings (public vs members only) a as well as product selections and required forms.
You can have one track - which will be auto-selected for anyone who registers. Or, you can have multiple tracks, and let your singers choose the right one for them. Multiple tracks are most common for children's choirs, or multi-choir/ensemble organizations.
New Workflow: Create a Registration Track (Effective Friday, August 29, 2025)
Release date: Friday, August 29, 2025.
This section documents the updated workflow for creating registration tracks.
Where to Start
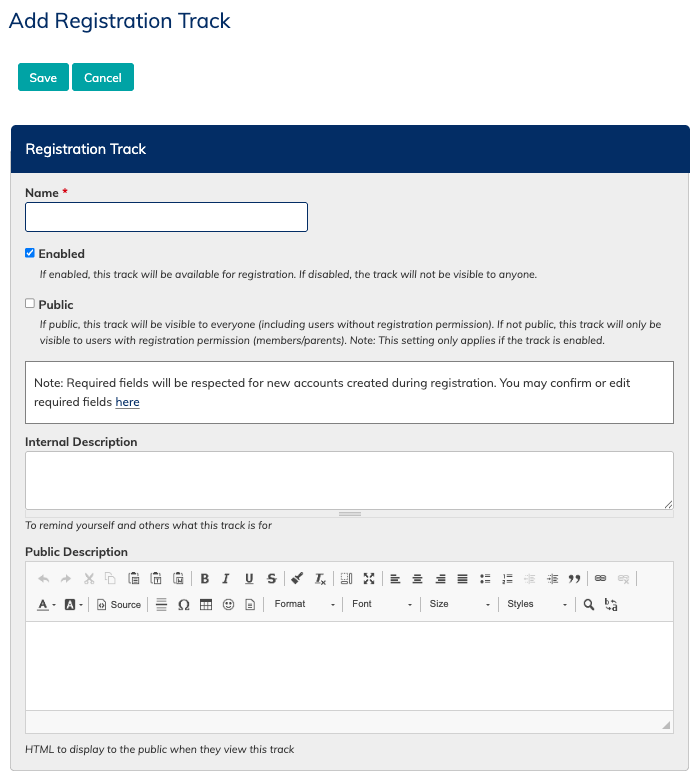
Go to People ▸ Registration Tracks and click Add New (the + icon).
Step‑by‑Step Setup
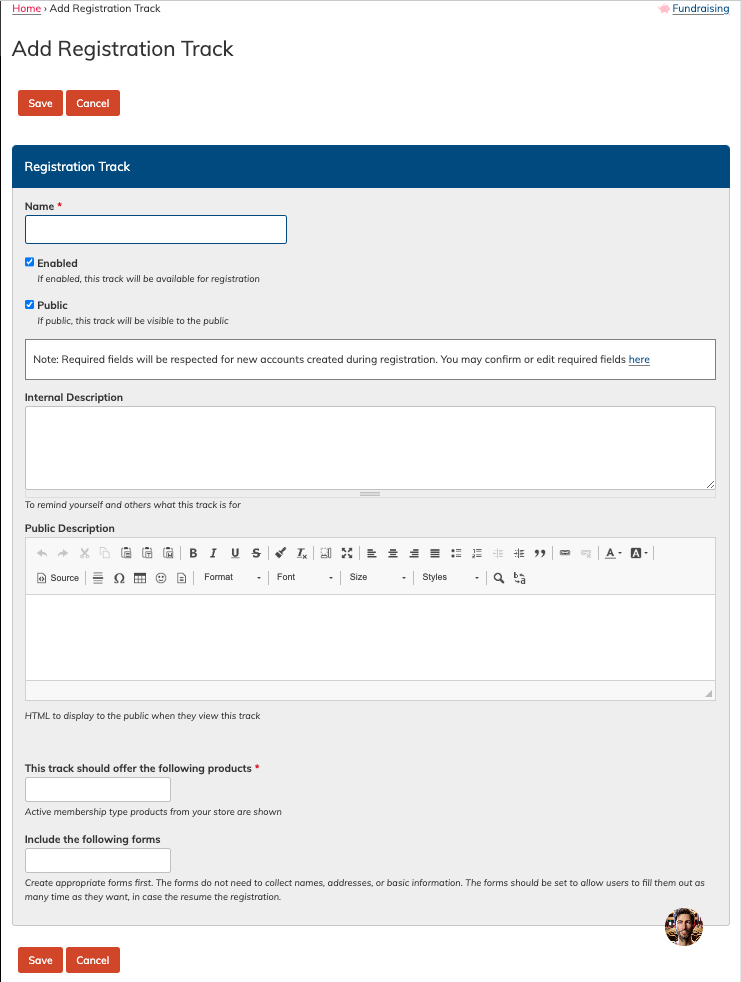
1. Registration Track basics
- Name (required) — visible to registrants on the track selection page.
Enabled — when checked, the track can be used for registrations.
Public — when checked, the track is available to all users (including visitors with no role). When unchecked, only members/parents (i.e., returning singers with a role) can see/use the track.
Internal Description (optional) — private notes for leadership to explain purpose/context.
Public Description (optional) — visible to potential registrants; use for eligibility notes (age, choir, skill, etc.).
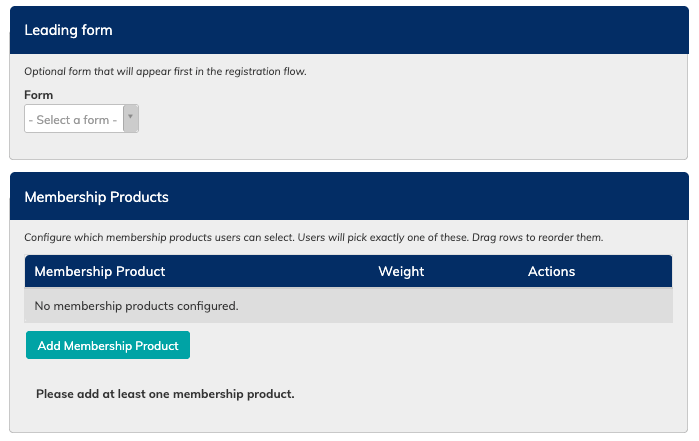
2. Leading Form (completed before choosing a membership product)
-
Select the leading form to key details from your user before the select a membership product.
- Often these forms might be a "Membership agreement" or an acknowledgement of understanding about the dues expectations, or volunteer hours.
- Forms must be in the Forms area to be able add them here.
3. Membership Products (registrant chooses one)
-
Add one or more membership products. The registrant will select exactly one option.
-
These products follow your Store’s membership approval rules (e.g., approve all, approve only new members, or no approval required).
-
Pro tip: Membership products can include required products (e.g., an automatic registration fee) that will be attached during checkout.
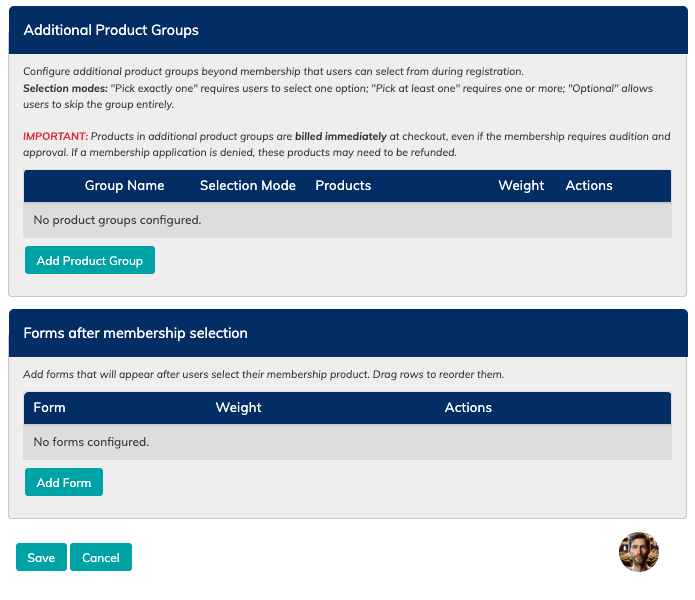
4. Additional Product Groups (billed right away)
-
Click Add Product Group.
-
Group Name — describe the set (e.g., Uniform Items, Music Pack, Optional Donations).
-
Selection Mode — choose one:
-
Pick exactly one — registrants must choose one item from the group.
-
Pick at least one — registrants must choose one or more items from the group.
-
Optional — registrants may pick any number, including none.
-
-
Add Products — type to search and add products to the group.
-
-
Reorder product groups with the cross‑arrows (left). Reorder products within a group with the reorder button (right).
-
Remove an item with the X beside the product. Delete a group with the Del button.
5. Additional Forms
-
Add any other forms the user must complete as part of registration (e.g., photo release, medical info, waivers). Provide N/A options when reasonable.
- Forms must be in the Forms area to be able add them here.
6. Save
-
Click Save to create the track. You can edit the track later from People ▸ Registration Tracks.
What Registrants Experience (Summary)
- They click to begin Registration, and they will be asked to verify their email address with a code that's emailed to them (unless they already have a login/are logged in)
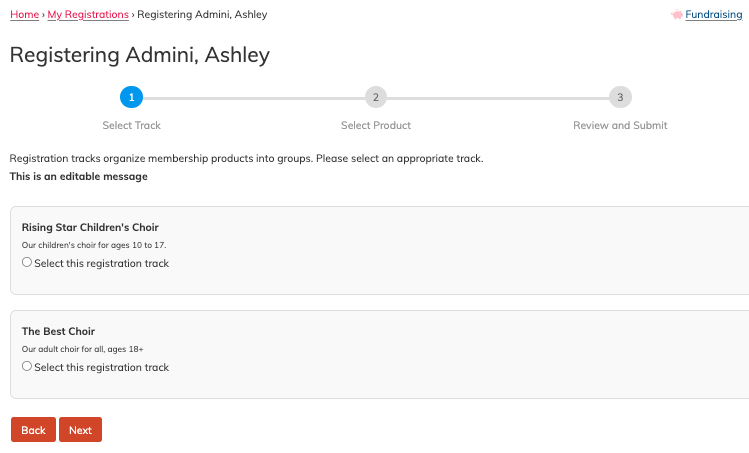
- They will choose to register themselves, or their child, and then be shown a list of enabled registration tracks. They will select a track to continue.
-
They complete the Leading Form first.
-
Then they choose one Membership Product.
-
They select items from any Additional Product Groups, following the selection rules for those groups.
-
They complete any Additional Forms required and then,
- Choose the option to take their registration through checkout.
- During checkout, they can enter a relevant coupon, add a saved payment method for any monthly recurring charges or memberships requiring approval, and then they will be invoiced for any products that are billed immediately (attached required products for memberships, any items from the additional product groups, etc).
- If memberships require approval, once the membership is approved, the customer will be invoiced and their saved payment method on the order will be charged.
Notes & Tips
-
Keep Public unchecked for returning‑member‑only flows.
-
Use required products on membership items for automatic fees.
-
Use separate product groups for things like uniforms vs. optional extras to keep choices clear.
-
If a required form may not apply to everyone, include an “N/A” option on the form for people to use.
----------------------------------------------------
Below is the OLDER version of registration tracks, which will be active until Friday August 29th 2025.
Creating a Track
To create a track, go to People > Registration Tracks, and click on the plus + symbol next to the menu item.
- Name - Give your track a name. This name is visible to registrants.
- Enabled - Choose if this track is available to use
- Public - Choose if this track is available to the public, meaning "non-members". You will want to make sure this is check-marked if you allow new people to join your choir through the registration system without adding them yourself site first.
- Internal Description - This description is for leadership, so you know what this track is used for at a more detailed level.
- Public Description - This description is visible to people who can select the track (your singers). It can be used to help explain who should select this track (age, skill criteria, etc).
- Products - Select your products that this track will offer to singers. You can select multiple products, but they will only select one. They will be given the option to choose a variant. Products/variants that are chosen will respect any required products for that item.
- Forms - Choose your mandatory forms. You can add none, one, or several. Users will have to fill out these forms before completing registration, so be sure to include an option on the form for "n/a" if you're making it required to register, but it might not apply to all singers (a bursary application, for example).
Remember to save the track when you are finished.
------------- (end of older section) ----------------
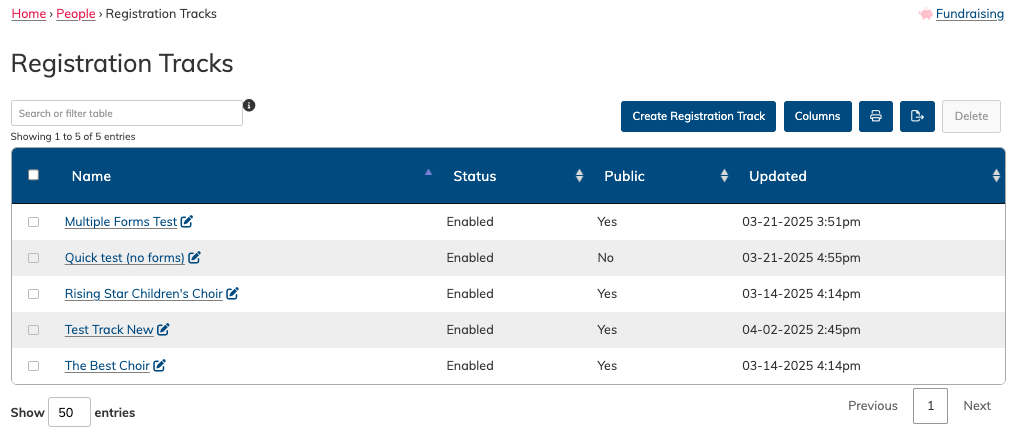
Review All Tracks
To review all your tracks, go to People > Registration Tracks
Here you can see all your tracks, which ones are enabled, and which ones are accessible to the public.
You can edit them by clicking the edit pencil next to the track name, or click on the name to see the details, and then click the edit button. You can also delete them from this view.
Setting Up Registration for a Single Community Choir (Adult Members)
Here’s a step-by-step guide to setting up registration for a typical adult choir:
-
Create Your Products
Add your membership items to the Store (e.g., “Fall Term - Adult Singer”). There's detailed instructions on adding membership products here. - Check Your Membership Approval Settings in the Store
Decide if all membership purchases require approval, or is current members are auto-approved. There's more detail on editing this setting here. -
Create Your Forms
Use the Form Builder to design any necessary intake forms (e.g., “Tell Us About You”, "Photo release", "Membership agreement"). There's detailed instructions on creating forms here. Remember, you may also want to add custom fields to collect certain info on the profile. You can choose which fields are mandatory on the profile on the Account settings page (Admin Settings & Tools > Account) -
Create a Registration Track
Define a new track and choose which product(s) and form(s) should be included. Info on creating tracks is available here. -
Customize Your Welcome Page
Add a friendly message and helpful info so your members feel at ease with how to proceed through your registration process. Info on customizing this message is available here. -
Share the Welcome Page Link
Send the link to new and returning singers via email, social media, or your website. This is the basic url of the welcome page.
Reminder: As long as the registration feature is enabled, there will be a "Registration" button on the login page, and a menu item will be added to your menu.
What Members / Singers See
The interface is clean, fast, and works for everyone—whether they’re brand new or returning. The can:
- Access the welcome / landing page via the menu by going to "Registration". This is a top level item.
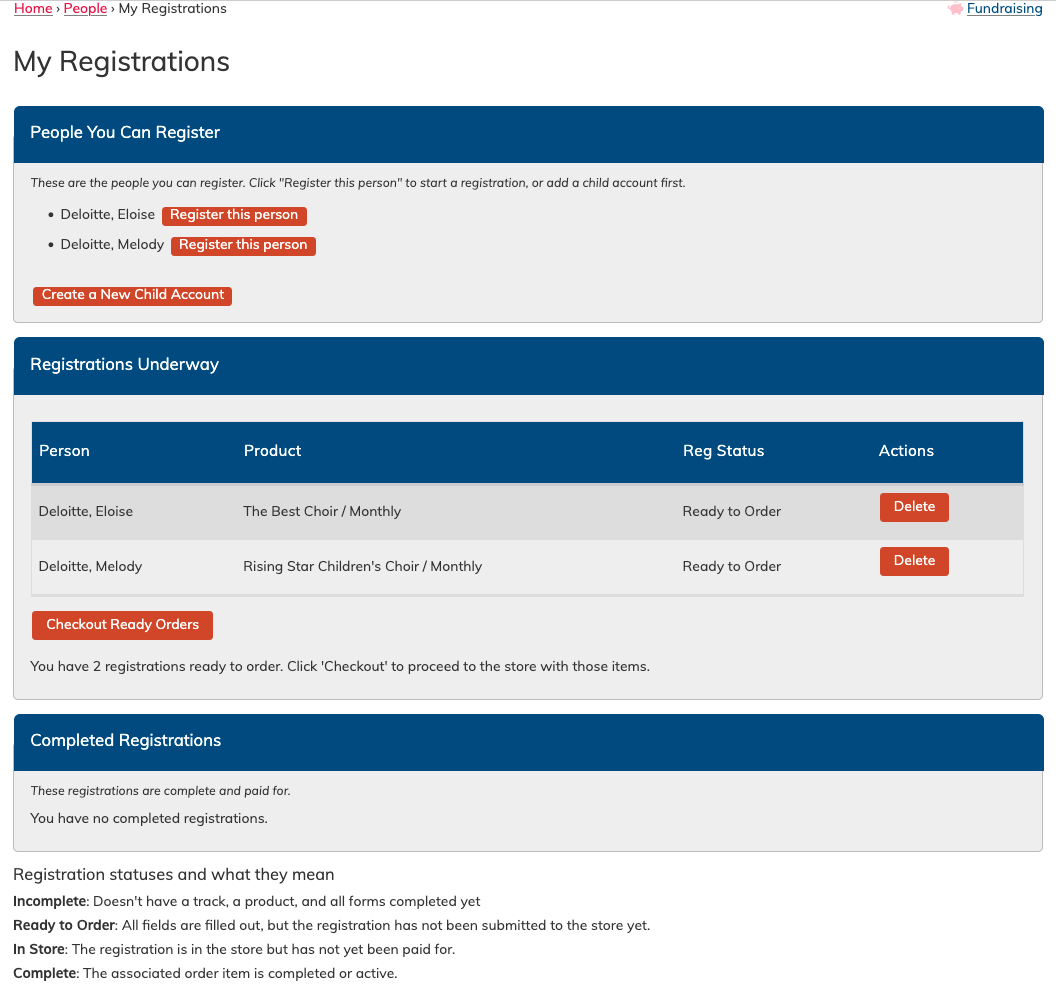
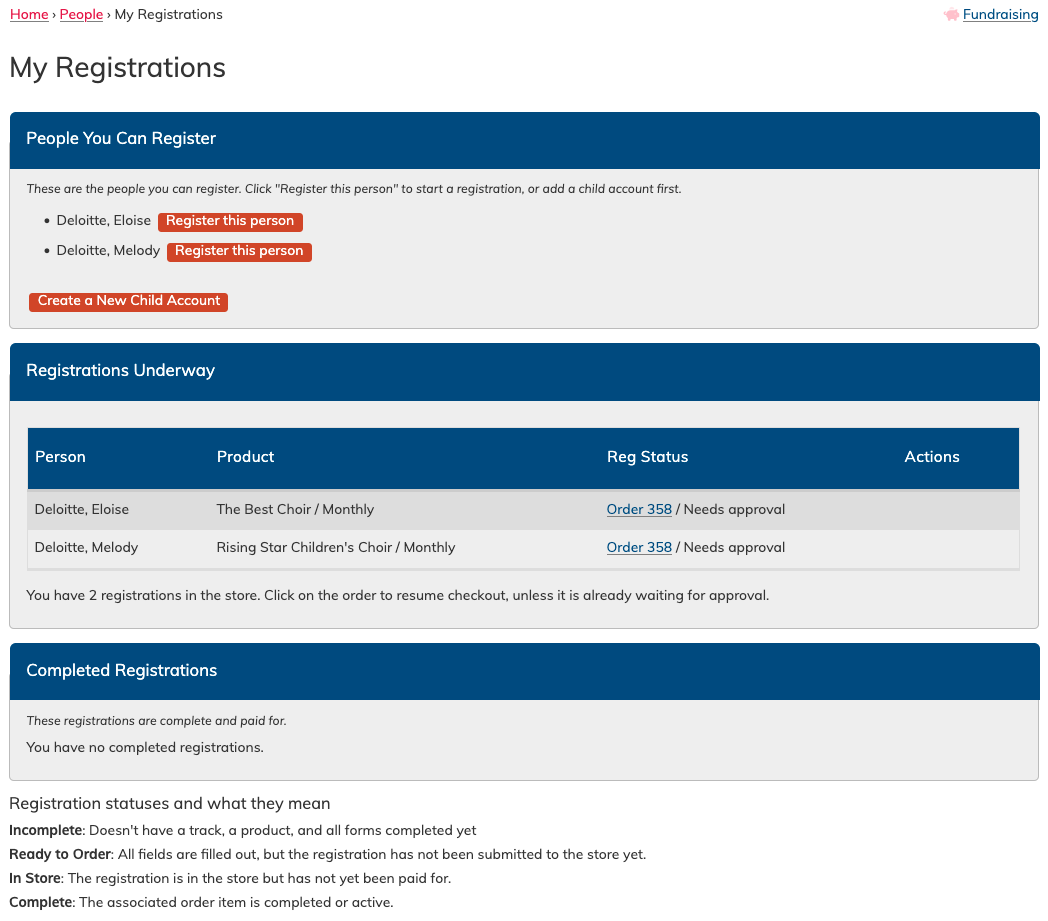
- They can see their registrations (past, or start a new one) by going to
People > My Registrations

Setting Up Registration for a Children’s Choir (Family Registration) or a Multi Choir Society
Before you begin, make sure that family and child tracking is enabled in your settings. This can be found under: Admin Settings & Tools > Account
You will also want to scroll to the bottom of the Account Settings page and checkmark which profile fields are requited for your Members (singers) and Parents.
Step-by-Step Setup
-
Create Your Products
Add options like “Junior Choir - Fall Term” or “Youth Choir - Audition Track”, or whatever best suits your choir structure. There's detailed instructions on adding membership products here - Check Your Membership Approval Settings in the Store
Decide if all membership purchases require approval, or is current members are auto-approved. There's more detail on editing this setting here. -
Create Your Forms
Use the Form Builder to design any necessary intake forms (e.g., “Tell Us About You”, "Photo release", "Membership agreement"). There's detailed instructions on creating forms here. -
Create Your Tracks
Define tracks by the ensemble, or age group. You may also wish to have a separate track for those requiring auditions, versus those that do not. Info on creating tracks is available here -
Customize the Welcome Page
Add helpful instructions for parents and guardians to your landing page to help guide new singers and parents through the registration process. Info on customizing this message is available here. -
Share the Registration Link
Send out the welcome page link to families, or direct them to the login screen of your site to use the
What Parents/Members Experience
Parents will be guided through a clean, mobile-friendly flow that captures all the right details—for each child, in one go. Parents can register themselves, their children, and check out all registrations at once.
Members of a multi-choir organization will be able to easily select the right track for the choir the want to join, which will include the correct product options and forms.
Reviewing Registrations
View your own
Users can view their current or past registrations (and their statuses) via
People > My Registrations
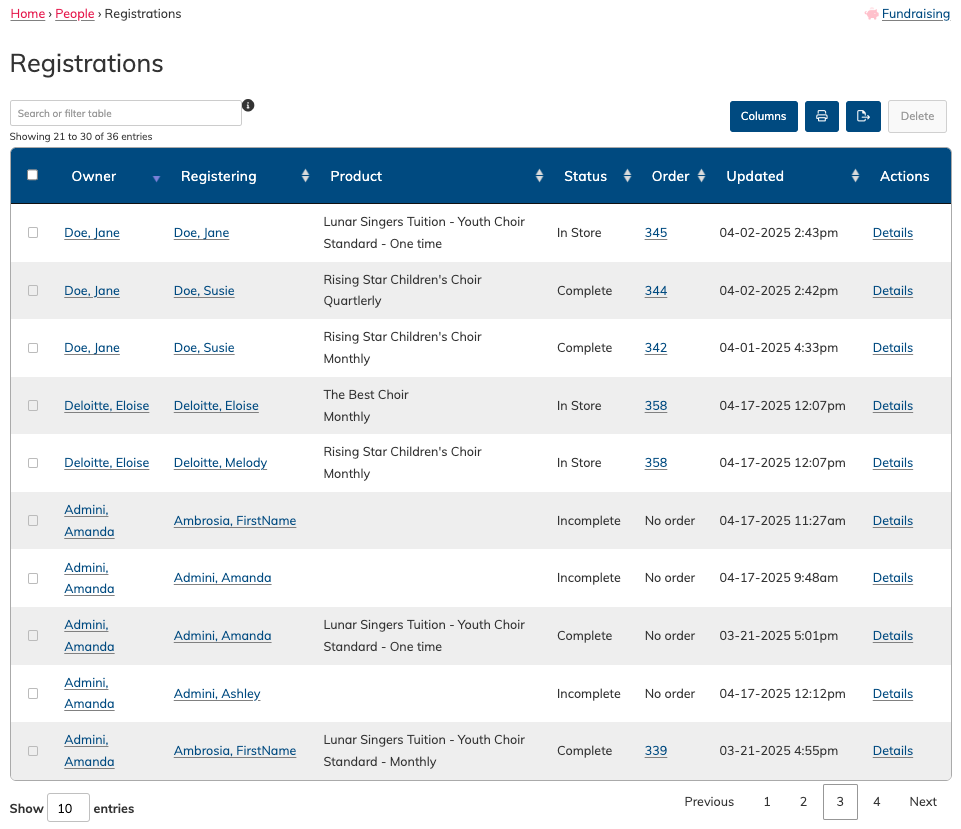
View all registrations (Admins & Managers)
Admins and Managers can view all registrations by going to:
People > Registrations
FAQs
Is this feature available on all plans?
The new registration feature is available on Team and Executive plans.
Do I need to use the Store for this to work?
Yes—your membership products need to be added to the Store to be included in a registration track.
What level of access do registrants have to my site?
Members of the public that create an account as part of the registration process will have the "community" role. Once their membership is approved (or if your store is set to auto-approve all membership purchases) they will have the "member" role.
How do I know what it will look like for my singers?
It's a great idea to logout and try going through the system as a new registrant, so you know what to expect!
Can I edit a registration after it's been submitted?
Yes, admins can view and edit registration details as needed through the registration area.
Can I delete a registration?
Only if it has not been completed. If there are payments associated with an order, then it cannot be deleted.
How do I connect this to audition time slots?
You can tackle auditions with 1) a form that's part of a registration track, or you can have an Event where community members are invited to sign up for time slots. If the audition slot is offered after payment is collected (membership approved) then you can invite people based on a subgroups attached to the different membership products.
💬 Need Help?
If you have questions or need help setting up your registration, reach out to support@choirgenius.com. We’re happy to assist!